Daniel Granovsky

+ Follow
since Oct 17, 2015
Merit badge: bb list bbv list
For More
Israel
Apples and Likes
Apples
Total received
In last 30 days
0
Forums and Threads

Recent posts by Daniel Granovsky

Hi Maurine,

The book provides a decent amount of detail but far from enough. There is a lot of trial and error involved (a.k.a. time and money spent). I've had varying levels of success since I started and I'm on version 3.0 already.
The truth is, I'm far from satisfied with the results thus far, and I'm only keeping at it because I'm stubborn, and because I have an EXTREMELY supportive wife who doesn't make my life difficult beyond the occasional eye-roll.
That being said, my pool is not a disaster. Most of the time it is either swimmable or can be made swimmable, but the amount of effort required is more than I imagined (and frankly have time for), and the water quality is not where I'd like it to be. There are plenty of companies out there that at least claim to be able to provide crystal clear water without nasty chemicals and I'm not willing to stop till I get there. My goal is to figure out an affordable way for a DIYer to create a healthy swimming option and share it with the community.

I'll just quickly add this - "natural" is a very subjective term that I no longer like using. My goal is to have a pool that has high water quality without being a chemical soup.
For example, this year I added a UV filter. The book is opposed to this because it's not "natural". My view is different - the filter isn't harmful to swimmers because the UV rays are confined to the tube and there is no residual effect on the water. Anything that improves water quality without being dangerous or unpleasant to swimmers is okay in my view. I also want to experiment with bubbling ozone into the pool in small quantities. Ozone isn't healthy to breathe in, but it decays very quickly (15 minute half-life) and the only by-product is oxygen. It's supposed to have an extremely positive effect on water quality and if I run it a bit at night when no one is swimming it shouldn't be an issue.
The bio filter is still the central part of the system in terms of removing nutrients from the water to prevent algae, but I need to be able to handle edge cases with minimum down-time and maintenance effort.

I will write a post later today updating on my various attempts thus far, hopefully with pictures.
2 years ago
I built my biofilter shortly after this post. I wrote up a post about it here:
https://permies.com/t/122194/Intex-natural-swimming-pool-build

It has been working on and off for two summers, although maintenance is exorbitantly time intensive. Cleaning the biofilter is extremely difficult and I'm still not sure that I've managed to do it correctly judging from the amounts of biofilm still attached to the substrate.
Last summer I had an entire month where the pool water was green and nasty and I kept running the pump anyway mostly because I was too busy with work to stop it and think of a solution, and sure enough a month later the water cleared up on its own. Summer has pretty much
arrived where I live, so I'm currently working on filter version 2.0 which will hopefully be my magnum opus. This filter will be a fluidized bed reactor based on k1 media. These filters are often used in koi pond filtration but from what I can gather it uses the same principal as the Biofilm Substrate Filter described
by Wolfram Kircher and Andreas Thon. Kircher and Thon explicitly state that phosphorus removal is proportional to flow rate through the media. A fluidized bed reactor uses plastic beads that are roughly as buoyant as water, making it extremely easy to agitate them (i.e. increasing the effective flow rate of nutrients past the
biofilm). The pieces of plastic are constantly crashing into each other, causing weaker bits of biofilm to fall off, which will hopefully make it infinitely easier to clean. I'm waiting for the filter media to arrive from Amazon, so hopefully I'll have a working filter within two weeks. I will update on Permies as soon as I have something.
3 years ago
Thanks for the ideas!

Enlarging the barrel is, unfortunately, out of the question. Keeping the barrel as small as possible was pretty much the only condition my wife had for this project to go forward.

I do have fairly strong draft most of the time (depends on wind - the windier it is outside the stronger the draft), so I do think I will try to remove a brick or maybe even two. It isn't likely to affect the heat output very much (the burn path will be slightly shorter, so maybe), but it will make it easier to work with firewood that isn't the perfect size. If there is smoke-back I'll still be able to use bricks to constrict the airflow somewhat. Either way, it is easily reversible...

From what I could briefly find online, the five-minute riser is made with ceramic wool blanket? My current riser is insulated with a ceramic blanket, and I hate working with it. I think I might make one out of cf board. It's expensive but it seems like it's not very difficult to work with. Will I still need the ceramic blanket insulation if the riser itself is more insulative?

I'll post updates as soon as the work is complete.

Thanks again.
4 years ago
I came across Rocket Mass Heaters in a Youtube video about seven years ago and I was immediately hooked. After several years of experimentation and a few prototypes in the middle of my living room (I really have no idea how my wife puts up with me), I eventually built one (with a lot of help from friends, family and the good folks here on Permies). This will be our fourth winter living with an RMH, but, the truth is that I am somewhat underwhelmed with the results and am looking for advice on how to improve. Don't get me wrong, I love my RMH, the kids love it, and the cob couch is our main living room couch. But, there is no denying that there are serious downsides:

1. I have a 6" system and the resulting feed is just too damn small. The wood I have available is often somewhat crooked, and is too thin to split easily and too big to use as-is. I spend way too much time splitting wood with a hand axe to get it to a size that is optimal for my stove.
2. Whether because I used dense firebrick, or because the burn tunnel is too long, or both, my system takes far too long to reach peak temperature. In the fall and spring this is tolerable, but in the dead of winter we usually need an additional source of heat to tide us over.
3. The peak temperature is just not as high as I expected it to be. I've never gotten anywhere near a visible red spot at the top of the barrel. I think the most I ever had it was around 300 degrees Celsius, and that happened only once and after running the heater for over three hours. At best it can keep a 30 sq.m living room warm, but it definitely doesn't reach the whole house (which isn't particularly large - 95 sq.m.)

Last year we just stopped using the RMH in the middle of winter because I was busy at work and I didn't have time to split wood and sit next to the stove maneuvering it through the feed. We are at the beginning of heating season and I need to improve the stove in a way that will require minimum effort and give maximum benefit. Here are the things I was thinking of, and I'd appreciate any additional ideas. Also, if my ideas suck I'd like to hear about it :-)

1. Rebuild the entire combustion area into a batch box style heater. This will supposedly solve all of my issues, but this is highly unlikely to happen right now. Winter is here and it will take me too long to design, gather supplies, and implement.
2. Remove the dense firebrick heat riser and insulation, and replace with ceramic fiber board. The ceramic fiberboard is fairly lightweight from what I saw in the specs, so I'm guessing it's insulative enough? This should actually be a fairly quick fix. Any reason not to do it? This would theoretically make the system burn hotter..
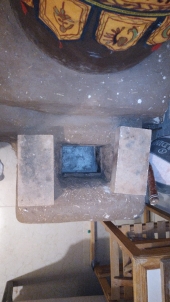
3. Enlarge the feed. I spoke to a local builder who suggested this is possible, although I couldn't find anything on it in the forums... He said I'd just have to make sure to not increase the amount of wood I put in, which is fine with me as long as I have more wiggle room for the same amount of fuel. Is this a good idea? Implementation would be fairly easy - I could just remove the first brick in the burn tunnel and the cob above it (see pic below). This would also have the additional benefit of decreasing burn tunnel length. If I could remove all of the bricks from the feed and just leave the cob, I'd have a very reasonably-sized feed.


I'd appreciate any feedback on my ideas above, and obviously any additional ideas are welcome too.

And now, for some grainy RMH porn:


Thanks guys!
4 years ago
I recently assembled an Intex above-ground pool with a DIY Biofilm Substrate Filter made out of two IBC totes.
Construction was based on the book How to Build a Natural Swimming Pool by Wolfram Kircher and Andreas Thon
The swimming pool is roughly 2.80 x 5.5 meters. I used two IBC totes instead of the recommended three (based on the area of the pool)
because I ran out of blocks on which to set the IBC totes. I also only filled them up halfway because the substrate I had access to was unwashed
and getting all of the dust out was extremely tedious (I ultimately gave up and let everything wash into the pool, used alum as a flocculant and vacuumed it out).
I bought a pump that's much more powerful than necessary because it was the only one in stock, and I wanted to get the project finished THIS summer.
I assume that the increased percolation rate will at least partially make up for the smaller (and frankly, shoddily constructed) filter.

We are roughly two weeks post-build and the water is quite clean. Haven't used any chemicals other than the alum. I vacuum it regularly with a small pool vac, and remove
dead bugs and leaves with a net. Here are some pictures:


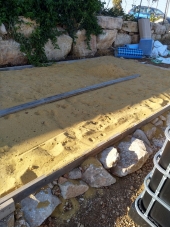
Ground preparation for the pool


Supports for the IBC totes. There was a larger-than-expected height difference...


Water distribution pipework at the bottom of the IBC tote, before filling with substrate. In retrospect, one horizontal pipe would have been enough for even distribution...


A gravel and stone pathway to prevent the creation and propagation of mud into the pool


The water is crystal clear. Hopefully it stays this way...


5 years ago
Hi,

I would really like to build a pool for the kids to swim in, and I want it to be chlorine-free. I have How to Build a Natural Swimming Pool by Wolfram Kircher and Andreas Thon, so I'm familiar with some of the theory.
Unfortunately, for a wide variety of reasons (permits, not knowing what I'm doing, seven species of venomous snakes that I don't want near my pool, etc) it appears that I am constrained to installing an above-ground pool (Intex, Bestway, etc).
I would like to apply natural swimming pool principles to this project, but I can't seem to find anything on Google (or Permies) where this was done with a prefab above-ground pool. I hope I'm not the first person to come up with this,
and that there are people here who can provide some tips.

1. I would like to use a BSF (Biofilm Accumulating Substrate) filter, which is basically a container filled with substrate (gravel, zeolites, etc) on which beneficial bacteria can form a biofilm. The water needs to flow rapidly and evenly through the container. Benefits:
  • Efficient at destroying harmful bacteria
  • Efficiently removes phosphorus from the water, which limits the ability of algae to thrive
  • Reduces or eliminates the need for plants, which is useful given my constraints
  • Not having plants allows me to keep the pool covered when not in use, greatly reducing water loss to evaporation (useful with the hot dry summers we have)

  • I haven't found any practical advice on how to build one outside of the book, and the book didn't go into a lot of detail.

    2. I was thinking of putting in a UV filter somewhere along the flow. I know this contradicts the "Natural Pool philosophy" (the book explicitly states this) but I am not the purist I was when I was twenty.
    It's important that the water be sanitary. A UV filter does not affect the microbial environment in the BSF nor does it hurt my kids. Any thoughts? I can be convinced that they are unnecessary...

    3. Google, YouTube, Pinterest, etc are filled with multiple examples of home-made pond filters using a five-gallon bucket filled with gravel/bioballs/old sponges etc. Amazon also has multiple "biofilters" for sale - I can only assume that they work using similar
    principles to the BSF - a substrate for beneficial bacteria to grow on and do their magic, with the occasional back-washing to prevent an old and dying biofilm from releasing nutrients into the water. These filters appear to be intended for fish ponds and not human use,
    but from what I can gather from the videos, the water appears to be quite clear, so the filters are presumably managing to remove the nutrients that the fish deposit. I also see videos where people swim in their koi ponds - can a simple five-gallon bucket filter manage
    to keep a pool clean enough for human use? The recommendations in the book are that a BSF should be 10-25% of the total area (10% only if installed by a professional), so am I missing something here? Some of the filters on Amazon appear to use some sort of sponge-like media,
    and a lot of the homemade filters use old dish sponges - are these media so much more efficient than gravel that they can manage the nutrient load with such a small filter? I would love to just build a few filters using five-gallon buckets.
    Even if the filter needed back-washing on a weekly basis, it would be much simpler and cheaper to switch out buckets than to build a much larger BSF.

    If anyone has any experience with a project like this I would greatly appreciate any advice I can get.

    Thanks!


    5 years ago
    Hi,

    About to get started on my build, but I keep coming up with last minute doubts.
    My wife refuses to have a 55 gallon barrel in the house so I salvaged an old 35-ish gallon boiler.
    The top (the part sitting over the heat riser) is concave/convex (depending which side you're looking at it from).
    From the point of view of the heat riser, the center of the boiler is higher up than the sides, i.e. concave.
    Is this usable? How do I calculate an appropriate gap given that the gap at the center will always be
    larger than on the sides?

    Thanks,

    Daniel Granovsky
    8 years ago
    Hello,

    I'm trying to build my first RMH. I'm a bit short on fire bricks and getting more requires a pretty long trip.
    I do, however, have access to a bunch of salvaged concrete paver bricks.
    Can this be used to build the manifold (and in case I'm using that term incorrectly, which I might be, by manifold
    I mean the brick structure that holds the barrel and which also has the start of the stove pipe for carrying out hot gases
    to the thermal mass)?

    I'm building a 6-inch system and I'm using a relatively small boiler which needs to be lifted off the ground quite a bit
    in order to accommodate the 47" heat riser (Ernie and Erica's Annex plans). If concrete pavers can be used,
    that'll save me a bunch of time and money.

    Thanks,

    Daniel Granovsky

    8 years ago
    Hey Allen,

    I appreciate your response. I'm still somewhat confused. The gases in the heat riser are hotter, and they cool down when they come in contact with the barrel. What do you mean by temperature profile?

    Thanks,

    Daniel
    9 years ago
    I built a mock-up of my rocket mass heater core outside (no mortar, no barrel). Both the firebox and the heat riser are made out of dense firebrick. I noticed that it took quite a while before the outside of the heat riser got so hot that I couldn't touch it. At least a half hour. My question is: if the outside of the heat riser takes so long to heat up (due to the thermal mass of the bricks), what role does insulation play in keeping the interior of the heat riser hot? It takes so long for the outside of the brick to get hot enough to the point where insulation is needed that I might already by approaching the end of my burn (I live in a mild climate). Is the insulation needed to keep the hot gases from heating the outside of the brick? Why? I have the feeling that I'm missing something here, and I would greatly appreciate advice from some of the old-timers.

    Thanks,

    Daniel
    9 years ago