Harry Malecki

+ Follow
since Dec 02, 2021
Merit badge: bb list bbv list
For More
Apples and Likes
Apples
Total received
In last 30 days
102
Forums and Threads

Recent posts by Harry Malecki

BEL Post #14

Good evening Permies! It is with mixed emotions that I write this final post for my current trip to WL before I head home to reunite with my family in CO as we prepare for our big life change and eventual return to WL in May. I appreciate everyone who has kept up with the work Stephen, Esteban, and I have been up to over the past few weeks and hope to have you all reading new updates when I return in May. I again want to thank my family who afforded me the time away to do this, and I also want to thank Paul, Stephen, Esteban, Samantha, our new SEPper and of course Cujo for having me as part of the "family" here at WL.

As for my last work day before my long drive home, I started off by heading up to Allerton Abbey with Esteban where we worked to (nearly) finish up the floor project. We spent time working to get a finer mix of cob prepared for the top layer which needed to be carefully leveled/smoothed with a wet wooden float. This is really the part of the job that had me most concerned, specifically regarding blending the fixed areas with the existing floor surface ,and how well the fix would adhere to the existing floor (especially the linseed oil treated top layer -- which based on pieces that we removed is about the first 1/4 inch of the cob). I think we were successful in getting the new surface layer to blend with the existing floor. I did inform Esteban that it will be important to clean around the fix and consider lightly wetting and wet floating the surface one more time before letting it final dry and applying the linseed oil. I am going to be excited to see this job finish up while I am gone!

In the afternoon, I went up to the Lab with Stephen to identify three trees to fell, delimb and bring to Basecamp to debark and start preparing for the next project - Abbey Gates! We fell the trees, delimbed them, and then put the limbs at locations identified as brush piles to provide habitat for woodland critters. After returning to Basecamp, I spent a couple of hours on the Bodger bench/shaving horse debarking the logs that we harvested from the tree (six logs in total). After some cleanup of all of the bark (there was a lot!), I helped Stephen begin to measure, mark, and pilot the holes that would eventually become mortises for other parts of the gate structure. Time ran out before we could get too far, but again, I look forward to seeing at least one of these gates getting build while I am away.BEL Post #14

Again, thanks to everyone who has been keeping up with my posts. I have had a great time here at WL and enjoyed the projects I have been able to help work on and complete. With that being said, I am very excited to be heading home to see my family so that we can finish the work required for us to head back up here together. More to come!!

Coydon Wallham wrote:

Harry Malecki wrote:BEL Post #7


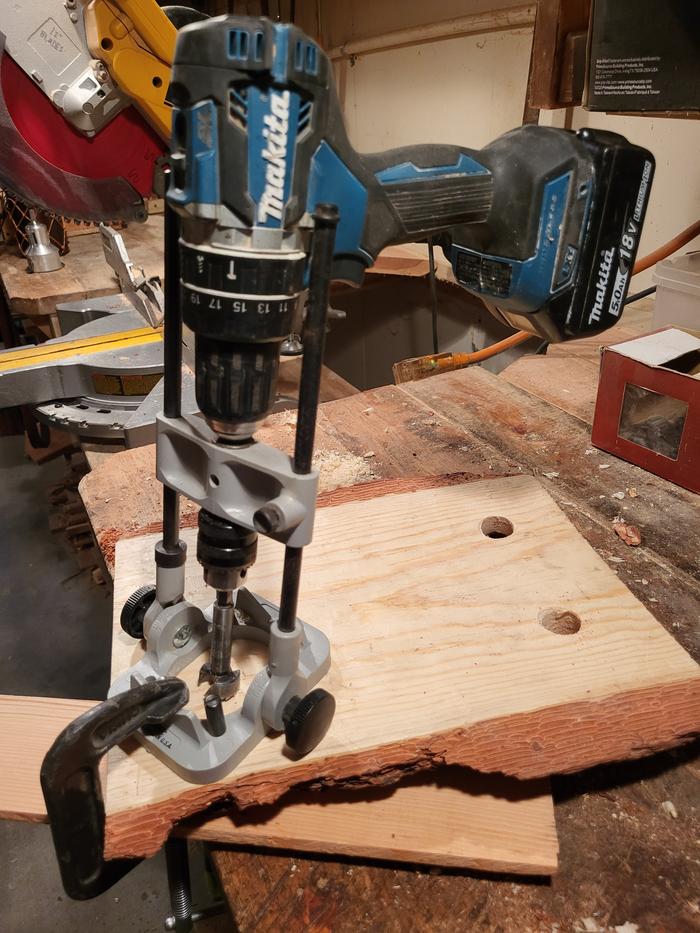
What do you call that angle drilling jig? Was it tucked away in the shop somewhere or did you have to procure it somehow? Is it a universal fit or custom for that Makita?


Hey Coydon - Thanks for following my posts! This jig is know as a portable drill guide. Here is the one they have at WL that I used for this project (Portable Drill Guide at WL). I was familiar with it because I have one at home as well. The drill guide can be used by any drill since it just tightens down the same way you would tighten down a drill bit. The chuck attached is the limiting factor. The one at WL has a smaller chuck (3/8 inch), so it was limited to smaller drill and forstner bits. If you are planning on using this guide for anything larger than a 3/8 inch, you should look at the other options (the one I have at home I believe is a 1/2 inch chuck).

Coydon Wallham wrote:
I like the design and slab selection there, are your steps to level the bottoms of the legs a guarded secret or just too simple for a master craftsman to bother mentioning...?


I can't say I am anywhere near a master craftsman, but I am definitely aspiring to get closer. For the leveling, especially for the stool where I didn't get the legs closely sized to final dimensions before installing them on the stool top, I first had to determine which leg was at the height I wanted the stool to be when I finished. Given that I was going to have to cut the other legs to achieve that height, I selected the smallest leg. I then used a right angle ruler sitting on the surface of the stool to get an approximate length of the shortest leg and then used that technique to get an approximate mark for where to cut the other three legs. I say approximate here, because I intentionally left a little extra length on the other three legs so that I could rasp them to final length as I worked to get level in all directs and take out any wobble due to pairs of legs being longer (that process was simply set it down, check for wobble -- I identify the legs that were long and where the floor contacted the legs and then I rasped away at it little by little repeating until I got it just right). I hope some of above made sense. Maybe when I return to WL in May, I can get one of my kiddos to record a video of my doing some of the process and we can post it.
BEL Post #13

Hello, Permies! I hope you accomplished things you were proud of this weekend, as the feeling of accomplishment is always a boost for the impending week.

Friday night into Saturday morning many inches of snow fell at WL, so the morning was spent "digging out" to allow for any necessary trips and errands to be run during the day. After taking the my van out to fill up the tank before my impending trip to reunite with my family back in Colorado this coming week, I was fortunate enough to have time both on Saturday and Sunday to work on and finish my end table project. As the assembly was completed, I focused primarily on the table top surface. Given that it is the "business end" of the table, I spent a lot of time preparing the surface, taking the challenge to do so without any power tools. To complete the task, I used hand planers, a raps planer, and the card scrapper we were acquainted with and prepared earlier in the week. After the Saturday, I exposed all of the beauty of the wood and got the surface to a reasonable level plane. On Sunday, I completed the remaining surface prep, removing a majority of the sawmill cut lines. I kept some shallow cut lines in a few places along the edge of the table, both for the interesting aesthetic, but also because I was worried it make take me a couple of more hours to remove them entirely while keeping the table top surface relatively flat. Once the table top was completed, I needed to clean the greenwood legs up a bit more because of some hasty debarking I did a couple of days ago using the vise. To get the last bits of loose fibers and "fuzz" off the legs, I used the card scrapper, which was really effective in doing so (I also card scrappered the top surface as the final step). With a linseed oil coat, the table was completed. Note that I built the table without the front support so that it could also be used as a desk (see example pictures below  ). I am proud of it!

After cleaning blitz today, I decided to take on a nest labor project to replace a fading sign in the kitchen. In place of the card with writing on it, I made a wooden placard with the message burned into it. I put a pilot hole and countersunk it for a flush fit when I screwed the placard into place. I have a comparison between the old and new signs below. It felt good to renew this sign - it was actually one of the first signs I remember reading in the kitchen when I visited WL more than a year ago.

We ended the day on Sunday after finishing our end tables (Estaban has mostly finished his as well!), we came back to a surprise apple pie backed by our current SEPper. The top crust was absolutely crispy perfection! So glad the Johnny Appleseed half-assed holiday inspired the SEPper to make pies this weekend!
BEL Post #12

Hello Permies! It was a snowy day here at WL, so we had to adjust our plans for the morning to keep things indoors.

So, to start the day, Esteban and I continued our round wood table builds (while Stephen did some shoveling outside -- we were really appreciative to Stephen for letting us work our projects while he took care of things at Basecamp). Since yesterday we a lot of prep of the materials and getting the legs in place on the table top, firstly, I worked to size the leg supports and get the mortises cut for them. I decided to have one support going across the back of the table and one along the each side. My thought was, given the height of the table, no support on the front would allow for the table to act as a desk if so desired. However, because I did not have a support across the front, I wanted to make sure the three leg supports I was installing were snugly fit to the legs, so I decided to bore and peg each support. You may ask why not draw bore these supports? In thinking through those joints, I decided not to draw bore them because the legs are greenwood and the supports are dry. As a result, the legs will experience some shrinkage which will help to tighten the mortise around the tenon but will also do the same for the peg, so I didn't think the draw bore was necessary here. On the contrary, when I finally got the leg assembly completed and went to "fasten" it to the table top, I decided to deploy the draw bore, because the legs are green and the table top is not. Therefore. I needed a fastening method that would provide retention as the tenon on the legs are going to shrink some inside the mortises in the table top. To achieve the draw bore with the round wood, I ensured that all of my tenons had a distinct "shoulder" (the flat part at the bottom of the tenon) to snugly seat against the table top when the legs were installed. Next, I removed the legs and drilled bores perpendicular to each of the four legs' mortises. After reinstalling the legs, I then used a drill bit that was 3/64th smaller than the original bore bit and match drilled the bore hole through the tenon by drilling each hole's center closer to the shoulder of the tenon. I then removed the legs from the table top and drilled the bore holes in the tenons to the full size of the peg (3/8 inch). The resulting bore hole in the tenon is a fraction of an inch offset to the tenon shoulder, so once reinstalled in the table top and after a tapered pin is driven through the bore, the tenoned leg is "drawn" tightly into the table top mortise and therefore keeping a very secure fit. I know my description above may be hard to follow, so I will share a link below to anyone interested in seeing draw boring being explained in video and with a squared mortise and tenon. The round wood element of the work I did today caused me to invent some ways to make it work given that you don't typically see "round wood" and "draw boring" being used together much on the web. Today ended with some surface prep (planing) and initial checks of level (some work to finish there). I am planning on spending some time this weekend finishing this up, so I will share the final photos when it is done!

Draw Bore Video

For the second half of the day, we went up to the Labs. Stephen ran the tractor to plow the roads getting into and around the labs. Esteban and I fed the cats at the Abbey and got the RMH and cook top started up at Cooper Cabin and began chopping wood to replenish the stockpile. The starting temperature in the Cabin was 42 deg F and after about 3.5 hours, we got the temperature up to 65 deg F. After leaving a generous woodpile in the Cabin, walkways shoveled and roads cleared, we headed back to Basecamp for dinner. We were all surprised to see that Samantha and our SEPper had made a small feast for us all to enjoy. The "spread" included lamb prosciutto and cheese, roasted sunchokes and onions (with lots of cayenne pepper which I loved ), mashed sunchokes, almonds, dried mango, peanut butter and oat cookies (can't believe there are a couple left still!), and a lamb burger (not pictured, but so delicious - thanks Samantha!). It was a great way to end a snowy, wet, and cold day .

Alexandra Malecki wrote:Fun!! I bet you're loving the joinery projects!
<3


Yes!! Round wood joinery was something that I was hoping to do here at WL. Enjoying the projects thus far.

Alexandra Malecki wrote:Do the automated cat feeders no longer work?<3


I believe the cat feeders still work but are not currently being used. I need to ask why, but it may be due to the winter time impacting them?

Alexandra Malecki wrote:I'm curious about how you'll merry the cob finish on the flooring. Will you use a finer cob mix for the top?

<3


The plan will be use use a finer mix to blend the top layer to get it to merge with the existing layer. I think this will be the hardest part of the cob floor project because of the existing top layer being oiled already. I guess we will see early next week!
BEL Post #11

We had a rainy Thursday here at WL, so tasking was limited to mostly indoor activities. The day started with a trip up to the labs. Stephen did some straightening up and started a fire in Cooper Cabin to bring the temperature up to 60 deg F (which he was successful doing). While Stephen was at Cooper Cabin, Esteban and I went over to the Abbey, fed the cats, and then started to prepare and reconstitute the cob to continue the Abbey floor fix. The preparation was more in breaking down the old cob as much as possible before adding water. By doing this, we had a much easier time mixing the batches. First, we focused around the front door where I had previously replaced the threshold and the lower door jamb. The cob had to be broken away from the old threshold, so we needed to fill in the spaces to close the seam with the new threshold. Then we worked on filling in more cob around the new hickory plank that I fit into the floor. The previous layer was still damp, but this meant we could lay the new layer on top without having to re-wet it (each time you add layers to cob, you need to ensure that the previous layer is dampened before you can apply more). We completed the morning by getting the last layer of cob on the floor before we install the top smoothed layer.

At lunch, our new SEPper shared that Samantha brought hard boiled goose eggs with her and made deviled eggs with them. The SEPper offered to prepare me a couple to try and I graciously accepted. When she handed me the plate, the two halves of the deviled goose eggs was like eating a second lunch (with how large they were!! See picture below). The eggs were delicious! Thanks Samantha!

While Stephen was in Cooper Cabin the whole morning, he noticed that additional end tables would be helpful in the bunkroom. As a result, for the afternoon, he gave use all a challenge to each make a end table using round wood construction -- the table top was "artist's choice". We had basic dimensions as a starting point, but the key was to each exercise and build skills while making functional furniture for Cooper Cabin. I decided to use a slab of WL pine that I had my eye on last weekend as my table top surface. I chose some dry wood for my cross braces and then was able to fell my first tree at WL, debark, and then start shaping those for the table legs. We are planning to finish up the effort tomorrow, so I will discuss more about details for my approach/design and how I executed it. I will share that I am going to attempt to use draw bores for all of my tenon joints (with the offset which is going to be the challenging part), and all of my mortises will be blind holes (meaning they will not go through the other side). While I did use the tenon drill tool here at WL, I am following up after cutting the tenons and rasping away at the curve left by the tool to establish a more distinct "shoulder" in the tenon as well.

It looks like we are going to finish the top layer on the Abbey floors tomorrow and finish our end table builds, so stay tuned!
BEL Post #10 (double digits!)

Happy "hump day" Permies! It is odd to think that in my past life only a few months ago, Wednesdays held more significance as it represented having more than half the work week done. When the stress was high (which it often was), finishing Wednesday was a significant work week milestone. Why do jobs have to be only about looking forward to getting past the halfway point and the (hopeful) "glide" to the weekend. Let's just say that one of my motivations for my significant life change was driven by these thoughts. I can't say I have experienced the same longing here at WL -- honestly, I find it harder to keep track of the days of the week of the time of the day. I think my only anchor, right now, when it comes to time is looking forward to being reunited with my family before we all collectively take this journey together.

This "hump day" also happened to be the half-assed holiday Johnny Appleseed Day. So while the second half of our day was to be focused on activities aligned to the holiday, we started our morning up at the Abbey feeding the cats and moving forward the repair of the floor. Specifically, today was the start of repairing the cob earthen floor. Given the depth of the majority of the repairs, we decided that the fix was going to need to take place over the next few days. Today, we reconstituted some of the cob we removed from the damaged floor and started to fill in the gaps between the new hickory plank as well as the tool access cuts we had to make in order to pin the plank to the log. I would estimate that we have two more days of working on the cob floor to get to a finish top layer that will eventually go through the linseed treatment.

Next, as an alternative to costly (and disposable) sandpaper, Stephen introduced us to the card scrapper. The best way to think of it is a piece of steel that you can drag across the surface of wood to scrap (and in some cases plane) the surface similar to a drawl knife but much less material is removed. The reason why this works is all in the preparation of the scrapper. First, it requires a clean and "squared" edge to be established. This can be done with a file, but in watching a video on YouTube University, we discovered that a jig can help to significantly improve this step. So, when we got to the workshop, I made the jig that holds the file and establishes a right angle to assist in the steps to prepare the scrapper. After filing the edge, it must be further polished to a very fine finish, so fortunately, the jig made for the file can also be used to assist in this step to hold the established right angled edges. Finally, the scrapper gets burnished on either side with a burnishing rod (which can be any rod-like tool as long as it is harder than the scrapper) by running the rod at a slight angle along the edge of the scrapper with it lying flat on the table. This creates a microscopic burr along the edge of the scrapper. Finally, the burnishing rod is used across the narrow edge of the scrapper to bend down the burr established in the previous step causing it to "hook over" (you can feel it with your fingernails) and create the feature used to scrap fine wood shavings from surfaces. As a budding wood worker, I was glad to have the opportunity and learn to use the card scrapper. There is nothing like causing beautifully curled shavings when using a well prepared tool . I even came back down after the day was done and redid the preparation process for the scrapper and played around more with using it.

For Johnny Appleseed Day (JAD), Stephen planned for us to head up to the Labs and start a fruit tree "nursery" at Dances with Pigs Meadow. We identified a spot, raked back last season's dried grasses, removed established grass roots and exposed the soil, collected mulch in the form of the dried grasses from around the area, planted our seeds (apple, apricot, and plum),  mulched around the seeded area (for wind protection and water retention), and then put up a fence around it to keep out the deer. Given that we have plenty of precipitation in the forecast, no watering was necessary . The plan will be start these fruit trees off here in the Meadow and once established, move them to locations behind fences around the Labs.

Next up on JAD, we regrouped at basecamp and worked together to cut apples and start an apple cider vinegar fermentation. The hope is that in 6-8 weeks that we have our own homemade apple cider vinegar to add to the pantry!

Lastly, we prepared more apples and pancake batter to make apple pancakes! I was able to enjoy mine with some honey that Stephen brought home from his travels earlier this year where he visited Permies friends in North Carolina. Thanks for the wonderful and tasty gift!

I am looking forward to more progress at the Abbey on the floor tomorrow and the other efforts I can help move forward! Thanks for reading!!
BEL Post #9

Taco Tuesday ended with great food made with Boot teamwork and started with more progress up at the Abbey.

As we navigated the strange weather here in western Montana (it went from dark and snowy, to sunny, to sunny and snowy a few times throughout the day), Esteban and I started the day up at Allerton Abbey to continue working on the floor fix. After feeding the cats (we are all pretty sure that Cheyenne had her kittens and that they are in one of the cat boxes in front of the Abbey), we came up with a plan for how to "fasten" the wood plank into position. Our constraints were: 1) ensure that the plank was secured and to prevent any motion/wobbling that could cause the cob butted up to it to crack in the future, 2) hide the fastening method to maintain the integrity of the beautiful plank surface we ended up with after yesterday's work. The approach we came up with was to pin the plank to the logs at each end by putting holes through the plank and into the log from the side of the plank (see the first picture below). In order to do this, we had to remove some of the earthen floor cob to accommodate the use of the tools to drill the holes. After removing the cob flooring, boring holes through the plank and into the log, we then cut dowels to length, tapered the ends to ease installation, and then tapped them into place with a mallet. The plank was shimmed to level before the dowels were installed, the end result was a pinned/fastened down plank that is firmly in place . Now all that is left is the cob work.

Next, Stephen had Esteban and I work on "Powerline"  signs to clearly mark the path of the underground powerline from the pole by the Solarium to the Workshop/Classroom. I did some simple sectioning of my sign to keep my letters a consistent size and then after routing the letters, I had a little more room, so I added lightning bolts for character . Next, we used torches to burn our signs. This chars the surface of the sign. We then sanded away the charring across the original wood surface to result in high contrast lettering that is easy to read. We then were tasked to place our signs at either end of the underground powerline using rock jacks. This was the first time I built a rock jack, but after watching Esteban complete his first, I got the idea and cut my logs, marked and notched them, nailed together the joints and then applied the rocks to the "seat". Not bad for a first rock jack (looking forward to building larger versions for the fences)! Lastly, while Esteban and I worked on the signs, Stephen had been clearing the path up Complexity Trail that was blocked by downed junk pole fencing. After finishing the sign installs, Esteban and I joined Stephen and helped to clear the last part of the trail. Complexity Trail is "open" again!! This felt even more like a win amongst us Boots, because it reopened the trail to Stephen who has been sleeping in his tent and typically uses the trail to get to and from his tent each day. So glad to be able to work as a team to make this happen -- next step will be rebuild/repairing.

Nancy Reading wrote:

Harry Malecki wrote:Propagating dock seeds around the Abbey


Only on permies would you be able to write this and everyone know what you might be doing it for! I must admit it wouldn't be something I'd propagate round here as it isn't useful enough and is a bit of a pain to get rid of, but as a soil improver/dynamic accumulator it's almost as good as comfrey and rather easier to get rid of (apart from the soil seed burden).


Hi Nancy! Funny enough, this wasn't the first time I have propagated dock directly from the dried plant. My wife, Alex, has collected it before around our current home in Colorado and propagated it along the bluff behind our house. It was to build soil as you describe above. We use dock and comfrey as well around our home in Colorado.
Hello Permies!

If you haven't had a chance to hear my and my family's stories, please see the following threads:
Alexandra's SKIP to Homesteading
Harry's BEL Thread

As a new boot, it was brought to my attention that I should bring awareness to my BEL thread here on the Boots Love thread, but also reach out to the broader community with any recent requests for "Boot Love". Given that I have only been here for a little over a week, I solicited my companions for ideas and collated below:

1. Coffee -- all of the coffee
2. Chocolate - I prefer darker chocolates, but a mix would be great
3. Dog toys for the unofficial current boot mascot,, Cujo (see Esteban's BEL Thread)
4. Markers that are good for outdoors and for in the shop -- I have been surprised at how little options we have to mark lines, so anything on this front would be helpful. Example below:
Outdoor Marker Example

Thanks for all who have given in the past and continue to give! Your contributions show us boots how much our work is appreciated !