Jon Hay

+ Follow
since Jul 08, 2024
Merit badge: bb list bbv list
Biography
Since 2016 I've been establishing an off-grid homestead in New Zealand and building a natural earth home since 2019. It is a roundhouse made from native NZ roundwood timber, featuring a reciprocal frame roof and various wall systems, including cob, straw bale, cordwood and light earth. It's lime plaster exterior and earth plaster interior, with no cement used apart from the foundations. It also has an extensive living roof with a variety of sedums and succulents.
For More
Northland, New Zealand
Apples and Likes
Apples
Total received
In last 30 days
3
Forums and Threads

Recent posts by Jon Hay

Hi folks,

If anyone is considering a living roof, I've posted a video outlining the construction of ours and how it's fared over the last 4 years of growth. It was done on a budget, using mainly sedums and other succulents which were all propagated from around 100 original donor plants, then planted out into pumice/potting mix, which itself was placed onto the roof in hessian sandbags in order to retain the soil whilst the plants established over the first few months.

Long story short, we've been really pleased with how it looks and performs, providing insulation and protection from the weather. It was also relatively easy to install (just time consuming), and very easy to maintain (just some occasional weeding of the most prominent weeds.

Any questions, feedback or suggestions, please feel free to fire away!

4 days ago
Hi Gabriel

That sounds like a great project, and I hope this reply isn't coming too late. I've built something very similar to what you're describing - a 9m diameter timber frame roundhouse (using roundwood framing), with a reciprocal frame roof, central "eye" skylight, walls of straw bale, cob and cordwood, rubble trench foundation with rock stem wall, living roof, earth plaster interior, earth/lime plaster exterior, etc.

I'm really happy with how it's turned out, and I'm starting to upload some explanatory/instructional videos to YouTube (links to a couple of them below). The only thing is, I'm based in Northern NZ, so we have a very different climate - no frost, no snow loading, etc - so I can't give much advice on insulation and thermal bridging etc. What I would say is that the thermal mass of the place (0.5m think walls, slate tile floor, etc) helps maintain a very steady temperature year-round. We've got reclaimed single-glazed windows (which are draughty) and no roof insulation, but a decent sized wood stove for winter. However, the roof does a really good job of insulating from heat and cold in our climate. The living roof consists of: 25mm sarking boards, layer of tarps to stop dust falling through the boards, foam carpet underlay for padding and some insulation, flexible polyprop pond liner, approx 100mm of punice/soil in a 70/30 ratio, sedum planting which is typically 2-300mm tall and quite dense now. As a reference, we also have a 40m2 timber cabin, which is double glazed with an insulated roof and 70mm thick timber walls, and the roundhouse is always a more comfortable temperature, despite the single glazing.

I've used cob on the sun-facing walls, so it absorbs the heat, and then straw bales and cordwood on the shady walls for insulation.

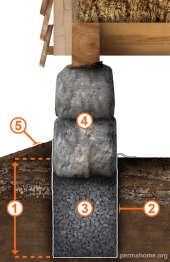
For the floor, I layered: waterproof membrane, approx 200mm or pumice for insulation, approx 150mm of compacted road base, sand to level, mortar bed, then slate tiles. I laid underfloor heating pipes in the sand layer in case we needed it, but we've been through two winters and it seems fine - as I say, it's a very temperate climate here. Our main issue is the amount of rain we get, especially over winter, and the high winds and driving rain. But overall the building has performed very well. The central aperture of the roof relies ultimately on a bead of silicone to seal, which is not ideal and has led to a couple of minor leaks and repairs (i.e. re-siliconing). I have a couple of ideas on how I might go about fixing it properly, but it's all a bit experimental as I struggled to find good information or solutions on how to do the roof light without spending a lot of money on custom made stuff.

Hope that helps - I hope to be uploading more videos to the channel soon!

Cheers

Jon


3 weeks ago
Thanks Mike, I can highly recommend it!

There's actually already a video on my channel on the rubble trench foundation, plus a couple of others on the framing of the henge:  https://youtube.com/@earthbuildnz?si=hCG9XW6D2rDQbBxP

Hopefully the link works, if not you can search for EarthbuildNZ on YouTube and it should take you there. I should mention I had VERY little in the way of previous earth building (or general building!) experience when I moved to this property 8 years ago, and picked things up mostly from YouTube and books, so hopefully my videos can help others to get the confidence to give things a go.
That's a good question! The short answer is I had no accurate way of knowing anything for sure.

The longer answer is that there's little technical information on the native NZ timber I used (Totara), especially for the younger trees I was using, but it's known for being generally strong and durable, which was a good starting point. And I knew I needed each rafter to span 4m so, as an approximation, I set up a 4m span between two blocks of wood on the ground and then placed different poles on there and loaded up the mid-points of each them with weight (people, or whatever else I needed, up to about 200kg). I could then see how much each pole was flexing and used this to grade the poles in order of strength. I noticed there was a significant increase in flex beyond a certain minimum diameter, so I only used the poles that had minimal to zero flex, keeping the smaller ones for smaller spans elsewhere in the building.

It's difficult to calculate the weight of the earth roof above, but I was pretty that even with sodden wet soil up there, I felt the weight on each rafter would be fine (It's a 50m2 roof with 20 rafter poles, so each pole only needs to support 1.5m2 of roof, plus a decent portion of that area will be towards each end of each pole where they're a lot stronger.) Fortunately I'm in a climate where I don't need to worry about snow loading.

The living earth roof has now been up for several years and weathered many a storm and downpour with no issues so in the end it's worked out really well, and the roof looks amazing (inside and out!). I definitely understand your concern, as I was a little bit hesitant using my rustic approach to structural engineering, but I think a bit of common sense goes a long way. Not to mention I think it would have been near impossible (or at least incredibly expensive) getting proper engineering calculations done, as each pole was unique in size, shape, taper etc.

I hope that helps - I'm hoping to do a video or two on the living roof in the next few weeks if that's of interest. And (eventually) I'll have one on how I finished and weatherproofed the hole in the centre, which gave me a few sleepless nights trying to work out how best to do it!

Thanks

Jon


I thought this might be of interest here - it's an explanatory video on how I constructed the reciprocal frame roof for the earth round house I'm building. It was a few years ago that I actually built the roof frame, but only just getting around to editing old footage and posting to YouTube! It's an 8m diameter span, supporting a living earth roof (which I'll do another video on later).


Happy to try to answer questions on it too...
Thanks Phil, it's been a long road, but getting there! Nearly ready to post a video on the reciprocal roof which was a really satisfying part of the build - feels like an age ago now though.
1 year ago
Not sure if this is helpful for the scale you're planning (and certainly not an ancient technique!), but I've built our 8 meter (internal) diameter earth roundhouse house in New Zealand with a living roof blending into a bank on the ground on one side. I kept the roundhouse section self-contained, on its own rubble trench foundation with the earth around it angled away from the foundations and a secondary French drain installed to move any water away. I then extended the roof out from the house to the ground, creating a deep, protected verandah between the roundhouse and the ground, and keeping any ground water well away from the earth walls. The house was relatively very cheap to build from local roundwood timber for the frame, and local, natural materials for the walls. The biggest costs were the reclaimed joinery, and the pond liner we used to cover the roof.

The original plan was to use the verandah space for firewood and other storage, but whilst building the framing we decided to keep a higher head height and infill the spaces with additional rooms. The living roof drains down to the ground, where I dug another trench with a French drain to take away any roof water, which means there's now very little water coming through the bank, so I plan to put a membrane down and then create larder/root cellar/ cool storage areas adjoining the bank, then other living spaces on the inside of that. This effectively moves any potential problems further away from the actual house.

The roundhouse is now nearly finished and habitable, and it's worked out really well. I'm in the process of editing and posting a series of videos on YouTube which you may find helpful:


The channel will cover rubble trenches, roundwood framing, reciprocating roof, straw bale, cob, cordwood, light earth, earth plaster, lime plaster, living (sedum) roof, and hopefully much more
1 year ago