

|

|

|
.png)
|

|

|
|
|
|
|
|
|
|
Your concern would be justified in the case of a 1st generation batchrocket build. The Shorty core however, is radically different in this respect. Maximum temperatures won't be at the top of the bell anymore, but opposite the core exit instead. This is better in more than one way, the most obvious one: people tend to live at a lower level than the top of a high bell.
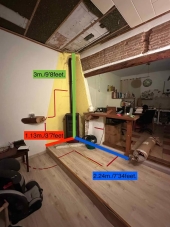
How much below the exit riser's port should it be placed? Should the opening of the bypass be facing the floor or the wall?
sara ventura wrote:
I can squash 20 cm from the top, leave the core aligned with the bench top and lower my ISA to 5'2.
Will I get away with that ISA and the bypass?
Hard to tell, as long as the chimney is of good quality, it might, since the ISA oversize is now roughly 15%.
I am unsure whether or not I mentioned this, but there shouldn't be a wall between the main bell and the bench at all, just a few columns. Try to view the whole of it as a strangely shaped bell.
The accepted bell size for a 150 mm first generation batchrocket is 5.3 m². However, the top combustion rate of a Shorty core is somewhat tuned down, in order to create a much more reliable core. So, for a 150 mm Shorty, that ISA should be 15% less, being 4.5 m².
However... you could have an oversized bell ISA although a bypass is a must in that case.
sara ventura wrote:
-Space between riser's top and bell's top ---> I have now 30 cm, could it be reduced to 20cm?
Top gap could be zero, but for safeties' sake, let's say 10 cm or 4" would be sufficient.
Peter van den Berg wrote:
This core type can do very nicely without insulation at all.
Maybe I should explain a bit what happens inside this Shorty core.
In order to obtain complete combustion or close to this state of affairs, the three T's are important. In no particular order: temperature, turbulence and time. Some mainstream knowledge say smoke should disappear as soon as a temperature of 850 ºC (1560 ºF) is reached. There's even a German group by the name of 850 Grad, which is promoting this idea. Of course, nobody specified where that temperature should be reached and accompanied by which amount of turbulence and during which amount of time. Since I've seen numerous times smoke disappearing within 5 to 10 minutes into a burn after a cold start, I started wondering. The numbers doesn't look like fixed figures, it could be that the figures are at least partly interchangeable. Maybe, with an awful lot of turbulence induced both the other two T's, time and temperature, could be smaller.
I used what I thought was the best "insulating fire brick" I could get my hands on in the states. And after a few years these have started to break down, while the hard fire brick has NOT SHOWN any problems. (same stove)
I am unsure what type of insulating firebricks you have there. Better to use just hard firebricks for the entire core. The riser is the part that's heat stressed most of all, especially the liner in the lower half. Thin strips of insulating firebrick, I feel scary about its durability.
I"ve had a look at your drawing of the core, and question arose. The depth of the firebox, is that a fixed figure because of the bell depth?