Dan Huisjen

+ Follow
since Dec 13, 2011
Merit badge: bb list bbv list
For More
Acadia Region, Maine.
Apples and Likes
Apples
Total received
In last 30 days
0
Forums and Threads

Recent posts by Dan Huisjen

I just spent several hours tapping shiitake dowel plugs into oak logs this afternoon. This is one way you can start, but you should be thinking about what the logs need by way of environment, and what mushrooms will grow on what logs. And what time of year the logs should be cut and the mushroom spawn installed.

Mushroom growing can easily turn into a laboratory clean room kind of operation. You might want to look into some basics along those lines too, just to understand the life cycle. The first thing I did was oyster mushrooms cultured on agar in a petri dish (which really wasn't that hard), and then grown out on straw that had been through the pressure cooker. There are ways to grow oysters from supermarket oyster mushrooms on boiled cardboard. Maybe give that a try. The advantage to that is it's quick (a few weeks) and you learn a bit in the process.
8 years ago
I would find paying for a new septic system to be an onerous chore. The bucket really isn't a problem.
9 years ago
Tristan, I'll second that motion. A hose in the sun is a wonderful thing.

Two days ago I reinstated my summer bath tub. I have about 700' of 1 1/4" black poly water line (scavenged from the local plumber's refuse pile in ~70' lengths) coiled up in the sun, under a bit of (scavenged) used greenhouse plastic. I didn't want to pull the tub out of my treehouse bathroom, so I built a new one. It's outside so I don't care if it leaks a little. I used strips of 3/8" plywood to make a ring 12' in circumference, or just under 4' diameter. I made this from one old sheet of plywood, cut into three 32"x48" pieces, with battens to screw to. I set that on the ground and draped another piece of greenhouse plastic in it as a liner. In this set up, I've paid for hose splice barb fittings and hose clamps. That sheet of plastic has a few pinholes I might tape up, but the leakage is too slow to be an issue, really.

It's not as deep as using the 70 gallon rubbermaid stock tank, but it works. By the time the hose water runs cold and brings the tub back down to 107°, the tub water is about 8" deep. (This depends on weather and solar gain, of course. Last summer I had 150° water coming out of the hose at one point.) I displace about 3 cubic feet, and Dirt Girl displaces about 2 cubic feet, so that can raise the water level a bit more. I think I should cut the side down to 24" on one side to make it easier to step into, but the high sides are good for wind protection. It was only about 48° out yesterday when I had my bath, but it was a very nice soak.

Being non-rigid, dumping the water is awkward, so I siphon it mostly empty with a scrap of garden hose.

Now if I can get an insulated tank and fill it from the coil once a day when it's sunny, then pressurize it with cold coming in at the bottom, I can have some level of hot running water in the treehouse too.
9 years ago
I had an Avalon back in the late 90's. They use a clean burn secondary combustion system. They aren't catalytic. They're pretty good stoves.

Yep. Wet wood.

Allen is right. If wood was sold by dry weight instead of volume, people wouldn't care so much what species it is. It's somewhere around 6400 BTU per pound, multiplied by your combustion efficiency. For that stove, it should be around 75% efficient.
9 years ago
One more thought on amaranth:

If you throw a half cup of it in a dry skillet and gently shake/swirl it over medium low heat until a bunch of it pops (like very tiny popcorn), then add a bit of sweetener and some milk, the rest of the seeds pop as they absorb some of the liquid. This makes it very easy to cook and eat, without the weedy taste of stewing it to porridge. It takes only minutes to prepare it this way.
9 years ago
We should be aware of the difference between "virtually eliminate" and "relocate to the site of our local electrical generation station".
9 years ago
Gloria, it might help to know a little more about the stove. Is it new? Or is it just new to you? Can you tell us the brand and model?

A new clean burn stove should really never smolder, once the stove is up to temperature. The smoke should combust before going up the chimney if the combustion air damper is open at all.

When the wood isn't burning well, is there any moisture fizzing out the end of the log away from the burning part?
9 years ago
Efficient in terms of what output, for what input? Do you want it to be easy labor, best drying, most wood in the smallest space, easiest to build? What's the priority?


Don't stack wood without some kind of roof. Wood will not shed rain well enough on it's own to get really dry. It can be an open sided shed, or something more enclosed but with good ventilation. The more loosely it's stacked, the better the air flow and the better the drying. Some solar gain helps.

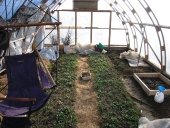
My primary fire wood is small manufacturing waste hardwood blocks. I shovel them into my truck at the factory, shovel them into my drying shed (above), shovel them into totes to sled over to the house.... There's not much bending. The drying shed has a slat wall behind the pile of blocks. I sometimes open the double doors on the near end for ventilation on sunny days, but I close it up in storms. I hate snow-covered wet firewood. The north side (left) is boarded and roofed, more or less, but the south side is greenhouse plastic above the fist four feet. The first four feet on the south have slats to hold back the wood, and air can come up from below. The whole thing is on pallets, over two layers of plastic lumber wrap on the ground. That way I get air flow from below without soil moisture. On top of the pallets I have plywood scrap, which slows air flow (bad) but makes shoveling much easier (good). There are still some air gaps around the pallets.

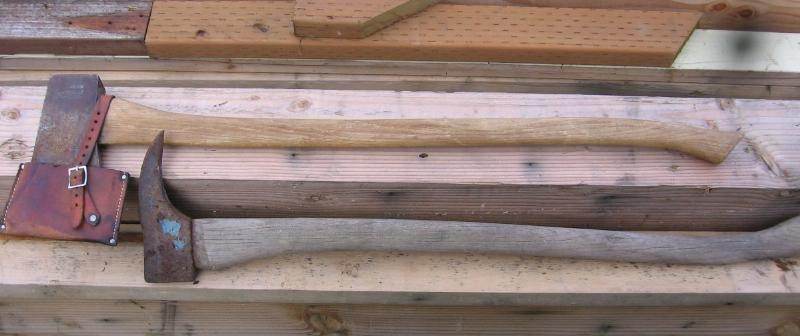
If I'm dealing with logs, I use a picaroon, like this one (not my picture). If you wanted one cheap, they were traditionally made by grinding a hook point onto an old axe head, but you might also make one by cutting off one claw from a big framing hammer, and sharpening the other one to a point. They greatly reduce bending and lifting. Mine has a handle the length of my old furnace firebox, so that as I work, I know if the log will really fit. These work much better than hay hooks, IMHO.


Some feel that stacking in long rows in the weather for a few years is good, but then the wood should be moved under cover for the final drying. This just sounds like extra work to me.

Wood should not be dried in the living space. That's too much moisture to put into the structure of your house without encouraging mold and rot. The only way this isn't true is if you have a house that's unlivable because there are so many air leaks.

For stacking in the stove, efficient means efficient combustion. it's mostly an issue just when starting the fire, but make sure there's a good vertical air channel through the fuel, but the flame is able to heat the rest of the fuel. Like I said elsewhere, putting two dry split faces close to each other with a vertical air channel between them makes for better fire starting. Lots of wood stacked in horizontally, with the vertical paths clogged with the ash of too much paper tinder, will not catch easily.

9 years ago
I light my stove by taking two nice split faces of a log (anything from spruce to oak) and putting them in the regular old wood stove, an inch or so apart. Then I put about a half a square foot of waxed cardboard vegetable box (folded some, and maybe ripped a bit) between the two log faces and light it. That's all there is to it.

What kindling?
9 years ago
Yes, the jig was made on an improvised table with a couple of sheets of plywood for the surface. Blocks for the jig were screwed to the surface to define the curve and hold the ends of the convex side. Once I got into the rhythm, I could do a half arch in about 7 minutes, with two 3" galvanized deck screws through the strapping and into the each block from either side, so that the screw points overlap by and inch.

The tops are gusseted together with plywood. There are stringers on top to either side of the ridge, but no ridge board.

The frame was made with a lot of scavenged material for blocking and bracing, so I paid just $100 for the strapping and screws for a 16' x 24' greenhouse, about 8 years ago. It's due for new plastic and frame overhaul now, but I'm happy with those 8 years.

I don't know about the more rigid materials to cover it. I've got another one with an east-west ridge that I boarded up the north side on. I keep my firewood in there, and dry my laundry in there too. That one is on a pallet foundation, on top of plastic laid on the ground.
9 years ago