hagrid small

+ Follow
since Nov 12, 2012
Merit badge: bb list bbv list
For More
mid/northern Vermont
Apples and Likes
Apples
Total received
In last 30 days
0
Forums and Threads

Recent posts by hagrid small

Thanks for replying Michelle.
As I said in the OP - the ambition here is to grow some moringa indoors in our teeny tiny apartment.

Outdoors here is dicey for 3 reasons:

If I were to grow Moringa in a cold climate as an annual, I would start them indoors and then plant them on a sunny side of a building protected from the cold prevailing winds.


1. Being renters we have no idea how long we'll stay in this spot;
B. The other tenant here does the landscaping work & tends to mow down everything he sees indiscriminately;
3. The owner shows up every so often and changes outside things sort of randomly.

So - yes - I am experimenting with these, and this is my story.  

As to these more common things:

...but I would really put my energies into to growing Kale and parsley and other leafy high nutrient greens and herbs.


I can easily walk out our door, take a nice stroll for 2 blocks & get most common stuff anytime - but it is NOT possible to get moringa locally & growing it will be a good way to get some IF its requirements are met properly.

Hence this thread asking for any info - which I'm guessing nobody here has to share as evidenced by only the single reply.

We have seeds from several sources now and did get some to sprout up - but the directions used for that batch did not match what came after they sprouted, so they failed.
Trying another method now & just waiting to see how long it takes before they sprout as it seems to be a very slow process.

Thus far the important detail in starting this seems to be just locating viable seeds...and after the present test concludes we'll know which ones are viable & which are just good for snacking.

Thanks.
8 years ago
For some time now I have wanted to try some indoor cultivation of the Moringa Oleifera, which is also sometimes called the 'miracle tree'.
The ambition in this is as an indoor fresh food source as it is supposed to be highly nutritious as well as being a super-fast grower.

Since it is a tropical plant and we are in Vermont, the only realistic methods are to grow it outdoors as an annual (we are renters...), or indoors, being attentive to its needs & keeping it as a dwarf.

So we got some seeds for it - and they are a bit more demanding than seeds that one merely pokes into moist soil - but that's OK.

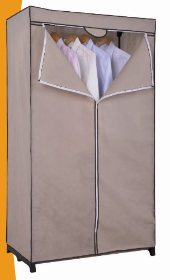
To provide for their needs of warmth & light I morphed a very inexpensive/lightweight wardrobe type of thing into an insulated grow closet of sorts.

It started out something like this one:

And with the addition of some 'space blankets', black trash bags, a single piece of waferboard, some duct tape, staples, lights & a timer - it is perfect for keeping lit ~16 hours a day - even though we like our bedroom 100% dark for sleeping.

T'was actually very enjoyable to assemble the portable closet thing - and neat to see how well the 'space blankets' work so very well.
It uses just several LED bulbs & a single 7.5 watt incandescent bulb, yet stays very toasty warm in there - and all the linings are doing a great job of keeping the moisture level up nicely as well.

What is really nifty to me is that our place is very tiny, so this had to be something I could sort of squeeze in between things while being tall enough inside to accomodate a couple of smallish trees - and for under $20 that is exactly what I was able to find.

Adding a tray with the properly planted seeds then keeping them moist enough is all that has happened thus as we've watched & waited for some germination to occur...
Sadly, it seems we got some poor quality seeds and/or got something wrong because when a few did sprout - either via being started in coconut coir or via the paper towel method, most have failed soon thereafter & the 1 that looked strong & sturdy is also failing now & we do not have any idea of why that may be.

Questions for others here, please:
- Has anyone here any experiences growing moringa to share (especially indoors, etc...) ??
- Does anyone know what we might use for some sort of safe plant food for this edible plant so as to make sure it flourishes safely ??

Thanks for any helpful info !!

PS - more info, if anyone is interested:
http://www.ilovemoringa.com/How-To-Sprout-Moringa-Seeds-Easily.html
http://www.ilovemoringa.com/How-To-Grow-Moringa-In-Cold-Climates.html
http://www.moringamatters.com/how-to-grow-a-dwarf-Moringa-tree.html
http://moringafarms.com/growing-moringa/
http://moringafarms.com/wp-content/uploads/2014/05/Growing-Moringa-for-Personal-or-Community-Use.pdf
http://thinkhealthytips.com/2016/02/the-health-benefits-of-moringa-the-superfood-of-superfoods/
http://livelovefruit.com/health-benefits-of-moringa/

8 years ago
It amuses me endlessly that this monster weed can actually be both edible and very health-promoting !!
I found many articles which have great things in them about both its weediness and how to go about eating it.

This one actually has a warning that I am very glad I found:
http://www.theotherandyhamilton.com/2013/04/22/cooking-with-japanese-knotweed/

.....only use the first shoots of the year (15-20cm or 6-9 inches) as the adult plants are not only too tough to eat but they have a sap inside them that can leave your mouth blistered.


There are even videos about eating the stuff:

A very worthy read here:
http://www.huffingtonpost.com/rebecca-louie/invasive-plant-recipe-japanese-knotweed-fruit-leather_b_7279058.html
Excerpt:

Many people eradicate Japanese knotweed with herbicides, but I don’t want to put poisons in my soil. Instead, each spring I hack away at the broomstick-thick shoots as they emerge and dig up as many of the gigantic, brain-like, mother rhizome nubs as I can before crumpling into an exhausted heap.


Another good read:
http://www.eattheweeds.com/japanese-knotweed-dreadable-edible/

It’s an invasive weed in Ohio, Vermont, West Virginia, New York, Alaska, Pennsylvania, Oregon and Washington. About the only place where they are not upset with the plant is where it’s native, southeast Asia. What do they know the rest of the world doesn’t? It is said that Japanese Knotweed out lives the gardener and the garden.


Knotweed, in the Buckwheat family, is not liked in western nations because it grows around three feet a month, sends roots down some 10 feet, grows through concrete, damaging roads, dams, buildings and just about anything made by man.


We live directly across the road from a very steep bank of a nice river that is just infested with the stuff and when I walk the dog I have noticed the red shoots.
Must be time to pick some & try them out as a food !!
8 years ago
Nasty stuff indeed !!

I did get it stopped at one time though - here's the story of that:

I was renting an apartment and was offered a garden space by the barn - with an active knotweed infestation - bleah.

Turned out the crazy landlady loved the stuff - it was her 'privacy hedge' of choice out front.
She had seen it down the road and liked it so much that she took cuttings and planted it by the road !!
Since then it had traveled many hundreds of feet and was taking over the place.

That stuff is truly mighty - it literally penetrates and shatters things like that barn's concrete block foundation !!

I went on a crusade.
Spent a couple of days tilling that entire area, digging out, chopping out & removing the knots & runners.
(Turns out is also spreads by wind blown seeds...or even the smallest cutting - the stuff spreads like wildfire.)

Spent that entire month re-digging and yanking out sprouts of it as soon as I saw them...and eventually planted good stuff there.

Managed to keep it out for the years that I was there - it seemed to go in other directions during that time & skipped the garden.

Sadly, it came right back after I'd left & did a lot of damage to that barn.
She had to replace the foundation & I've no idea if she ever accepted that it was her 'hedge' that smashed it up.
(I got called names when I tried to explain it to the old dear so I just quit trying.)

Bottom line IMO:
It can be bested without harmful chemicals with diligence & ALOT of work.
8 years ago
Thanks for posting a reply.

Wanting a smaller-than-usual and even less costly RMH is not an odd request; but getting answers about that idea can be very difficult.

Fortunately I have found a very helpful and practical man who builds these as a hobby and uses one in a (larger than mine) trailer daily.

All the problems mentioned just above (by allen lumley) are not my problems at all and do not require attention in my situation.

Getting fuel, exhausting the RMH through the tent, and/or moving the camper are not the issues which concern me at this time; knowing which things to buy vs. wasting money is my starting point in making the heater I desire with the camper staying where & as it is.

Once it is made, there are piles of dry fuel within easy walking distance - enough to keep me in sticks for several years.

Unless I run into some sort of snag as I build it, I now consider that I've privately & directly gotten enough info elsewhere/otherwise as to mark this query 'resolved'.

Thanks.
12 years ago
I'm amazed.
Of all the possible places on the internet I'd sort of think of this one as the home of the rocket mass heater - OK, so...
I posted here hoping for some help and/or guidance and...and...and...nuttin after over 2 weeks.
Wow.

I've read 'the book', a couple of times, and have some clues & ideas of my own, but sure would appreciate getting useful, usable, maybe even tried/tested ideas from others.

I simply cannot imagine there's no permies a'tall who live on a shoestring in a tiny place like I do.
Living small is so wonderfully efficient, and it takes so much less in order to do it !!!
12 years ago
I beg to differ here:

Yone' Ward wrote:The biggest issue I have with using humanure is the five moths every year that everything outside is frozen. It has to be stored or processed underground for that time unless you are ok with dumping it on top of the snow.


Seems to me it's pretty cold & frozen alot of the time here in Vermont, and the only 'problem' I ever have with emptying the bucket is if/when the roof-drops are so heavy that it requires 1st digging out the composting buckets....no biggie - it's winter & it's supposed to be cold !!!
12 years ago
I've had & used one now for 6+ years.
It is dead easy, requires very little attention, and as it is a 'dry' bucket, has so little odour as to be unimportant.

Back-story:
I live in a very tiny 50+ year old camper, which has a big tent built around it.
Space is very limited.
The toilet, therefore, is between the camper & tent; a great spot for it.
It is built from scrap lumber and the remains of a disassembled desk for the bigger parts.

The secrets of the bucket:
An oval toilet seat.
Recycled buckets with lids.
An ordinary plastic funnel as a pee diverter.
A recycled gallon jug to catch the pee from the funnel.
Scrap office paper, torn in 1/2.
A good, sturdy spatula to optimize the space used...which lives on top of=>
A big bucket full of wood shavings.

Comments:
- I 1st learned the do's & don't's of this from friends who had a 'wet' bucket, indoors - and it stank something NASTY !!!
- Covering the poops with office paper and squishing it down genuinely displeases the nuisance bugs and they seek elsewhere instead.
- The stretched-out opening of the oval seat allows better space for the funnel to do it's job.
- An easy way to make the funnel stay set but to easily come out of the way is those big office binder clips to hold it tightly against the bucket.

As the gallon jugs fills, it is spread on the happy jewel-weed forest which is right outdoors here ; apparently jewel-weed thinks pee is GREAT stuff.
(It seems to discourage other green growing things though, a good thing as there were nasties growing there too...but no more.)

As the bucket fills, depending upon weather at the time, it is either covered & replaced, or emptied into 1 of 2 ordinary, covered trash cans with worm-holes in their bottoms.

The emptied bucket is set where there's good rainwater to fill it and emptied a couple of times before it's next use.

That's it.
Simple, easy, and no real bother a'tall.

Closing thought:
The only thing more insane than flushing away perfectly good drinking water so that it ends up in the ocean eventually - is boiling water with fission.

PS:
The rant about the fertility cycle is DEAD ON.
12 years ago
I had arrived at this forum via a link that suggested discussing the RMH stuff, and knowing no better, I posted my query here:
my query
Apparently that was not the correct spot, so I would like to continue it here, and hopefully get some good info as I'd like to get this well underway ASAP !!!

The quick background:
I live in a teeny-weeny old camper with zero extra space except on the outside of it, between the camper and a big tent built right over it.
There's a wee bit of space beneath it, so I'd like to run the exhaust tube from the RMH under it and out the back flap of the tent.

Here's where this project stands right now:
- I've made the space beside the camper as ready as I can.
- Scrounged around for materials
- Searched quite a bit for construction details.

Materials on hand:
- A small stack of bricks
- An old propane fired 30gal. water heater carcass.
- A used-up ~20 gallon water expansion tank

I have a wirefeed welder and 4" grinder so I can do some fabrication work.

Looks like I'll need to buy some stovepipes, some kind of exhaust tubing, mortar and perlite.

And there's ALOT of sticks & yard waste around here that will burn nicely...when I can get it all done.

I've seen someone's idea of using 4" stovepipe for the inside/insulated flue and 4" flex tubing for the outlet.

I'm wondering these things, if anyone can help me out here:
- What is the practical length one may extend the outlet tubing to ? (Is 20-30' easily do-able ?)
- What size pipe is usually best to surround the 4" flue with so as to hold the insulation ? (6, 8, 10" ?)
- What advantage of using tamped-in perlite vs. the used fiberglass from the old heater ?

I can butcher up the old water heater any old way - even re-use it's built-in flue if that is a good idea, but I'd like some suggestions as to how best to do it because soon enough it'll be snowing regularly and I'd rather have it ready than to be still learning via trial & error...

Having read a bunch here, watched videos, and checking out a bunch of sites mentioned here including Len's Rocket Site has given me alot to go on, but it is the things I must buy that most concern me right now.

Thanks.
12 years ago
Thanks, I shall do what I may in this regard:

R Scott wrote:Then put the mass bench UNDER the camper.
The heat will radiate up into the camper, even if it is insulated on the floor. Putting a skirt aroud it will hold more heat there so it radiates more into the camper.


Given that the camper sits in a tent in still air and is somewhat skirted already, I'm off to a good start that way.

Here's where this project stands right now:
- I've made the space beside the camper as ready as I can.
- Scrounged around for materials
- Searched quite a bit for construction details.

Materials on hand:
- A small stack of bricks
- An old propane fired 30gal. water heater carcass.
- A used-up ~20 gallon water expansion tank

And ALOT of sticks & garden waste that will burn nicely...

I've seen someone's idea of using 4" stovepipe for the inside/insulated flue and 4" flex tubing for the outlet.

I'm wondering these things, if anyone can help me out here:
- What is the practical length one may extend the outlet tubing to ? (Is 20-30' easily do-able ?)
- What size pipe is usually best to surround the 4" flue with so as to hold the insulation ? (6, 8, 10" ?)
- What advantage of using tamped-in vermiculite vs. the used fiberglass from the old heater ?

I can butcher up the old water heater any old way - even re-use it's built-in flue if that is a good idea, but I'd like some suggestions as to how best to do it because soon enough it'll be snowing regularly and I'd rather have it ready than to be still learning via trial & error...

Thanks.
12 years ago