Richard Kniffin

+ Follow
since Sep 06, 2015
Merit badge: bb list bbv list
For More
Apples and Likes
Apples
Total received
In last 30 days
0
Forums and Threads

Recent posts by Richard Kniffin

Yes, a batch box might be in my future :) Probably no time soon, but when I get to it I can fix a few design flaws at the same time, and really feel good about it.

Maybe I'm being too pessimistic about the wood savings... I checked the oil tank outside today, and it's probably safe to say that I've burned my normal amount of wood, but noticeably less oil.
4 years ago
Here's an update with lots that I've learned over the past few months:

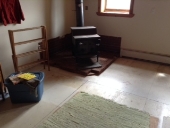
Pictures below show my RMH as it currently stands. I still have to dig some silt for the final batch of plaster around the front and back of the burn box, but otherwise it is complete.

I've been running this dragon all winter and getting adequate heat from it. Going by mathematics and gut feeling, I'm not sure if my wood savings will be at all significant; it is tough to measure because there are multiple heat sources in the house. At around 2,000 sq ft in a cold climate, the house is just too big and leaky for an RMH to do the job, even burning it 6 hours per day. I did meet a fellow in my Vermont county who has used nothing but an RMH for 15 years in a 1,300 sq ft house. For those building their own dragon as a standalone heater, I would not expect to heat any more space than that in this climate. One note from that person I met- he just got a pellet stove this year so that he can turn that on and leave his house for days at a time without worrying that it'll freeze.

I can say for certain that the RMH has changed the quality of heat in the house. It never gets as cold as it used to, it never gets uncomfortably hot, and the air stays at a healthy humidity compared to the old wood stove, which was burning hot and drying us out constantly. It's been good for my whole family's skin, and once the surface of the bench was finished, we certainly enjoyed warming up on it.

Was this a permaculture project? I spent about $800 on materials, the project dragged on for 5 months because I had almost no physical help with it (hard to organize work parties during lockdown, harvest season, holidays, etc.), and I had to take breaks due to emotional/mental burnout. Like I mentioned, I don't think the wood savings will be significant for me. I was hoping for at least a 40% savings, but I can tentatively say that is not going to happen this year. I'll keep records as much as possible for the coming winters and hope it turns out better.

I think the best permaculture solution to my heating needs would have been keeping the old wood stove, a huge Fisher Grandma Bear, and adding lots more firebrick plus a custom-cut sheet of steel inside the firebox to make it burn cleaner and more efficiently. Other people have done this, but I'd never heard about it until I was deep into the RMH construction. Oh well.

The upside is that we'll get some amount of money selling the old Fisher, and the ambiance of the RMH is really spectacular. It's cozy for the family, and a wonderful place to sit and share a cup of tea with a friend. Sleeping on it is pretty nice, but I haven't got the perfect cushion system yet. With planning and patience, I'm able to cook certain dishes on the barrel top, basically the same way that I did with the Fisher. I have to use smaller pieces of firewood, and that has disciplined me into always having good tinder on hand. It's been a wonderful learning experience in physics, fire science, earthen building, metal-working, etc.

I made a heat shield that holds itself directly on the back of my barrel, by cutting 1/3 of another barrel and bending over some tabs so it will hold itself in place. I'll post pics of that next time, hopefully. I haven't seen anyone else do this, and I worried that it might mess with the heat flow, but everything seemed to operate identically with the heat shield on or off. It's a very low-profile heat shield, it cost me $0, it didn't make any holes in the wall, and it's 100% recycled. I view it as a 'cape' hanging off the back of the barrel, and since mine has a funny emblem on the side that looks like the Imperial symbol from Star Wars, I call it a Vader Cape heat shield.

As long as I burn this dragon for less than 7 hours a day, I feel confident that it is safe. One time I burned for 9 hours straight, and the floor beneath the burn box got way too hot (can't remember the exact temperature).

There's a damper in the existing vertical chimney, and since I have extra strong draft, I am able to close that down slightly, for better heat capture. I don't advise anyone else to do this, since it can easily cause back puffs. Experiment at your own risk! I've watched carefully, and found out where the sweet spot is in terms of heat and safety. That sweet spot changes based on outside weather conditions, so I've learned to be extra careful with it.

My overall feeling is that the whole project worked- success! But it was harder and less successful than I expected. As E+E and others have said, an RMH is for heating human bodies (when they sit on or near it), but it's not for heating large spaces. I'll close by saying that with this building experience, I know I could build an even better RMH next time!

Another thanks to all those who helped guide me through the bumps with info and encouragement. Peace,
-Richard
4 years ago
And as others have said, digging their roots out by hand is the other way to eliminate them. Sometimes that's practical, if it's a small plant.
4 years ago
Multiflora Rose can grow quite tall and wide, making it hard to approach on foot. If you have a pole pruner (for pruning fruit trees), they work very nicely for reaching in horizontally through the thorns and sawing the plant off at its base. If you want to eliminate MRose permanently, you'll have to mow/cut continuously, probably for years, or else burn a large bonfire over the root system of each plant.

Goats and pigs can probably take them out, too, but I don't have any experience with that. Good luck!

While they're there, enjoy the rose smell wafting off their flowers each season in bloom. Probably early July in my neck of the woods.
4 years ago
I've been paying attention to my draft each day, and it was a lot lower last week when I allowed the burn tunnel to accumulate some ash. Worth trying out and seeing if that diminishes your draw in an advantageous way or not. Best of luck!
-Richard
4 years ago
Hi Mark, I'm close to finishing the build on my 8" RMH, very similar to yours, also in Vermont. I can verify the advice from Thomas and Gerry: for start up, I recommend blocking off the burn tunnel with as much wood as you need to, then lighting your paper/kindling/etc behind that screen of wood where the draw is not as strong (but still strong enough to pull the flames into the burn tunnel, incidentally starting your wood screen on fire). It works for me every time, and I can consume less kindling this way. If you need a visual aid, let me know and I'll post a photo of my starting setup.

Like you, I wish I had less draw, so that more heat would stay in my house, and less of it fly out the chimney. I may extend my bench in the future (at the 180 degree turn), or else find a way to take more heat out at the beginning of the system, with a heat-operated fan on top of the barrel for instance. The fan idea is tricky because various models can be damaged by high heat, so proper placement is critical.

In summary, I think we live in very different climatic conditions than some RMH builders, and we have good natural airflow shooting up the chimney, plus there's a culture of good, strong chimneys with proper draw in Vermont, because they're absolutely necessary!

Your RMH is looking beautiful, thanks for sharing the pics. -Richard
4 years ago
After posting yesterday, I found that the heat below my burn chamber had gone up considerably in the hours after I shut down the feed tube. It reached a max of 150F at the bottom edge of the 'danger' brick, meaning it was hotter in the interior, and this was with only 6 hours of burn time. That was not acceptable to me, so I took the brick out today. (pics below)

I didn't record the length of today's burn, but the temperature is below 133F/56C everywhere that I can reach to measure. Much better! I'm very happy I was able to remove the problem and make more airspace for cooling. I cracked a little cob around the feed tube in the process, but it was a quick fix.
4 years ago
After many good burns, I can say with certainty that my system is now fully reliable and easy to operate. Success! Relief! Jubilation! I'm still adding the final layer of bricks to my mass, then finishing the exterior with plaster, but the unit is now functional and reasonably good at keeping the house warm.

There are some limitations: After 5 hours of burning, heat from the burn chamber reaches down through the bricks inside my air channels, and it seems to stay safe at 6 hours, but overheats in one particular danger zone if I go to 7 hours. This danger zone is one single brick directly beneath the feed tube, which makes sense since that's where the heat is being created. I thought the heat of the combustion chamber would spread out much wider, but it is highly focused in that one spot. I think the only place an air channel is needed is 1 square feet of area right there, at least with my build. I wish I had made my air channels taller, 4" rather than the 2.25" that they currently are. It's not a huge problem though, as long as I limit my fires to 6 hours. If I ever rebuild the combustion area I'll make those air channels taller.

For analytical folks like myself, here are the numbers I was able to record, but remember they're only taken from the lower exterior edge of a brick, not the interior of the brick, and not the actual wood floor that needs to stay safe. The wood is inaccessible, since it's covered by a layer of concrete board. These temps would be hotter in the center of the brick, then cooler on the bottom side of the concrete board, so there are a lot of unknowns here.

6 hours of fire: 133F/56C
7 hours: 160F/71C

Ernie and Erica say that wood has to stay below 150F/65C, but I don't think the science of pyrolysis is settled yet. I've seen other sources that I can't cite off the top of my head, which recommend 170F, or 140F, as safe numbers. I would like to stay toward the low side, 140.

I haven't seen any heat danger anywhere else in the system, but I'll do my best to fit a thermocouple here and there at a later date. I insulated between the manifold and the floor. I have a minimum 6" of masonry between the flue pipes and the nearer walls of the house, and those walls are along the final stretch of pipe, which receives the least amount of heat. The vertical chimney poses no threat so far to nearby walls, which are 6" away from it. I measured that metal at 150F, and I'll continue to measure it now and then.

One more thing I've learned is that my pipe system could have been longer... since the vertical chimney is tall, indoors, and insulated, it provides excellent draft, and pulls air with no problem at all, as long as I don't cover it with screen :) E+E say that a good chimney adds 10 feet of potential horizontal run, and I wish I had made mine longer in order to catch more heat. My horizontal is about 26 feet now, with (4) 90 degree turns adding 20 feet to the hypothetical length, equaling 46 feet total.

Here's a picture as it stands this week.

4 years ago
Have you heard of Goutweed? (or maybe you know its other names- Bishop's Weed, Ground Elder, etc). I eat it every spring when fresh leaves come up, and it's quite tasty at that point, then it becomes tougher as the season goes on. If I had gout I would think about eating it more often, and making poultices with it for external use. I would not plant new patches of Goutweed though, it takes over and spreads like crazy in my climate.

http://www.healing-from-home-remedies.com/goutweed-for-gout-control.html

I have a friend who had gout, and his diet was heavy on meat, sugar, white bread, and alcohol. For many, many reasons you should be conscious of what you're eating and what it does to you!
4 years ago
I took the window screen out this morning and the system is pulling and burning the way it should!

I put the screen in because a bird falls down the chimney every five years or so (really!), and I thought I'd be saving myself a bit of work by preventing that. Since everything worked fine the first time I ran the RMH, I thought the screen was ok, but it slowly got clogged up, which makes everything run badly, which clogs it up more. Then the exhaust runs too cool, and water vapor collects on the screen and the chimney itself before dripping down.

It's remarkable how the entire system runs differently now, collecting heat in different places. The vertical chimney is finally warm now that air is being pulled through the system easily, rather than pushed with force and resistance.

As to the brick box at the 180- I think it's all good. It's slightly more than 8" tall, and wider than it needs to be, but not by much. Glenn, thanks for the funnel concept- with that kind of concept in mind, I worked hard to make a smooth transition from the barrel down through the manifold, and I understand what you're saying. I can visualize the air wanting to move smoothly from one space to another.

I'm so relieved, I can walk away from the heater for awhile and relax while it's burning! Many thanks to all of you,
-Richard
4 years ago