Mike Autumn

+ Follow
since Oct 06, 2016
Merit badge: bb list bbv list
For More
Tecate, Baja California
Apples and Likes
Apples
Total received
In last 30 days
0
Forums and Threads

Recent posts by Mike Autumn

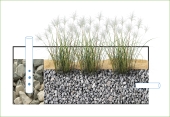
I have always liked to make miniature versions of what normally would be a bigger project, in order to gain experience and knowledge due to the restraints of living in a small apartment. I have done several things in this manner, such as composting, making papercrete bricks, biogas, etc. I know the basics of how reedbeds work but I was wondering if it's plausble to make a light-weight, small and functional reedbed using say, a 40 liter glass fish tank? I was thinking that I could cover up all the sides to protect the roots from light but I can keep a removable side to see everything in action. From what I read, I can use common reed (perhaps I can include other riparian plants as well) since they break down organic matter and absorb excess nutrients from grey water. This is a really simple diagram based on one of Geoff Lawton's videos on making a reedbed of what I would like to do:


The way it works (in theory) is simple, grey water with small organic particles goes into the perforated tube on the left, once its like at 3/4 of it's capacity I let it sit for a while to let the plants process all that grey water. I cover the tube with a cap to avoid any fetid smell. So thus, my questions are the following:

Besides gravel and sand, can you use other lighter materials such as perlite so that it can be moved around or possibly made portable for demonstrations?
I know I have to let the grey water sit for a bit before it cleans it up but how long do you think is sufficient? days, weeks?
When do you think the reedbed will need maintenance? does that involve just pruning or uprooting the plants or does it mean taking everything out, cleaning it and/or replacing the substrate?

Thank you for your help!
4 years ago

Mike Haasl wrote:Or make the bricks a bit smaller....


Definitely a doable solution! I just wonder if the original size was made with a specific goal in mind.
4 years ago
I just came up with an estimate for how much one of these would weigh. A traditional 10x4x14 inch (560 cubic inches) adobe brick weighs 30 lbs. The total volume of this type of brick is around 24x9x9 inches (1,944 cubic inches), so using the weight of a cob normal brick applied to this minus 300 cubic inches from the space occupied by the bottles plus considering lightweight straw taking up some more space we get to around **85 pounds** per completed brick, yikes! I think that we will need to fill it with as much straw as possible and to get help from as many friends as possible.
4 years ago
I recently came across this video uploaded to Youtube from a user called David Mcfall, that shows him making large bricks from whole beer bottles and stabilized earth.  


Now, I've got to say that I fell in love with the whole idea and I reaally like the fact that the beer bottles are whole and evenly spaced apart (satisfying, right?). I can imagine that fact saves time and energy since you don't need to cut the bottles like in other methods I've seen, plus the bricks probably lose a lot of weight due to the fact that the bottles are empty. I like the addition of the pine straw halfway through filling them with stabilized earth that I'm sure definitely helps with tensile strength. Lastly, I like the thickness and the length of the bricks which make me feel like the house will have good thermal mass. I hope these bricks aren't THAT heavy to move around.

After watching the video a few times I looked to see if there were any more detailed instructions but I wasn't able to find anything on the description or channel to my dismay. I was able to find a few things in the comment section though, he uses a 6:1 ratio of cob to cement and he mentions it took him about an hour of time per brick. As to the dimensions of the bricks, I just used some mathematical reasoning and Sketchup to make this image of what I think is the approximate size considering the spacing between bottles:


I wanted to document as much as I could on this video since I haven't seen it anywere else, but that leads me to my big question: what is your opinion on this technique? what do you think are the advantages / disadvantages of it? Also, what can you use as a mortar between these type of bricks to have good structural integrity? cement, mortar mix, adobe? Do you think one hour per brick is too high on the time scale?  (I'm sure this can be optimized though) I've seen other bottle building projects and I'm just not very keen on using a mix with only sand plus cement since we live in an earthquake zone and that much cement in proportion would be quite expensive. I appreciate all of your input, thanks!
4 years ago

John C Daley wrote:I studied the water situation because you need a lot of it for cob or adobe.
The peninsula of Baja California in northwestern Mexico has few available water resources and is one of the most arid areas in Mexico.
The Tecate River is a sub-basin of the Tijuana River basin, a coastal watershed in Baja California adjacent to the USA-Mexico international border
that discharges into the Pacific Ocean (Figure 1). In 2000, the groundwater resources provided about thirty percent of Tecate’s potable water supply [1],
decreasing to only twenty percent in 2015 [2]. In addition, with the increase in population, urbanization, and industry in Tecate,
there is a concomitant increase in contaminants being introduced into the Tecate River and groundwater resources. The Tecate River,
which under natural conditions is an ephemeral stream, has become a perennial one with poor water quality downstream of the discharges.

I am worried it may be a big issue for you.


Thank you for researching and worrying about us! I'm truly grateful for your effort, fortunately we are all the way in the bottom left part of the municipality of tecate, at least a 40 -50 minute drive away from the main city. We have a well here and it's fed by the Las Palmas aquifer, while not as stressed as the sources in the city of Tecate that you mentioned and Ensenada, it still presents a challenge. We are thinking of doing some good earthworks, rainwater collection and planting a lot of native species to retain as much water as possible in the landscape and local aquifers. I'm gona give atmospheric water collection a shot in several experiments such as stone mulch around trees, dew collection on flat panels and a rather interesting method I learned in a scientific article that consists of a transparent glass pyramid that contains a water retaining solid that expels the liquid contained inside after it is heated up. Here's a link to a really good review on sustainable methods for atmospheric water collection. These will be mostly for personal consumption and crop use but the well has provided enough water for a few other cob structures that have already been built.

Review of sustainable methods for atmospheric water harvesting


4 years ago

Rufus Laggren wrote:I have lived in Chicago, St. Louis  and visited Charleston for a couple weeks. I have traveled extensively through the desert in temps of 100F. and more.

Charleston was the hardest with temps around 90-95F. and humidity over 90%.

Chicago was fairly livable with temps below about 98F. - depending on humidity. Desert travel in temps below about 105F AND in shade was not too much of a problem provided one had enough water - I usually drank more than a gallon a day and did not pee much.

What I'm saying is that for for _light_ activity in dry climate in "hard" shade (shade that does not re-radiate heat onto you) 105F. is not much of a problem. I did not make a habit of heavy labor in those conditions, though.  Depending on your own personal experience and proclivities, you _may_ be good with "105F. in the shade".

The next thought is not about your rock.  (GREAT rock, BYW!)  I have experienced noticeable improvement in hot weather comfort when I can use a double layer of shade.  In desert, my first, second and 3rd thought is SHADE. 1b,2b,3b is convective (moving air) between the primary shade and whatever makes a second ceiling for the personal space.  The thing is, just putting up a sun barrier doesn't get you the huge benefit because the barrier material gets hot and the lower surface of it radiates DOWN and what is "down"  there? You! To realize good shade, the lower surface of that shade needs to remain below about 80F. This is so it doesn't want so much to act like that fancy radiant heating people put into their walls and floors - to keep them warm! When erecting shade, one wants to try to arrange that the side toward you doesn't get too warm and _that_ may mean some kind of natural convective air flow across the bottom of your shade. No matter what makes up your shade.

I have done this semi-successfully with thick light colored canvas tarp over a smaller tent and eating area. The small tent (well ventilated) was actually cooler than the eating area even though it had somewhat less air flow. Inside the small ten there were two layers of shade between me and the sun and (this is the biggee) the small tent material was actually a comfy 85F. while the bottom of the primary shade tarp was easily over 100F. The primary shade tarp was still  passing heat, it was just radiating in the infra-red instead of bright visible spectrum+UV from the sun (which it was protecting us from).

So. When creating shade, keep an eye for ways to help get rid of the heat added to the shade material itself. And plan on a second layer of shade to protect you if the primary layer is going to get hot. I think  the Aussie's have something called a "summer roof" which is a top layer of tin or something that stops the sun which they install about 6" above the weather roof of their homes. The air space is open around edge and helps cool the "summer roof" to reduce it's radiation down onto their weather roof. It also prevents any heat transfer by conduction.

Or, natures way is with a few big trees in the right place to shade your home. Might be worth the years of water angst and sacrifice to see if  you can deep irrigate some big shade trees and get them rooted good enough to survive the real world.

But that rock is truly inspiring. You have found  "Presence" for sure.


Cheers,
Rufus
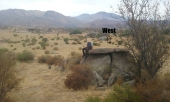


I appreciate your considerations on building shade, they'll work great for building a common area and our son's play area since he easily gets tuckered out from being exposed to the hot sun. Good point on the trees, we do have some native shrubs on the North side but placing some quick growing trees on the South end should work wonders then! We already have an acacia tree that is growing fine without any irrigation, well, very little irrigation.
4 years ago

Dustin Rhodes wrote:This guy is doing a granite integrated cob building in San Diego County; here's the most recent episode(go back into his posting history to watch each step for tips):


I just checked out the video and we're both in the chaparral so it's great to know someone else is already doing something that we envisioned in the same type of biome. I will look at the rest of them, thanks for the video!!
4 years ago

Hugo Morvan wrote:How does that work in winter anyway? When you want your house warmer then the rock. Do you need to heat the rock or can you insulate it until summer hits.
Maybe in winter you could have a room further away from the rock passively heated on the south side. A room you use less in summer time.. with a veranda that only let’s the sun in when it’s low on the horizon..


Fortunately, winters are very mild here since we rarely go below 0 C (32 f) on our coldest days but you have a good point, I would need to the rock's temperature in the wintertime.
4 years ago

John C Daley wrote: That is a fabulous rock, it may be best to use it as it is.
A cistern on top would be a distraction.
As suggested cob is a good medium to bond to the rock, although it needs more water than rammed earth would use.
Is there any clay in the area?
What will happen with water?.
Plants may be growing next to it because the rock will attract dew and thus moisture which will dribble to the ground.
I suggest it may be a better result to use it as a shelter object and leave the vegetation in place.
I live in a similar environment 45 deg C heat and dry climate.
A small thick walled home designed to exclude heat is something that works for me, with a safari shading roof over the roof and verandas for shade.
Having at least a 3 M ceiling height also helps.
If you plan it well, nothing needs to be pulled down as you extend the structure over time.
I have built a tall tower which draws air through the house, along to lines of middle eastern structures called wind towers.


Clay it is then! (cob, adobe, etc) We're actually thinking of installing an adobe dome structure and a high ceiling is a great idea! Thanks for the links, I'm trying to consider everything to get a rough idea of what would work best.
4 years ago

Eliot Mason wrote:I totally understand the impulse to use that rock as a wall.  I think its a great idea. If its really granite then you could sink some bolts into it as well and sort of use it as a foundation piece to hold the roof/walls.

A different idea is to actually build the house AROUND the rock.  I know that might be larger than you are presently considering, but it might be worth some thought.  By putting that mass inside the structure you have a huge thermal mass that you can, sort of, control. Alternately, if its used as a wall consider building a simple shade wall/roof to protect the rock from solar heating - anything you can do do keep that rock cool so it can soak up heat from inside your structure will be great.


I really dig the idea (sorry for the pun!) but for now we are building something temporary, if we really enjoy that rock, I think we can move the temporary house aside and build around it instead; thanks for thinking out of the box! (I'm a new dad so I'm getting better at these puns lol)


4 years ago