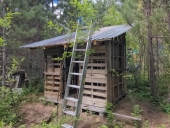
Stephen B. Thomas

pollinator
+ Follow
since Jul 05, 2017
Merit badge: bb list bbv list
Biography
Former vocational instructor, currently residing at Wheaton Labs to pursue Gertitude, build things, and grow things. I also make soap and games, watch classic movies, read anything, and ride my bicycle. DEVOlutionist. Fond of black licorice, b-horror films, metal and punk music, and cultural artifacts of dubious taste and utility. Ask, and I will send you a friendly physical letter, no matter where you are in the world.
For More
Wheaton Labs, Montana, USA
Apples and Likes
Apples
Total received
In last 30 days
51
Forums and Threads

Recent posts by Stephen B. Thomas

A couple of my go-to's:

"Great Caesar's Ghost...!"

"Son of a thousand whores...!"

"Curses! Blast and drat!"

1 day ago
I have a very-specific, but accessible to nearly everyone reading this, kind of request.

We're having problems with Rex, the Lab's excavator. It our quest in attempting to fix it, I've acknowledged that an operator's manual would be exceptionally useful.

Anyone willing to pick up a manual for us? One link appears to cost $30:

https://heavymachineryequipment.com/downloads/hitachi-ex120-owners-operators-manual/

The entire bundle is nearly 1,000 pages. Thankfully, this is an indexed PDF file that will be helpful for us to root through so long as we're working with Rex.

Anyone willing to jump in on this, you have my gratitude...! Thank you!  

Mike Haasl wrote:If I'm now correct, I think the post is the spine, the legs go up in the air and the arms reach down to the ground?


That's right. I didn't want to start off the description with, "Now, imagine someone is standing on their head, their ass pointed skyward..."

So yes: hands down on the ground, feet up in the air. To extend the description a bit more: the shelf pieces are attached to where the shins would be.

This document isn't meant to be the main descriptor tool (though I think it does all right at that). It's a supplement for "classroom discussion." And I wasn't able to fit much on a single page, including the diagrams. So there are minor details left out that are clarified in-person and once someone sees an example rock jack on-site.
Here's a reference document for those of you wanting to build junkpole fences at Basecamp. This is most helpful for Boots, obviously.

This is a slightly-different method of assembling fence sections than we've had in the past. This is primarily due to the fact that we want to keep chickens inside, and remove all the little nooks n' crannies where they could wander their way out. It'll also ensure that coyotes, should they ever come close enough to Basecamp, won't be able to wheedle their way inside to attack said chickens.

Both an image and a PDF are attached. Please post any questions about these instructions in this thread.

Anne Miller wrote:Since I have not watch that video, what do you feel Paul would recommend?


I think Paul would suggest that the trenches stay there, that woody bits be added to the "clear" side of the trench, then the dirt on the other side of the trench be moved so that it's on top of the woody bits.

It's likely your benefits would be as follows: your hugel berms end up taller and with more surface area to grow things, and the neighbours won't complain to the HOA when you have tall hills in your yard.

To save yourself some time the next time you do this, you may want to lay down woody bits on the ground where you want your hugel berms to be, then dig trenches next to them. All you would need to do in this scenario is pile the earth you're digging onto the woody bits, and your first layer/s of hugel are complete.

If you're concerned about the steep edges of the trenches next to your hugel berms, then remove more soil from the upper corner opposite the hugel, sloping it down into the trench instead of having to "hop down" into it.
1 week ago
BEL #835

I wanted to describe the concept of "planting a tree in a $100 hole." Paul explained to me that he thinks the saying had likely originated with Ruth Stout, and how you "Don't plant a $10 tree in a 10 cent hole." In other words: prep your tree area so it has the best chance to succeed. Inflation's been a bitch, so we just modified the saying a little bit.

Until I make a video about this process, then this photo-display will have to do.

Here's an example, based on what I did today. To sum it up, we have an excess of poplar trees that are springing up in an area where they aren't desired, and a decided dearth of Poop Beasts (of which the poplar species is one) in an area where we want some shade and privacy. So today's plan was to start the migration process for these baby poplars to their new home.

Step 1: dig a decent hole.
- At Basecamp, we're on a lot of rock. To give this baby tree a good chance, I made sure to dig down deeper than I thought I would need for typical conditions. I kept telling myself: "Every rock I take out means more roots for that tree." To be specific and clear, I dug a hole over 12" deep (30+cm).


I also rooted around for more rocks to remove. I'll use these later.


Step 2: retrieve your tree.
- There's a funny story about these poplars. For those of you familiar with Basecamp, we needed to drain water away from a back corner of the Classroom. We dug a shallow drainage ditch along the berm that faces the county road. It's maybe 25 feet long or so. We ended up exposing the roots of the large poplar nearby, and thought nothing of it. Fast forward a couple years, and now we have baby poplars sticking out of the exposed root surfaces. Said baby poplars will be moved, prior to moving the adult poplar sometime in the future.

(also pictured there: the pulaski, my favourite digging tool)


I dug the dirt out around one of these "suckers" (the official term for such a tree), and then cut the root stock with plenty of space on either side for more roots to emerge.


Here's the baby tree, ready to plant.


Step 3: fill the hole with goodies, and then plant.
- if you want to remediate soil, here's a good time to do it. In this case, we had a lot of livestock manure on hand (thanks, Samantha Lewis...!), so that was added to the bottom layer of the hole I'd dug.
- We also use organic alfalfa pellets for our typical garden beds, though overdoing it - especially with seeds and transplanted sprouts - isn't recommended. Also, not shown in these pictures is the large pile of Willow Candy not too far away from this spot. Poplars (AKA Poop Beasts) will send roots into the soil to have a generous helping of the excess nitrogen from the Candy.


I layered soil and manure in there once more, preparing the hole with more bulk and elbow room for more tree roots.


Soon the tree was added in, laying the existing root bits gently into the soil and manure I'd previously added. Another layer of soil was added to the top once the tree was back in the earth.


I think I added another layer of manure, then the rest of the soil I'd previously dug out. I used a hand tool to lightly pack the earth and manure around the base of the tree - but I didn't "stomp" down on the soil. I think that stuff ought to settle in time, but I'll keep an eye on this guy as time goes on to prevent tilting and crooked growth.

Fresh mulch is added next. We like to add a "donut of mulch" around baby trees, taking care to not pile anything up against the bark around the base of the tree. If there's excess moisture down there, it can invite mold, mildew, and fungus: things that aren't healthy for baby trees.

A donut of mulch can easily be up to 12"/30+cm in height. Just keep it away from the base of the tree.


Step 4: irrigation and water retention.
- At this step, I added a full watering can on the donut of mulch (about 3 gallons/11+ liters).
- I avoided the direct center of the tree hole, because I didn't want to "blast away" the soil I had just added.


I added rocks along the down-hill edge of the tree spot, added more water, and there you have it. The effort expended in preparing the baby tree's new bed will help give it a much better chance of survival.

We'll be adding more organic matter in a donut of mulch, then watering that mulch, as the season progresses.


If you have questions, feel free to post them in this thread. If I made any errors, I'll be sure to update this post as required.

That's all for now. Thanks for reading, and enjoy your day...!
Here's us...! Current group of Boots, and guests in May 2026.
I can only speak for the Boots at Wheaton Labs, and what we have in our pantry.

We rinse and clean off the rhubarb before drying, but I don't think we do much in the way of soaking. Same would go if we were to make jam or pie or something like that.

We might want to dunk and swirl it in some simple syrup for a minute or two to attain a sweeter candy from the dehydrator, but in general, for us there is no long-term soaking involved.
Nosherwan, is that pool/pond on your plot? Is it there year-round? Is there some way you can sculpt the land to ensure that the water doesn't find its way through that drainage culvert/tunnel under the road?

Based on the look of the land in that video, I also agree that the "greening the desert" material from Lawton will be useful for you. Finding ways to retain that water if at all possible, and then channeling it to where you want to grow food, will likely be key for your growing operations. To retain more water, you may want to add some texture to that slope that leads northeast so the soil has a chance to catch water before it runs off to your lower lands in the north northeast. Swales are common remedies and might be helpful for you.

Maybe right now you can start fortifying the soil by chopping-and-dropping plants that you don't eat into the areas where you intend to grow food.

Best of success to you...!
1 week ago

John C Daley wrote:Nynke, no I have not, I never seem to get going with any vegetable planting, which is why I thought the tower was clever.
Christopher, thank you for the surprising counter case for the towers.
For those not inclined to look up Chris's referenec [sic]
[...]
The purpose of hilling is not to stimulate production of tubers, but to protect the tubers from the environment.
Potato yield is primarily limited by foliage area, not by the amount of soil above the seed tuber.


In my experience here at Wheaton Labs, we've covered potatoes with soil and mulch of some kind to protect them, and were elated when the potato shrubs seemed to overtake the area where they were planted. With a massive potato shrub, we'll consistently have a lovely yield.

I think it's tempting to ignore the presence of foliage, coupled with the hopes that all the magic of potatoes happens underground. My take is that caring for the above-ground portions of the potato is undervalued in typical, "conventional" gardening.