Amy Clarke

+ Follow
since Jan 19, 2020
Merit badge: bb list bbv list
For More
Apples and Likes
Apples
Total received
In last 30 days
7
Forums and Threads

Recent posts by Amy Clarke

Are you trying to get her to sit, or to quit?

For sitting:

* You basically want it as similar as possible to the nest that she started sitting in. You can even leave her in the original nest for the first couple weeks of sitting, then move her to a maternity pen only when the babies are about to start to hatch.

* Ideally that means dark around the nest, with a good view out the door to see anything approaching.

* If you've got the space, it's ideal to put your broody's box somewhere where she can walk outside of it to her own food and water. That way the daily egg-sized poop can end up well away from the nest like nature intended.

* I find it helpful to size my nest boxes so each one fits a plastic dish pan, and then when it's time to move a broody before the eggs start hatching, I can pick up the entire pan with chicken, eggs, nest, and all.

For quitting:

* You want her somewhere as un-nest-like as possible -- bright light, no eggs, no shadowy corners to hide in

* I have a small fully enclosed run that shares a fence with the rest of the flock, and when I need broodies to stop I'll put them in there. No nestbox, just plants and perches up under a big porch roof. They seem to like the social contact as they get over themselves.

* A dog crate sized cage works ok, but the birds seem happier when I stop them brooding in a larger enclosure so they can walk around more
5 days ago
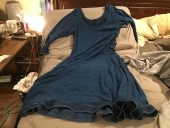
What a lovely dress!

You could take the lacing out of the sleeves by unpicking the seams that hold the loops, taking the loops out, and re-sewing them. But that won't fix it if the sleeves are too tight over all.

I think if I wanted to change this as little as possible to get a dress out the other end that meets your standards, I would start by cutting the stitching which attaches the trim to the neckline and wrists, to free up the trim pieces. I'd then cut the sleeves off to leave short sleeves at a length I found flattering on myself. I would use the trim that came off the neckline to finish the sleeves, with a bit left over.

To fix the neckline, I'd start by unpicking the seams across the tops of the shoulders back a bit from the old neckline, and any other seams that went into the old neckline as well. I would unpick all the seams on the former sleeves that I'd cut off, to get pieces of donor fabric. I would piece the donor fabric back together to fill in the neckline, being very careful to get the seams symmetrical relative to the finished garment, and lining up the grain. Then I'd add the now-large-enough bits of donor fabric in to the neck hole, not worrying about how the garment won't have a good neckline just yet. I'd then pin the heck out of it so nothing moves and carefully join the donor fabric onto the dress body, folding all the raw edges under and into the space where there's 2 layers of fabric, so no raw edges are exposed to unravel later.

Then it'd be ready for me to trace a better neckline, and probably lengthen the shoulder seams as well since the new neckline will be narrower. I'd trace the neckline off a garment that I like the fit of, preferably one made from a similar fabric. I would go for a keyhole type neckline, with a vertical slit in the front to ensure that that the finished neck fits easily over the head. The trim that came off the wrists would be perfect for finishing that neck slit. Last, I would try to get the leftover trim attached to the now-smaller neck hole, but I would be prepared for it not to want to make a tight enough curve.

Some of the former arm lacing could be moved to the neck slit if you like the look of having that part lace up.

I would personally open the back seams with the lacing and add a bunch of the sleeve lacing into them, because I like the look of densely spaced lacing (like the current sleeve situation) better than the current back setup, but that's pure preference and you might have other views.

Now, if you want to make something other than a dress... it'd make a lovely purse or bag if you take all the trim off then put it back on strategically, or a cover for anything around the home that needs a cover, or a curtain (cotton/linen will fade in the sun worse than synthetics, though it's easy to re-dye, perhaps with natural materials). If you have any old items of similar fabric weight that are getting too worn to patch, you could use the old thing as a pattern to sew a copy of it from the newer fabric.
4 weeks ago
volunteers are the best, and what a bounty of them!

I've got volunteer borage all over the place, and the kale is growing increasingly feral as I let it set seed each year. Plenty of calendula that I don't remember planting, and the strawberries that I thought I'd killed with neglect are popping up in random places that they like better than where I put them.

Soil has yet to warm up enough to tell whether last year's tomatoes and tomatillos have moved themselves in yet.
4 weeks ago
Start by observing.

Observing includes digging some holes to see what's actually going on under the soil.

Observing includes witnessing what the weather does in all seasons, and pondering the various earthworks and buildings you'd like to have later, and how they and their resulting microclimates would combine with the existing features of the land.

Observing includes paying attention to what does well and what does poorly on neighboring sites.

Worst case if you plant a tree in the wrong spot, there's a few years when you can dig it back up and move it. Lots of labor for a problem you could've prevented by waiting, but small sites and big enthusiasm can intersect like that sometimes.

Thinking in guilds is helpful to determine what species you want to establish, but once you have your wishlist, think like a nursery instead. Buy as few plants as possible -- you only need a couple of each desired cultivar. It's highly important to keep that nursery stock alive, but once you've got it happily established, you can propagate from it indefinitely and try that plant in every possible spot to see where it's happiest.

Over time you'll build up a seed bank in your soil. Let everything set seed, and spread the seeds around all over your site. That way, plants will volunteer where the conditions are right for them. In the endgame of food forest equilibrium, you only have to move plants around to suit your human notions of convenience, like shifting things out of your paths.
4 weeks ago
What a good use of free resources! And if you have a little bit of a slope on it end to end, even just an inch or two, you can probably get some rain catchment off the roof as well!

David Wieland wrote:...(which can even be insulated with foamboard such as Styrofoam).


Does ground-contact foamboard hold up ok for you? I thought the pink/purple foamboard insulation was impervious to nature and left some pieces of it leaned up against a wall with their bottom edges on the ground, and something termite-ish ended up turning it into a bunch of cool-looking tunnels and uncool purple plastic powder.
1 month ago
welcome, you're in the right place!

And what lucky kids you have, to get to pick up the skills you're building -- and the meta-skill of building skills -- through exposure!
1 month ago
Similarly, public surplus sales are fantastic and sometimes include auctions as well. Look for your nearest places on publicsurplus.com, and they might have brick-and-mortar storefronts for stuff too cheap to be worth auctioning.
1 month ago
If you love the down but not the shell, transplanting it into a new shell would be the easiest fix. It wouldn't be impossible to sew your own shell, but a good shell will have baffles between the areas where the down sits, and those are fiddly and annoying to sew correctly. Of course, if you don't care about baffles, then quilting the down between each pair of pattern pieces would be pretty straightforward even by hand or on a domestic sewing machine.

Personally I'd thrift or yard sale a nice shell that's lost its down, then vacuum all the down out of the old one and make the world's fanciest pet bed or something. Give your new shell a good wash while it's empty -- you can use much more heat and stronger soap than you would when it has down in it. Then I'd figure out how to transfer the down from old to new... I'd have to go down the youtube hole and watch other people filling down items to get a clue how to do that at home.

Rule of thumb when opening up something you'll want to reassemble later, like a new shell, is that you only ever cut the stitching threads, never the fabric itself. A seam ripper is the correct tool for this job; tiny scissors also work.

If you're reusing the down into something quilted, I'd strongly recommend considering a flat-lining approach -- cut the lining and outer for each pattern piece, sew them together right-sides-out right along where you'll later put the seams to assemble the garment, put the down in, close the hole you put the down in through, fluff it to distribute the down evenly (like the world's flattest and funniest-shaped pillow), then quilt the whole thing to keep the down in place. Then you'll basically have a bunch of little separate quilts shaped like the pieces of the coat you're trying to make, and there will be down where you need it but no down making the actual seam bulky when you assemble the final thing. If you want to get really fancy you could french seam the edges of each piece before putting the down in, but that's overkill when you could just put bias tape over the raw seam allowances after assembling the final garment, or use a serger if you have one.
1 month ago