Dian Green

gardener
+ Follow
since Jul 08, 2023
Merit badge: bb list bbv list
Forum Moderator
Dian Green currently moderates these forums:
For More
Southern Ontario, 6b
Apples and Likes
Apples
Total received
In last 30 days
17
Forums and Threads

Recent posts by Dian Green

We continue to be very impressed by how well the turmeric and ginger tea cubes are working. Her movement is significantly better. The severe bursitis in her hips is greatly reduced. Her breathing is better and she's also found that her air pressure sensitivity is almost gone. No more noticing when a storm is rolling in!

A couple of friends visited this week. They are both in their early 80's and while in generally good health, they do have some issues and aches and pains. Both tried the tea. By the second day they were both feeling better enough that they wanted their own supply.
I was able to find some organic ginger ( from Peru) and (non-organic) turmeric at the grocery store. The ginger was in good shape and needed little prep but we removed all of the turmeric skin, just in case. We ended up with around 150 grams of each, so a higher percentage of turmeric. I still had a couple more of the lemons. The big change was that I pre-ground the peppercorns to a very fine grind before putting it all in the blender. It produced almost exactly the same amount of paste and they got the same 250 cubes with a bit left over. Total cost was around $10 since I'm not counting the lemons.

We see how it works for them but everyone agreed the flavour of the second batch was very close to the first.
1 day ago
I have seen some basic origami using leaves. One was making little birds and the other was roses. The roses seemed pretty simple.

I also wanted to mention that you might want to grab some milkweed pods since it is the season. The fluff can be spun, or used for stuffing and you can paint and use the pods. Lots of ways to do some fairy building with those! Maybe use the seeds as coins for the fairies?
1 week ago
Hi Celeste, welcome to Permies!

I'm not fully into a build but did do a chunk of research and thinking about designs. I am hoping to do a build in the next few years.
There are so many different ways to go with the tiny houses that it is super dependent on both how you live and what you want it to do for you.
One thing I know I will do is make the bathroom a full "wet" room since that will give the most usable space and flexibility to it.
If you have any storage space available, you can save a ton of cash by putting together a list of what's needed for your roughed out design and then start checking the Habitat for Humanity ReStores. There are also crazy good deals at local house clearing auctions. Most of those are online now so it's easier to watch the ones around you. Tools, supplies, kitchen and bathroom fittings, you can see it all at those!

Looking forward to seeing what others are thinking about for their tiny home concepts.


2 weeks ago
Just wanted to report that we are surprised and pleased with the tea cubes so far. My mother has been taking one in the morning, in hot water. Nothing else has been changed since starting the teas.
( she has very severe osteo and extremely limited mobility)

Already she has been feeling a bit less pain than usual and her movement is slightly better. She had a bit of a fluid purge over the last few days and we have seen that before, when her inflammation goes down. ( typically from steroid shots) Her breathing has also noticeably improved.
As a side bonus, some long term gut discomfort has also greatly reduced. Not sure the tie in there but it was fast and is holding so far.
I'll update as the trial continues.
2 weeks ago
Thanks for the info and suggestions.
Stuff was drying out quickly so I had to move fast.
I tried to run the leaves through the shredding disk of my commercial food processor but they were too fibrous.It might have worked if I'd tried the slicer but they were tough enough they have just been frozen for the next round of stock.

As for the roots, they were ground up with: whole, deseeded lemons, pepper, apple cider vinegar,  honey and a splash of brandy. Once it was a paste, I froze it in small cubes.
I got a bit over 250 of them and one makes a small cup of tea.
So far, my mother is enjoying them!
3 weeks ago
The tea paste cubes are quite small, I think a bit under a 1/2 tsp. They give a very drinkable brew with one in a traditional sized teacup of hot water.
I got just over 250 of them from this years crop. I think that should give us a good trial run for how it helps the osteoarthritis and it should also be a good option for any sore throats or sniffly days. ( maybe with a bit more honey since I just put enough of it and the liquids to get it loose enough to grind up properly)
3 weeks ago
I took some inspiration from here to figure out how to use my ginger and turmeric harvest.
Ended up taking all the roots from them, adding a couple of organic lemons that I washed and deseeded, some peppercorns, apple cider vinegar, a bit of honey and a splash of brandy and putting them all in the food processor.
Its a commercial grade so it go them to a nice paste. I've frozen them in small cubes and my mother has already given it a try.
At least they taste good so we'll see if they help her feel better!
3 weeks ago
We are probably getting a garden frost tonight so Ive picked and cleaned up all the ginger and turmeric I've had out this summer.
From what I've read, both types of leaves are edible. They smell lovely and fragrant.

We love Asian foods so prepping for that is helpful. My mother has bad osteoarthritis and I'd like to have some easy herbal drink options for her.

What I am considering: Chop the leaves and freeze everything. Put all of the roots and leaves, along with lemons and pepper into the pressure cooker and then freeze doses of it. Grind up at the fresh roots, with lemons and pepper and freeze it in tiny cubes while chopping and freezing the leaves for cooking/teas.

Has anyone tried versions of any of these options? Any other suggestions?
Thanks!
3 weeks ago
At our former place, one of the next door neighbours had trumpet vine that was right up on their building, on our side. It was a century brick that had been altered and added on to and was a retail store.
Even with the brick, it was a constant battle. The vines would pull chunks off it and damage the window frames. ( it did shade those windows really well) They would cut it back at least yearly, just to keep it from getting at the roof.

We found runners popping up a good 20+ feet out from the main area of them. Didn't matter how much you mowed them down, they never stopped trying.

The stuff looks gorgeous and the flowers are incredible but after seeing what it does, and how hard it was to contain, let alone try and eliminate, I was very careful not to allow any of it to get any closer to our buildings.
( it's bad enough that a garden full of it and yucca was a chunk of what put us off a house we otherwise really liked when we did our last property hunt)

3 weeks ago
Homegrown microgreens can be a great way to add lots of taste and fresh nutrition to your meals, especially during the winter. Getting started can look pretty expensive and complicated, but it doesn't have to be. I'm going to share how we do them, the cheap and easy way.

For sprouting and/or microgreens, you want to use food grade seeds since they won't be treated the same way garden seed packages often are. We like peas because they are: easy to find and grow, cheap, produce big enough greens that they can be used many ways, will regrow a few times and they taste like fresh peas.
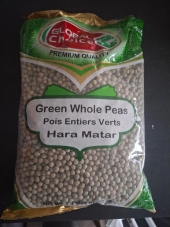
Dried peas can be used several ways in cooking so you can find bags of them at most grocery stores. We found the best deal for us was at our local Indian grocery store. The pictured 4lb bag is going for around $7 these days and we used less than a half bag over last winter. ( you can often find other sproutable seeds there at great prices too. Fenegreek is our #2 choice. I just find it a bit more complicated than peas but still very easy with great flavour)

The other supplies you will need are at least one cleaned takeout container that has a lid, ( if you can save several, that's the best option so you can have a more continuous supply) and a bag of potting soil or growing medium. I got a nice bag of organic, high porosity potting soil on sale in the fall and still had lots by the spring.

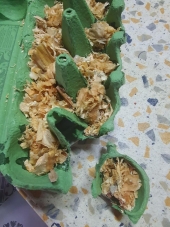
To get started you want to soak some of the dried peas in water for 12-24 hours. I go with 1/4 to 1/2 cup of dried per container and rinse the peas before making sure they are well covered in water to soak. They will plump up but still be fairly hard. The photo shows what they look like after soaking.

When the peas are ready, put a thin layer of soil in the container. At least a 1/2 inch and you don't need more than 1 inch depth. Then sprinkle the peas to cover the soil. You want to lightly water the soil so it is damp but not so wet there is loose water. Then cover with the lid.
Peas like it fairly cool to germinate so if you if you have a colder spot, you can put them there for a few days. Don't worry about getting them sun at this point.
Check on them every day or 2 and make sure the soil is still damp. They should sprout in 3-5 days.
Once they are sprouting, like the picture, you can take the lid off and move them to a sunny window. Keep giving them a bit of water every couple of days as they grow.

As soon as the sprouts are at least a few inches high, you can start clipping and eating. Clip off the sprouts at least a 1/4 inch above the seeds. ( the whole sprout is edible, including the tendrils) Peas are big enough seeds that you can often get a second or third round of growth from each batch. The later ones just won't be as large or tasty.
Once the seeds are fully used up, you can just dump them in the garden as mulch and clean the container for a new round.

If you want to have a regular supply then more containers come in handy since they let you keep starting new batches. One to 2 a week was the right amount for the 3 of us.

These greens can be used raw and plain, just as greens in sandwiches, snacked on or added to salads. They are great in soups, scrambles or stir fried too so lots or option.
Enjoy!