Jorge Mar

+ Follow
since Jan 29, 2011
Merit badge: bb list bbv list
For More
French Pyrenees
Apples and Likes
Apples
Total received
In last 30 days
0
Forums and Threads

Recent posts by Jorge Mar

Thank you Hugo, I appreciate your help...
7 years ago
Hello permies,

I'd like to share with you the project I started in March 2017 in the South West of France, near the beautiful Pyrenees. I invite you to discover it here www.jardindeslibellules.fr (in french) or https://www.jardindeslibellules.fr/en (in english).

I recently started a crowdfunding campaign to try to find funds for a multipurpose space that will make the project whole and will give green light to the activities around the garden, wether it be in the commercial aspect of the project (hosting a weekly market in the land and preparing veggie baskets) or for the community project (running workshops, preparing meals and hosting a nice little library).

https://www.kisskissbankbank.com/en/projects/jardin-des-libellules

Please, if this project speaks to you, consider supporting in any way. Any amount will be of great support and encouragement. And as I don't have social networks, sharing the campaign would also be very helpful.

Deep gratitude for considering taking part in making this big dream a reality
Jorge


7 years ago
Hi Glenn, thanks for your interest, I'm sorry I've taken so much time to answer. I'm not sure what happened to the pictures, and I felt so lazy about loading them up gain...!

The stove is doing great. To be honest it hasn't been used intensively since I don't live in the caravan, but the 10 to 20 uses have been very satisfying. It heats up to 20 degrees celsius on cold nights. The main structure hasn't suffered any decay, there's just one joint (the one with the red arrow in the photo) which has cracked and the piece of wood has moved about 5 mm, the problem being that I didn't make the joint strong enough, knowing that a caravan wall moves a little each time you open or close the door...

All in all I'm really happy with the stove, it adds a unique warm magic cave feeling in the night with the candle lights!


8 years ago
Thanks for your answer John. The cob is now competely dry, and the white vinegar plus de layers with borax have solved the mold problem, at least for the moment. My concern is that condensation could create between the cob and the caravan wall, making the straw rot and thus debilitating the cob structure in time. Time will tell...
9 years ago
Thanks Glenn and John for your nice comments, I'm happy you like the result. You are right John, the title can be confusing...

Two important things that I forgot to mention.

When I first gave the final plaster, some white mold appeared while it was drying (lack of ventilation inside the caravan, before buying the small fan) . Once it dried, y sprayed white vinegar diluted in water, let it dry and then gave another layer of plaster, but this time I added borax and casein. No mold has reappeared for the moment.

Second, and this is the thing that worries me the most, the cob being inside the caravan (with the two holes of exit and enter pipe) won't breath as a cob wall would, so I guess condensation could create in the caravan wall against the cob. In order to try to equilibrate the breathing of the cob structure, I gave two coats of linseed oil after applying the plaster layer. Plus one layer of casein mixed with borax. To my understanding, the borax and casein layer won't affect the breathability, but the two linseed oil layers should make the cob less permeable, hopefully not making it completely impermeable and thus letting it breathe the moisture that can transfer from the exterior through the two holes. Any thoughts about this?
9 years ago
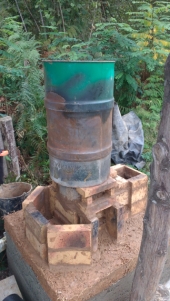
Hey everyone. I've been feeding on the forum's priceless source of inspiration and information for a long time. Today I'm happy to be able to add something interesting to it. last year I bought a piece of land in order to start a permaculture project (the goal is creating 1 hectare of food forest) and although I'm not living on the land for the moment, I bought an old caravan to have some shelter when needed. So a couple months ago I wanted to get ready for winter and started to think how I would heat the small space (4 x 2 meters). I really liked the idea of a rocket mass heater. They are so beautiful, simple, energy efficient, economic, free to run if you have wood, etc... So I was about to start building a RSMH in my caravan, but then started to realize how heavy the bench could be and the danger of running out of oxygen in the caravan or having a back-draft of carbon monoxide... I was about to turn to other alternatives such as a small woodstove or going electric with solar panels, but came out with something.


The how to...

Starting point


Water heating surface


As you can see some there are two barrels. The black one is there just to make it better looking and to hold the rockwool in place. (the combustion chamber barrel is covered with rockwool to get all the heat go inside the caravan.

It's been about two months since I got this up and running, so much more testing must be done in order to give a good review about functionality, but until now it works really great. the draft is very good, and when I use dry wood there is no smoke at all (either out of the feed tube or the exaust pipe). It heats the caravan in a very nice way, not too hot, but definitely making it warm.

The main advantages are that no matter what happens on the flow, no smoke or gases will go into the caravan (to my understanding). It is not space consuming, in fact I gained quite some space and a bookshelf.

lighting the candles at night transforms the caravan in a magic cave.


The main disadvantage is having to go outside to feed (maybe 6 steps...) but the caravan is sheltered with roof so I don't get wet if it's raining. Also, I don't really hear the roaring or see the fire lights from inside the caravan, but well...

This is an experiment, I tried taking all precautions and doing things as good as possible (with my liittle DIY experience), I hope it will last a long time, but from the beginning I've been conscious about the risk of ruining the caravan... We'll see!
9 years ago
Thanks a lot everyone for your replies


Today 15:29:08 UTC+02:00 Subject: Any thoughts on my vermicomposting system?
Redworms typically only live in upper soil levels (in the wild) because that's where the decaying organic matter is. When we make indoor or outdoor bins, heaps or windrows, the rules change.


That's what I assumed when I planned on doing such deep bins. I've already been using a dustbin of about 60 cm deep for vermicomposting and the worms did great. I just want to go much bigger now.

HOWEVER, vermicompost is great, but you'll likely never make enough to improve the tilth of even a small to medium garden.


Why would it be so difficult? I have almost unlimited food for the worms (assuming that the weeds I mentioned: fern, nettles, comfrey and horsetail, are a good feed for worms, although I know I'll have to balance with a lot of carbon rich material). I mean, lets say I have a 1 cubic meter of good stuff to be composted or vermicomposted, with a good c/n ratio, good moisture, etc. Would the outcome be a smaller amount of vermicompost than of compost? (assuming I have an adequate worm population)

Vermicast I've used is quite uniform and 'sticky'. It's amazing stuff, but it makes me wonder about it being the best majority addition to clay?


I don't know, the vermicompost I've used is quite sticky when dump, but even then I can squeeze it in my hand, and as soon as I touch it it will crumble, I had the impression it's like the lightest good soil you can achieve.

Jorge, when one section is done and you remove the vermicompost are you planning on manually sorting out the living worms in order to return them to a fresh bin?


As well as migrating upwards the worms will migrate sideways. I'd consider a 4ft by 16ft long row. Start your worm farm at one end and keep adding your scraps to the new side. Your worms will gradually migrate along the heap to the fresh food leaving their casts behind them, rather than under the fresh scraps.


The reason why I'm doing the 4 compartments like this is because that way the cycle never ends, as soon as one pile is full I can start filling the next one, and as soon as one pile is fully vermicomposted, the worms (ideally) will move to the next one. I guess my explanation about the way I'm setting the pallets was a bit poor or confusing, I'll try to take some pictures tomorrow.

Thanks again for your advice
11 years ago

S Bengi wrote:Composting worms really only live in the top 6inches of soil, 12 inches max.
So try and limit the dept to that


Thanks, that's something I hadn't thought about. Does anyone use vermicompost bins or piles higher than 12 inches with success?
11 years ago
Hi, in order to closing the loop in my new garden, I'm setting up a vermicomposting system which will hopefully allow me to build good soil in record time. I've set up a structure with 12 pallets: a 2 x 2 pallets square and then on the inside 4 pallets making a cross, so I have 4 compartments of 1 sq pallet. My idea is to have those 4 compartments always plenty, and as soon as one of them is ready, take the vermicompost out and refill with new organic matter.

This will be the main ingredients I'll feed the worms:

-compost crops I've planted or will plant (alfalfa, faba bean, maiz, sunflower and oats stalks)
-"weeds":the most used liquid fertilizers here in france are nettles, comfrey, fern and horsetail liquid fertilizers. There's plenty of the four where I live, so I'm planning on feeding those 4 "weeds" to the worms.
-cow manure (also plenty where I live)

I think that with this system and the abundant free resources I have available to feed the worms I'll be able to create a lot of vermicompost in order to build good soil quite fast (my soil now is clay, not too heavy, but heavy...).

So my questions are:

Is there any of the ingredients I'll be feeding the worms that I shouldn't or be precautious with?
Should I also make "plain" compost, or vermicompost is enough to create good soil?
I'm not sure if the pallets I've got are treated or not, would it be dangerous for the worms and microorganisms if the pallets are treated?

Thanks
11 years ago

Cris Bessette wrote:
Here is what I found on that quote:


“How can we maximize hammock time?” - Bill Mullison, author of Permaculture: A Designers’ Manual


Don't know if that quote appeared in that book or something else...

Funny thing though, I googled "permaculture hammock" and got 1.3 million search results for any combination of the two words on a page- so hammocks
and permaculture obviously go together! lol


I can't even imagine a permaculture system without a hammock, or viceversa!
11 years ago