• Post Reply Bookmark Topic Watch Topic
  • New Topic
permaculture forums growies critters building homesteading energy monies kitchen purity ungarbage community wilderness fiber arts art permaculture artisans regional education skip experiences global resources cider press projects digital market permies.com pie forums private forums all forums
this forum made possible by our volunteer staff, including ...
master stewards:
  • Nancy Reading
  • Carla Burke
  • r ranson
  • John F Dean
  • paul wheaton
  • Pearl Sutton
stewards:
  • Jay Angler
  • Liv Smith
  • Leigh Tate
master gardeners:
  • Christopher Weeks
  • Timothy Norton
gardeners:
  • thomas rubino
  • Jeremy VanGelder
  • Maieshe Ljin

New guy with a plan, help appreciated

 
Posts: 12
1
  • Likes 1
  • Mark post as helpful
  • send pies
    Number of slices to send:
    Optional 'thank-you' note:
  • Quote
  • Report post to moderator
Hi everyone! I've been researching permaculture here and there for a year, and now i want to get serious about it.

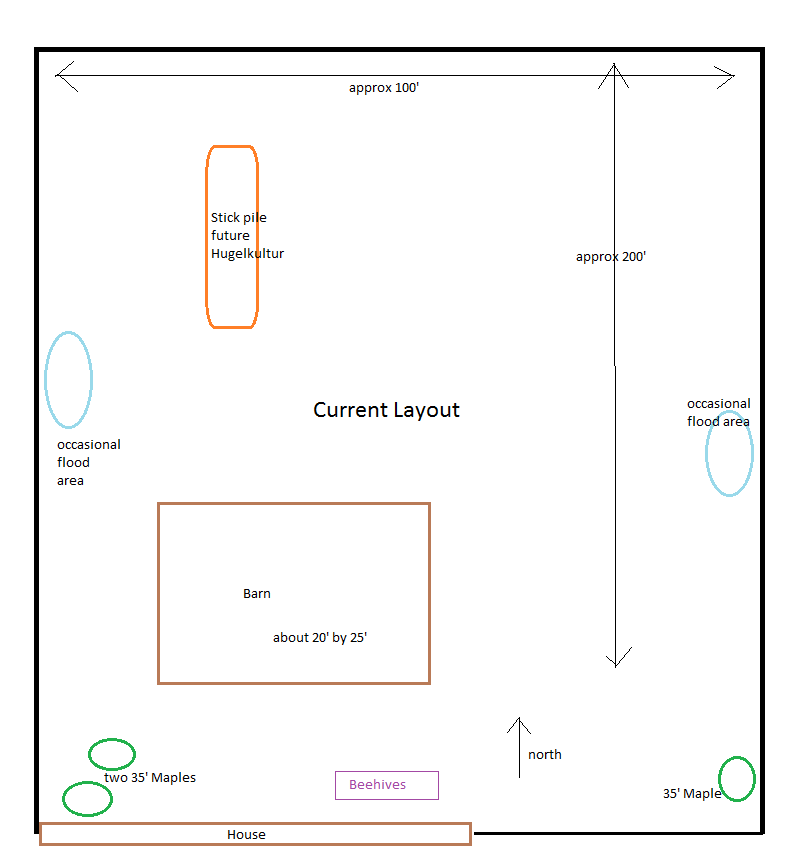
I live in Michigan on a flat 1 acre plot closed in by a metal fence. nothing has been done to it except mowing the grass every week or two. there is a lot of clay in the soil.

My idea/plan as of now:
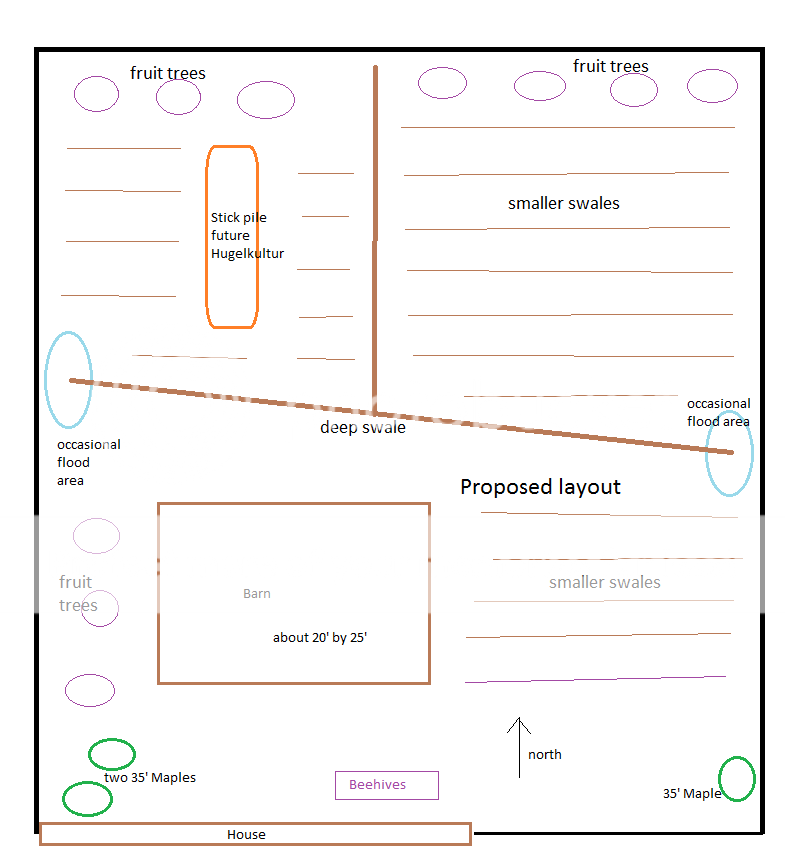
-I have two spots that will hold water for days if it rains well here. I was going to connect them with a deep swale( approx 1.5-2 feet deep), and then run that north to connect the rest of the field to it.

-Then create smaller swales (approx 1') in order to plant in. i was planning on mowing as close as i can. rototill the pathways about 6" deep to loosen the topsoil. shovel the loosened topsoil to the sides to make raised beds, then sheet mulch with newspaper and straw over top the newly formed beds.

-I was going to plant some fruit trees in the back so they don't block any of my sunlight. I'm not sure what kind yet. haven't gotten that far.

-I was going to start everything from seed, except maybe the fruit trees. Right now just vegetables, nothing exotic. I was planning on mixing all my annual seed up and and planting them together. perhaps plant the perennials close by, but by themselves.

I'm unsure about:
-should i run the raised beds/swales east-west or north-south? or a little of both? I can see the good and bad in both ways.

-start from seed or start indoors first?

-how to keep rabbits from eating everything


I really appreciate your help, and for making this forum a good community.
Patrick


pollinator
Posts: 1781
Location: Victoria BC
315
  • Mark post as helpful
  • send pies
    Number of slices to send:
    Optional 'thank-you' note:
  • Quote
  • Report post to moderator
Hi Patrick,

Congrats on taking these first steps, exciting stuff.

I like and have used the technique you mention of raised beds using the existing topsoil; no sense wasting it in the paths! If there is no slope, these are really more about raised beds/sunken paths than about swales... which makes sense for your intentions as I understand them, since swales are usually intended for trees after the first little while.

The first thing that jumps out at me is that hugel mound bisecting the nearby 'swales'. Given that you'll probably be putting the woodpile into a trench, in order to use the soil from said trench atop the wood, maybe turn it 90 degrees to fit in with the rest of the design?

Alternatively, if you want to mix in some north-south beds, this could the place to do so. I would suggest trying some of each, and if the land is so flat you can make them any shape you want. Double check for slope though.

Sun trap U-shaped swales, perhaps? The more variety, the more microclimates/niches...


How much clay are we talking? Is it possible the 'deep swale' will be more in the way of a 'slimy ditch of anaerobic suboptimalness'?


How many people are you aiming to feed? Are you looking to sell produce? It looks like you've got maybe 0.6 acres designated for swales with mostly annual production; planning I would be planting more trees along the back; staggered rows, with shorter trees and then bushes in front. I'd probably focus on the trees and the front swales in the first year; if the farther out swales get done, great! Sow them with a cover crop, mix a few other interesting seeds in, and see what happens. Don't spread yourself too thin!


Rabbits: a fence. Places I've grown at, we augment the 7'-9' deer fence with 3' of <1" wire at the bottom, with the bottom ~foot of that dug in to the ground in an 'L' shape. A dog helps, too.


Sowing/starting: I tend to start things indoors in addition to sowing some seed. Insurance, plus... I'm always impatient to start, and that lets me plant something earlier in the season. The headstart can be very helpful for some crops.
 
Patrick McGuinness
Posts: 12
1
  • Mark post as helpful
  • send pies
    Number of slices to send:
    Optional 'thank-you' note:
  • Quote
  • Report post to moderator
Hi Dillon, thanks for the reply

I'm doing a soil test today, i'll let you know the results tomorrow.

I'm only feeding myself, and maybe 3-4 family members if they want certain things. so probably even a haphazard attempt could do that on this much space. But I would like to sell my harvest and maybe even support myself financially one day with it.

the stick pile just formed from me picking up fallen branches in the spring from the 3 large maples i have. the north-south orientation wasn't planned. even though it bisects the land, i might leave it and see how it works. But that's an idea though, to bury it and have a "mound" that way. thanks.

I feel better about this because no one has responded with "that's crazy", yet. thanks
 
D Nikolls
pollinator
Posts: 1781
Location: Victoria BC
315
  • Mark post as helpful
  • send pies
    Number of slices to send:
    Optional 'thank-you' note:
  • Quote
  • Report post to moderator
Definitely not crazy! Pace yourself though, better to finish a portion and have time left to observe and fine tune, than to get every part 75% done and wear yourself out!

I really like trees, so I'd be starting with those. Some, especially if you include nuts, take quite a while to get going. Starting first with things that can be propagated from would let you experiment with propagation, and the corresponding savings/possible income source, that much sooner.

I'd also target the closest 1/3rd of the raised beds... and then work out from there. Your priorities will probably differ!

Do the bees need to be that close to the house? Not sure how often you expect to be visiting them. Keeping the 'zones' concept in mind is something I consider really important, and it's a pain to try and fix that stuff later!
 
Patrick McGuinness
Posts: 12
1
  • Mark post as helpful
  • send pies
    Number of slices to send:
    Optional 'thank-you' note:
  • Quote
  • Report post to moderator
well the soil test was a bust. not sure what i did wrong. i had a 1.5 gallon glass jar, dug a 6" diameter hole about a foot and a half deep put it in the jar with about a tablespoon of dish soap. shook it up a few times then let it sit for 30 hours and it never separated. i'll try again.

ya the bees are kind of close to the house. I'm sure the neighbors know i have them, but i'm trying not to advertise them to everyone too. and sadly, people steal hives, being closer might keep them from that.

I had thought about the zones a little, but on one acre, i could only come up with 2 zones. everyday stuff and weekly stuff. maybe in a year or two once the system progresses i'll be able to refine that a bit more.

thank you letting bounce my ideas off of you Dillon, it helps

I'll try to take pictures to show how it's coming along.

Patrick
 
Posts: 1670
Location: Fennville MI
83
  • Likes 1
  • Mark post as helpful
  • send pies
    Number of slices to send:
    Optional 'thank-you' note:
  • Quote
  • Report post to moderator
You have not mentioned putting your swales on contour, which is the usual way they are utilized in permaculture applications. What is your thinking for joining the two areas where water tends to accumulate with a swale? As to what direction to run your swales, north/south or east/west - normally that would be determined by how your contour lines run.

In terms of managing the wet areas, I would think in terms of either trying to infiltrate the water into the soil before it got to the bottom and pooled and in terms of planting things in those areas that appreciate having their feet wet.

Not sure as to why you are wanting to put paper down over newly created raised beds - it is not like you are needing to kill off a weed or grass population. I would be inclined to plant directly and then get in there with some organic material as mulch (straw, leaves, hay) but not the paper.

As already noted, depending on just how much clay in your soil, swales could serve to create excessively wet areas in new places on your property...

On the soil test - you said you added soap, but how much water did you put in? Clay can take an awfully long time to settle out, but over a couple of days you really should be seeing some layering.
 
D Nikolls
pollinator
Posts: 1781
Location: Victoria BC
315
  • Likes 1
  • Mark post as helpful
  • send pies
    Number of slices to send:
    Optional 'thank-you' note:
  • Quote
  • Report post to moderator
If you're not familiar with it already, an a-frame level could help determine contour where there is very little of it. It might only look like a completely flat site, the human eye is easily deceived...

The time to refine zones is now, while it's still easy to rearrange! It's true that some things will need more attention when young, like the fruit trees, but I bet you can find a lot more nuance in terms of frequency of visits with a little more consideration.

I can see sheet mulching with newspaper involved if you have problematic weeds in the soil or seed bank, and really want a good head start for your chosen plants; we do this with thick cardboard to help keep the cooch grass down, since it will spring back from a ~1" fragment.

Something I don't think has been mentioned yet is the swale bottoms/paths after the topsoil is moved to the beds; I would be planning on woodchips as a better path, to help infiltrate water while minimizing mud/compaction, and a possible mushroom growing opportunity.
 
Posts: 323
Location: Pittsburgh PA
18
duck forest garden fungi trees chicken woodworking
  • Mark post as helpful
  • send pies
    Number of slices to send:
    Optional 'thank-you' note:
  • Quote
  • Report post to moderator
Need details or a picture. But judging by the size, I would call the deep swales a swale, and the rest raised beds. Gimme pics
 
Patrick McGuinness
Posts: 12
1
  • Mark post as helpful
  • send pies
    Number of slices to send:
    Optional 'thank-you' note:
  • Quote
  • Report post to moderator
ya, that's probably better terminology Chad. just got a better camera, here's some pics.

each fence post is 10 feet apart. ignore the mess. my tendency to collect free wood has gotten a bit out of hand. picking that up is on my to-do list.
backyard-(1).JPG
[Thumbnail for backyard-(1).JPG]
backyard-(3).JPG
[Thumbnail for backyard-(3).JPG]
backyard-(4).JPG
[Thumbnail for backyard-(4).JPG]
 
Patrick McGuinness
Posts: 12
1
  • Likes 1
  • Mark post as helpful
  • send pies
    Number of slices to send:
    Optional 'thank-you' note:
  • Quote
  • Report post to moderator
here's a random pic of my girls flying around today
backyard-(2).JPG
bees
bees
 
Patrick McGuinness
Posts: 12
1
  • Mark post as helpful
  • send pies
    Number of slices to send:
    Optional 'thank-you' note:
  • Quote
  • Report post to moderator
sometimes they get unhappy with me, but overall pretty nice.
 
Patrick McGuinness
Posts: 12
1
  • Mark post as helpful
  • send pies
    Number of slices to send:
    Optional 'thank-you' note:
  • Quote
  • Report post to moderator
Day 1 of Doing

marked out my raised bed. 30" wide with 24" paths. no contour to speak of , so i'm just going to make these ones parallel to the barn.

rototilled the path. used my buddy's front-tine rototiller. let me tell you something about front-tines, they're horrible. I'm pretty sure the person that decided to make them thought, "lets take a machine that's unwieldy on a good day, and make it worse".

broke up sticks and laid them on the raised bed. mini-hugelkulture. it's an experiment. I could probably go denser with the sticks.

started shoveling. I worried about trying to cover a 30" row with 24" of path. worked fine. my explanation, magic. my best guess at a real explanation, formally compacted dirt is now loosened.

30 minutes into shoveling I kept wondering why time lapse video isn't capable in real life.

2.5 hours later, I was done. covered my mound with tarps temporarily. going to take half the seed out of each packet and mix them all in a bowl with a little bit of white clover seed then spread.
making-rows-(1).JPG
marked out my raised bed
making-rows-(2).JPG
rototilled the path
rototilled the path
making-rows-(3).JPG
broke up sticks and laid them on the raised bed. mini-hugelkulture.
 
Patrick McGuinness
Posts: 12
1
  • Mark post as helpful
  • send pies
    Number of slices to send:
    Optional 'thank-you' note:
  • Quote
  • Report post to moderator
Learning as I go....

here's an update. So i noticed something about my methods. I've been making rows as I stated in a previous post. once the seed is cast, i cover the ground with a layer of grass clippings, and then water in the seeds really well.

So a few days after my first row was put in, i thought the grass clippings were really matted down to the ground. So i thought if i put a layer of straw then a layer of grass clippings it wouldn't mat down so much, and would "fluff up" the mulch layer. well this actually worked against me.

in the pictures the middle two rows are nearly equal in age. only about a 2-3day difference in planting. the one on the left has straw and grass, the one on the right, just grass.

in the second photo, i even changed my method halfway through a row and you can see the difference. (i made half of that row one day, and the rest the next)

the third shows the plants underneath the grass clipping/straw layer when pulled back. the plants germinated, they just can't poke through.

my thought on why this is happening, although the grass clippings make a mat in both the straw/grass and grass methods, the grass only scenario takes up less height. so the plants poke through before their Cotyledons get very big. with the straw and grass, the grass forms a ceiling that the Cotyledons can't get through.

Lesson learned.
grass-vs-straw-(1).JPG
the middle two rows are nearly equal in age
grass-vs-straw-(2).JPG
changed my method halfway through a row and you can see the difference
grass-vs-straw-(3).JPG
plants underneath the grass clipping/straw layer when pulled back
 
Patrick McGuinness
Posts: 12
1
  • Mark post as helpful
  • send pies
    Number of slices to send:
    Optional 'thank-you' note:
  • Quote
  • Report post to moderator
Here's a drawing to illustrate my point
straw-vs-grass-example.png
a drawing to illustrate my point
 
Posts: 30
Location: Yorksire - North England
2
  • Mark post as helpful
  • send pies
    Number of slices to send:
    Optional 'thank-you' note:
  • Quote
  • Report post to moderator
Hi Patrick,

You don't seem to be getting a lot of replies. What you're doing looks good, and I'm finding it really interesting.

Just a few comments:

If you are anywhere near a carpet store, see if they will give you the cardboard tubes that the carpet comes on. Cut these tubes inti say 4" sections with a saw, and use them as a ring around your crops. This keeps the mulch back while they grow through, but also biodegrades down the next rainy season.

If you're on really clay-y ground, for the first few years, you soil is just going to consume the mulch. Focus on getting as much volume as you can in for as little money as you can. You look to be in at least a partly rural area - if you're in arable area, go see what spoilt crops you can get, or get hay, straw, anything. If you are in pastural area's, then manure, bedding etc will do the trick. Brewing area? Spent hops.... what ever you can get - just keep piling it on. At this point it doesn't especially matter WHAT you put on, just put on plenty. After a couple or three years you can easy off, but right now, focus on growing your sol as much as your plants.

You talked about rabbits - best thing for rabbits is to get an air rifle and shoot them. You say youre feeding yourself, and there is two good meals in a rabbit. Do your taste bids a favour and put them into a curry - amazing taste. Rabbits breed fast, and if your just feeding you, then taking the odd rabbit that makes itself visible eating your plants is sustainable and reduces your losses.

I would also think about getting in some trees. I don't know if they're available in the USA, but in the UK we can buy "bare root" trees in winter time for about $1.50, rather than the $10 or more for a tree in a pot that you would pay in spring/summer. As you have a lot of area to enclose, this is a much cheaper way of doing it.

The first thing I would think about putting in is in fast growing species of apples - like golden delicious - and especially pears (Kaffier or Oriental) Pears *LOVE* heavy clay soil. put them on what ever side the wind comes from, and put them in clumps. This will give you food, act as a wind break to improve your microclimate and boost the insects on the land as well. Your bee's will also love it. After a year or two, you then have places to plant climbers around your trees - I would consider peas, beans etc - this will boost production of the trees and also give your bee's another feast.

Steve
 
Posts: 299
Location: Oklahoma
22
  • Mark post as helpful
  • send pies
    Number of slices to send:
    Optional 'thank-you' note:
  • Quote
  • Report post to moderator
Interesting. I have some thoughts for you contrary to most of what you are doing. So I want to make sure you understand I am not being critical. But you actually have a pretty flat cleared piece of ground. So purposely adding contours with extensive ground disturbance doesn't seem wise to me.

For veggies I would go with something like this:
1)Mark off your rows and mow flush to the ground strips you want to make a bed from.
2)Paper the row with either cardboard newspaper or rolls of recycled paper.
3)Roll out a round bale of hay or straw.
4) Plant a diverse companion crop right through the mulch. I generally plant vegetables with herbs and flowers as companions.
5) Just mow between the rows instead of weeding or tilling.
6) In fall plant a winter cover crop mix. I like a tall grass mixed with a legume, like winter cereal rye mixed with winter peas.
7) In spring (after harvesting snap peas) Mow down your winter cover and shift the row over to what was path the previous year. By then the grass should have returned to the previous years beds.
Rinse and repeat every successive year.
photo-(3).JPG
Mark off your rows and mow flush to the ground strips you want to make a bed from
photo-(2).JPG
Paper the row with either cardboard newspaper or rolls of recycled paper.
Roll-out-the-mulch.jpg
roll out the mulch
roll out the mulch
 
Scott Strough
Posts: 299
Location: Oklahoma
22
  • Mark post as helpful
  • send pies
    Number of slices to send:
    Optional 'thank-you' note:
  • Quote
  • Report post to moderator
Continued:
polyculture.jpg
Polyculture row
Polyculture row
banana-pepper-and-celantro.jpg
Banana pepper and cilantro
mowing-cover-crop.jpg
[Thumbnail for mowing-cover-crop.jpg]
cover crop
 
Patrick McGuinness
Posts: 12
1
  • Mark post as helpful
  • send pies
    Number of slices to send:
    Optional 'thank-you' note:
  • Quote
  • Report post to moderator
Thanks Steve

the cardboard tube is a good idea for future planting. I've seen people use paper towel rolls for seed starting, i didn't think it would have more use after that as well. currently, i don't think it will help since i'm just casting the seed(ie throwing it on the ground), but i could work it in for future plantings.

I do have an air powered pellet rifle that i inherited. i did wonder if i would need to use it. surprisingly, there has been minimal rabbit damage so far. not sure why, but i'm going to go with it.

I wasn't too impressed with rabbit meat the few times i've had it. but, i've recently been trying brining meat. wow, is that a game changer for pork! maybe doing that to some rabbit would be good.

1.50 euros for a bare root tree? nice! do you get them at a local nursery or online? it might be worth the shipping and hassle of customs to order them from the U.S. at that price. at the local nursery by me fruit trees that are 3-5 feet (1-1.5 meters) are going for about $30-50 each (26-44 euros). I was going to go in there around Fall to see what kind of sales they might have.

I did order and receive some tree/bushes that i have been planting. blueberry, blackberry, fig and cherry. in the spring i might try to clone them through cuttings.

one thing i've learned so far is that businesses are oddly protective of their waste products. it took a lot of phone calls to find a source of newspaper, and even then i could only have a certain amount per week. the coffee places refuse to let me have coffee grounds. etc..
in the fall i am going to drive around on trash day and pick up the tree leaves people put out for pickup, and use those for mulch.
I started a worm bin, so i'll use those castings as well. I acquired 6 chickens too. once i get their chicken tractor done in the next couple days, they will be out there helping too.


Thanks for the reply Steve, I always appreciate the input
Patrick
 
Scott Strough
Posts: 299
Location: Oklahoma
22
  • Mark post as helpful
  • send pies
    Number of slices to send:
    Optional 'thank-you' note:
  • Quote
  • Report post to moderator

Patrick McGuinness wrote:I acquired 6 chickens too. once i get their chicken tractor done in the next couple days, they will be out there helping too.


If you look at the above, it is designed for a chicken tractor to be pulled on the grass between rows. Just space the rows the same width as your tractor.
 
Patrick McGuinness
Posts: 12
1
  • Likes 1
  • Mark post as helpful
  • send pies
    Number of slices to send:
    Optional 'thank-you' note:
  • Quote
  • Report post to moderator
sorry it took me a while to reply.

That does look fairly painless Scott, maybe next year i'll give that a try. digging these rows by hand is a serious pain.
You said that you plant in what was the path last year, what was your reasoning for that? to prevent over feeding in one spot (crop rotation) or something else?

the chicken tractor has been done for a week now. having one that fit in between rows probably would be nice, but this one is done now. I did put a front door in it so if i want to, i can fence off an area and let them out into it.

it measures 7 foot by 7 foot (2.1m by 2.1m). in the one side view, there are spots for 2 five gallon buckets to sit. one for food, one for water. I'm going to redesign the moving handle. that one puts too much downward pressure on the cross bars, but overall it's working pretty well. just need to make their nesting boxes to put in there. but i have until mid august to do that.

tractor-(1).JPG
the chicken tractor has been done for a week now
tractor-(2).JPG
chicken pen
chicken pen
tractor-(3).JPG
inside coop
inside coop
 
Scott Strough
Posts: 299
Location: Oklahoma
22
  • Mark post as helpful
  • send pies
    Number of slices to send:
    Optional 'thank-you' note:
  • Quote
  • Report post to moderator

Patrick McGuinness wrote:

That does look fairly painless Scott, maybe next year i'll give that a try. digging these rows by hand is a serious pain.
You said that you plant in what was the path last year, what was your reasoning for that? to prevent over feeding in one spot (crop rotation) or something else?

There are a few things going on.
1)Yes this is the crop rotation. You don't over impact the grass with too much chicken manure and you don't over impact the vegetable rows with too many crops and no fallow rest time.
2)Another part to it is maintaining the grassland biome. Yes this will suppress the grass for a season, but towards the end of the season you should see grasses making a comeback through the mulch. It shouldn't hurt your crop to have a little grass growing between plants. Just habitat for beneficials and too short generally to harm yields. Then by planting a multi species cover crop in fall containing a cool season grass, that restore the grassland biome pretty well. You could walk away from it at this point and no one could even tell you used the land to produce crops....except for maybe some fertile green strips.
3)The chicken tractor rows should be extra fertile as chicken manure has a lot of nitrogen and other nutrients. So following rotations with the mulched strips over what was previously fertilized by chickens will produce one heck of a bumper crop.
4)Whatever mulch is still left from the previous years crop rows will get scratched up by the chickens the next year, letting the grassland biome recover even faster, and potentially stopping pests from building up and overwintering under the mulch. Chickens will eat them!

Patrick McGuinness wrote:the chicken tractor has been done for a week now. having one that fit in between rows probably would be nice, but this one is done now. I did put a front door in it so if i want to, i can fence off an area and let them out into it.

it measures 7 foot by 7 foot (2.1m by 2.1m). in the one side view, there are spots for 2 five gallon buckets to sit. one for food, one for water. I'm going to redesign the moving handle. that one puts too much downward pressure on the cross bars, but overall it's working pretty well. just need to make their nesting boxes to put in there. but i have until mid august to do that.

I like your design! And even the dimensions will work! If you go with 4 foot strip mulched rows and 8 foot grassy living mulch between rows, it will be perfect and even allow a one foot path for access beside the chicken tractor! 4 foot is about the width of most giant round bales of hay. 4 foot rolls of commercial recycled paper or cardboard are pretty inexpensive too. So you could unroll the paper right in front of the hay being unrolled and prepare your beds in no time at all! Might have to trim the edges with a lawn mower but I see no problem there. This gives you a three year rotation. I think it will work! I am certainly interested in seeing your results if you decide to try it.
 
chad Christopher
Posts: 323
Location: Pittsburgh PA
18
duck forest garden fungi trees chicken woodworking
  • Mark post as helpful
  • send pies
    Number of slices to send:
    Optional 'thank-you' note:
  • Quote
  • Report post to moderator
Great job. You will learn as you go. Key principal in permaculture. But let me give you a head start, slowly shift your contours, to fairly off contour. The reason being; the water needs to move, and you are pretty flat. When water gathers, it loosens the soil, and the fine particles settle to the top. You will in the next 2 years have clay gutter swales. I recommend mulching the foot paths, and or water collecting side of the berm in such flat landscapes.
 
Patrick McGuinness
Posts: 12
1
  • Mark post as helpful
  • send pies
    Number of slices to send:
    Optional 'thank-you' note:
  • Quote
  • Report post to moderator
thanks guys. I'm a little disappointed that i haven't made more progress, but it's all a learning experience/experiment. I appreciate the help along the way.

I'm finishing up a worm bin today, then i'm going to work on a black soldier fly larvae trap later. and over the next couple months try to get more fruit trees in the ground.

but, i have to get started on other projects. fix the roof, have a garage sale, etc.

more reading and dreaming up ideas for next year.
 
Posts: 144
Location: Sacramento, CA
8
  • Mark post as helpful
  • send pies
    Number of slices to send:
    Optional 'thank-you' note:
  • Quote
  • Report post to moderator
Patrick, well done!

Two great sources for material AND help are craigslist and Meetup.com. Run ads asking for help doing permaculture and you will likely get locals who want to help for free, I have done it and it works. You can also find stables looking to give away manure. Meetup.com will have garden and permie related groups where you can find at least friends if not help and or sources of material.

Swales are tools for problems you don't really have. You don't have a shortage of water and you don't have erosion. Flat land is kinda boring but it makes moving a chicken tractor and such easy.

As you go about your plan, think about how to divide it into paddocks for animals, like sheep or goats. Install posts to mount mobile/modular fencing to and make sure that your trees and features help rather than hinder that. I am working on that myself in my moms yard so that we can have the chickens run free in sections and her yard is such a maze, going backward to do it is a major PIA!

This stuff is HARD work, trying to do the whole plot at once, especially by yourself is HARD. Creating this is a never ending process, even with permaculture, trees die, plants that should make it don't, etc. Adding work that is of dubious benefit, like swales (in your case, they rock here in California) creates a lot of extra work that could be better spent planting trees! Pace yourself so you don't burn out.

A word on figs, here in California they grow like weeds but you get heavy frosts there that would I think kill a fig. They are great trees so find out how they protect them where you are at.

Lastly, this is a very personal opinion but I would be working at plantings around the fenceline to hide my neighbors and create a sense of privacy. I would also want to break up the yard into areas so that you don't see all of it at once. You have to walk around and you see a different vista from different places.

Keep posting pics, you inspire others who don't have land and give some of us a chance to pontificate...lol!
 
That is a really big piece of pie for such a tiny ad:
A rocket mass heater is the most sustainable way to heat a conventional home
http://woodheat.net
reply
    Bookmark Topic Watch Topic
  • New Topic