• Post Reply Bookmark Topic Watch Topic
  • New Topic
permaculture forums growies critters building homesteading energy monies kitchen purity ungarbage community wilderness fiber arts art permaculture artisans regional education skip experiences global resources cider press projects digital market permies.com pie forums private forums all forums
this forum made possible by our volunteer staff, including ...
master stewards:
  • Carla Burke
  • Nancy Reading
  • John F Dean
  • r ranson
  • Jay Angler
  • paul wheaton
stewards:
  • Pearl Sutton
  • Leigh Tate
  • Devaka Cooray
master gardeners:
  • Christopher Weeks
  • Timothy Norton
gardeners:
  • thomas rubino
  • Matt McSpadden
  • Jeremy VanGelder

RMH on Wood Floor - Soliciting Ideas and Input

 
Posts: 57
21
  • Likes 2
  • Mark post as helpful
  • send pies
    Number of slices to send:
    Optional 'thank-you' note:
  • Quote
  • Report post to moderator
I've been planning and designing a RMH to be constructed on a raised wooden floor, working with Luke Parkhurst of http://rocketstovecores.com/ and Ryan McCutchan of https://www.humboldthearthstones.com/.  I'm close to starting construction and will be posting here as that progresses.  I'm concerned about getting it right and seeking input and advice before I take the plunge.  

There are two big issues with a RMH on a raised wood floor - supporting the weight and insulating for fire safety.  

Support:  My floor is 2x6 joists on 16" center.  I've installed two extra 4x8 supports under the RHM (the photo below shows only one, I installed another later).  The bench will also span an addition sill plate and straddle another set of supports.  The bench will be approximately 18" high by 40" wide by 96" long, or 40 cubic feet.  Cob weighs about 100 LB/ cubic ft, so 4,000 LB.  Ryan McCutchan, who has installed several masonry heaters that weigh considerably more, feels this is adequate given that it is spread over a fairly large area (masonry heaters are often more weight in a smaller area). Ryan uses a 3" poured slab of reinforced concrete on wooden floors under his heaters, for additional structural support, but I'm foregoing that.  

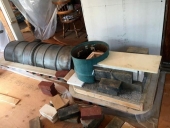
Insulation.  An earlier post on this forum by Lorne Babb shows the approach of laying durarock or hardie board on bricks to create an air space under the RMH and allow heat to disperse.  Below is a mock-up photo of a batch box heater core on this setup (I would use 1/2" rather than the 3/8 shown, possibly two layers).  Ryan McCutchan wasn't crazy about this setup, he felt there was a possibility for the durarock to sag over time.  You could play with the spacing to address this.  But the more brick the more points where heat could be conducted.  The gap creates a place for mice and dust, so you'd have to screen it off somehow.  

Another approach is to use ceramic fiber board, which is used to insulate kilns, furnaces and boilers, and withstands temps of 2600 degrees F.  This is what Luke uses to build his RMH cores.  When we trialed batch box and J-style RMH cores we measured 900 degrees plus on the interior of the flu and less than 200 on the surface of the ceramic foam board, so it's an amazing insulation.  I'm planning on going with this and using 2 layers under the heater core/ combustion chamber and one or two layers under the cob bench.  I'll cover it with 1/2 of durarock/ hardie board to protect it as it does dent and chip easily.  I plan on contacting the manufacturer about compression strength.

Of course, one could always combine the two previous approaches by laying brick, then durarock, and then ceramic foam board.  However, by then you're up to a base height of 4.75", and if you're planning on an 18" bench height, as I am, then you'd be losing 26% of your mass to the base.  

For protecting the wall I plan to use a layer of ceramic fiber board and then a layer of durarock/ hardie board and ai air gap or 2 or 3" between the wall, kinda like the photo below.

I'm open to any feedback or suggestions.  I'm especially interested in hearing from folks who have built a RMH on a raised wooden floor to hear how it went.  

Thanks!!

Mark DuPont


Foundation.jpg
On the left is a 4x8 support I added, to the right is an existing foundation for original structure (this is an addition) I added another 4x8 in between these two. Span from left to right is about 40", the width of my bench.
On the left is a 4x8 support I added, to the right is an existing foundation for original structure (this is an addition) I added another 4x8 in between these two. Span from left to right is about 40
IMG_3803.JPG
Heater core on top of durarock/ hardie board, on brick spaced to creaate air gap. I would use 1/2" rather than the 3/8" pictured, you get the idea...
Heater core on top of durarock/ hardie board, on brick spaced to creaate air gap. I would use 1/2
IMG_3805.JPG
two layers of ceramic foad board covered with durarock.
IMG_3808.JPG
1 layer of ceramic foam board with layer of durarock to create air gap between wall and RMH.
 
Rocket Scientist
Posts: 4530
Location: Upstate NY, zone 5
576
5
  • Likes 2
  • Mark post as helpful
  • send pies
    Number of slices to send:
    Optional 'thank-you' note:
  • Quote
  • Report post to moderator
You need some sort of air gap under the core. Insulation doesn't stop heat transfer, it just slows it, and if there is contact between the core base and the floor, it will get hot eventually. If the core only runs for an hour and is out for 12-24 hours, it may be fine, but on cold nights it might have to run for several hours. Heat over time (years) will slowly lower the char point of wood, so while it might not get hot enough to burn now (400+F), in the future 200F might be enough to start the floor burning.

Making an air space, even a small one, with ventilation is critical. You can break bricks in half or smaller to give less spacing between support points and avoid sagging, while not increasing the amount of contact area.
 
rocket scientist
Posts: 6355
Location: latitude 47 N.W. montana zone 6A
3209
cat pig rocket stoves
  • Likes 1
  • Mark post as helpful
  • send pies
    Number of slices to send:
    Optional 'thank-you' note:
  • Quote
  • Report post to moderator
Hi Mark;  Awesome your getting started!   You are going to be very happy this winter!

So your suggestions.   First I would like to tell you that there is quite a bit of heat that passes thru CFB, after a rocket has been burning for a few hours. The temperatures that you got during your test burn are low.  The IR temp guns are deceptive.  Inside the riser temps are 1500-1800. The external temp of the cfb would be quite a bit higher when that stove gets to really rocketing. CFB is awesome insulation, but with 1" cfb expect the external temps to go well over 200 F closer to 300 F .  Those are the temps I read on my batch box thru 1" cfb and 2.5" clay bricks.

So your mass. I think you did a great job and your floor is properly supported for the weight , no issues there.
Raising the mass on hardy board with bricks is foolproof. Plus you gain a heat radiating surface from the bottom.  
Yes you also created a great pace for dust bunnys to hide and I guess mice might hide there as well.  
No worry's about brick conducting heat to the floor. Your mass will never get very far past 100 degrees especially the further it is from the core.
Using cfb under the mass would work fine but seems expensive to me. The same holds true for the wall side of your mass. A simple cement board with airgap to the wall would be ok.
In my studio I spaced cement board 4" from the wall and simply poured loose perlite in the gap.

The place to be super concerned about high heat, is your core. It will get very hot!  Go overboard with protecting your floor and walls near the core!  
I would consider raising the core,Maybe with bricks or maybe with rock. Makes loading wood easier if it is raised. (mine is raised 18") Then transition down to your mass.

What design horizontal transition were you planning on?  I recommend a small brick box to start your horizontal run rather than the cut barrel .  Here is why, The transition area is traditionally a problem spot for restriction.  By using a brick box you have doubled or tripled the space and eliminated it as a restriction area.

Keep up the good work and keep us posted with plenty of pictures as you build!


Posts: 221
31
  • Mark post as helpful
  • send pies
    Number of slices to send:
    Optional 'thank-you' note:
  • Quote
  • Report post to moderator
I've seen pics of charred flooring under similar setups and I would be grossly uncomfortable with a permanent full time use,
it seems like a small distance to fill between floor and crawlspace, could the floor be reframed and the area below the stove +6 " perimeter be supported with cinder block?
Then the "cinder box" could be filled with sand and capped with 4" concrete, or just filled with a concrete slurry.
You'd still like to have an airspace underneath to provide a thermal break and keep the majority of heat in the envelope of the building.....
 
thomas rubino
rocket scientist
Posts: 6355
Location: latitude 47 N.W. montana zone 6A
3209
cat pig rocket stoves
  • Likes 1
  • Mark post as helpful
  • send pies
    Number of slices to send:
    Optional 'thank-you' note:
  • Quote
  • Report post to moderator
Yes Bill is correct!  I have also seen photo's of charred wood floors under a mass... very scary!
The problem occur's when people forget that the heat radiates in all directions from the hot piping.  Yes heat rises but, heat wood often enough and the ignition temp lowers to the point of  charring and loss of structural integrity.
 
Mark Dumont
Posts: 57
21
  • Mark post as helpful
  • send pies
    Number of slices to send:
    Optional 'thank-you' note:
  • Quote
  • Report post to moderator
Thanks for the feedback and suggestions, very much appreciated!  You have my full attention, I’d prefer to avoid a charred floor, thank you.  I think I’ll go with both the brick-air gap and CFB under the core, and yes, I was planning on having plenty of mass (cob) under the core in order to raise it up.  As far as the bench, Thomas, it sounds like you feel bricks with and air gap is sufficient without CFB, correct?  Do you have experience with this?  Very good point that it also facilitates another radiating surface.  I’m tempted to include the CFB just to be extra safe, but this eliminates the radiating surface underneath, hmm…

As far as the clearance for the vertical surface, I was following Ryan McCutchen’s advice based on masonry heater codes, which is 8 inches of mass and a 4” air gap between the combustion.  He acknowledges that codes err on the safe side and are often more stringent than necessary.  I’ll chew on this for a while.

Thomas, you recommend a brick box to start the horizontal run to avoid restriction, can you refer me to any more info on this in the way of links, photos, plans, etc?   Can the brick box be used in conjunction with the batch box core?  Are you recommending against the horizontal half-barrel under the bench (which is what I was planning) and using stove pipe instead?  

Thanks again for the input, it’s extremely helpful.  I’ll be posting my next question soon – 55 gallon or 30 gallon barrel?  
 
thomas rubino
rocket scientist
Posts: 6355
Location: latitude 47 N.W. montana zone 6A
3209
cat pig rocket stoves
  • Likes 1
  • Mark post as helpful
  • send pies
    Number of slices to send:
    Optional 'thank-you' note:
  • Quote
  • Report post to moderator
Hi Mark;
Always good to hear other ideas, never know when a good one will come along.
I have not personally put a mass up on flat bricks. But it has been documented many times here at permies.
Vertical wall clearance) using cement board with 4" gap is plenty.  The external temperatures on the mass just don't get burning hot.  My own mass averages around 100 f.
You could fill the 4" gap with loose perlite like I did.
Anywhere near the core will need extra cfb.
I had not noticed that your plan was for a 1/2 barrel system I  assumed you were going with pipes.
With a bell system the half barrel transition will work fine. There is so much room in a bell that restriction is a non issue.

So 30 or 55 gallon barrel?   I think 55.  Being sure to get one with a removable lid.    
 
Mark Dumont
Posts: 57
21
  • Likes 1
  • Mark post as helpful
  • send pies
    Number of slices to send:
    Optional 'thank-you' note:
  • Quote
  • Report post to moderator
Thanks for the response Thomas, much appreciated.  I'm leaning towards the 55 gallon drum, but still weighing pros and cons, as expressed in a new post I just placed.  Gotta finish adding some more foundation support, get some plaster and paint up, and knock out a few walls, then I'll be ready to start the RMH.  Will be sure to post photos.  

MD
 
Posts: 18
3
  • Mark post as helpful
  • send pies
    Number of slices to send:
    Optional 'thank-you' note:
  • Quote
  • Report post to moderator

thomas rubino wrote:
Raising the mass on hardy board with bricks is foolproof. Plus you gain a heat radiating surface from the bottom.  
Yes you also created a great pace for dust bunnys to hide and I guess mice might hide there as well.  
No worry's about brick conducting heat to the floor. Your mass will never get very far past 100 degrees especially the further it is from the core.


Just to be clear, are you advocating for an air gap below the hardy board on all sections of the stove, bench bells included?
 
Attractive, successful people love this tiny ad:
Rocket Mass Heater Jamboree And Updates
https://permies.com/t/170234/Rocket-Mass-Heater-Jamboree-Updates
reply
    Bookmark Topic Watch Topic
  • New Topic