• Post Reply Bookmark Topic Watch Topic
  • New Topic
permaculture forums growies critters building homesteading energy monies kitchen purity ungarbage community wilderness fiber arts art permaculture artisans regional education skip experiences global resources cider press projects digital market permies.com pie forums private forums all forums
this forum made possible by our volunteer staff, including ...
master stewards:
  • Nancy Reading
  • Carla Burke
  • r ranson
  • John F Dean
  • paul wheaton
  • Pearl Sutton
stewards:
  • Jay Angler
  • Liv Smith
  • Leigh Tate
master gardeners:
  • Christopher Weeks
  • Timothy Norton
gardeners:
  • thomas rubino
  • Jeremy VanGelder
  • Maieshe Ljin

25x40 Hugel-Esque Buried Wood Bed Underway

 
Posts: 150
32
  • Likes 2
  • Mark post as helpful
  • send pies
    Number of slices to send:
    Optional 'thank-you' note:
  • Quote
  • Report post to moderator
In my garden area, I am installing an annual vegetable garden bed, which is roughly 25’ by 40’. This spot was cleared last year, subsoiled, and sowed in crimson clover. To date (with a tractor) I have dug out the clover laden “topsoil” (tan clay) to get down to the subsoil. I then dug out rock hard orange clay subsoil on the upper (north) side to build a berm on the lower (south) side. The intent was to create a contained area to fill with logs and refill with amended topsoil, for a hugel-esque buried wood bed.  I have attached some pictures to help illustrate my descriptions.

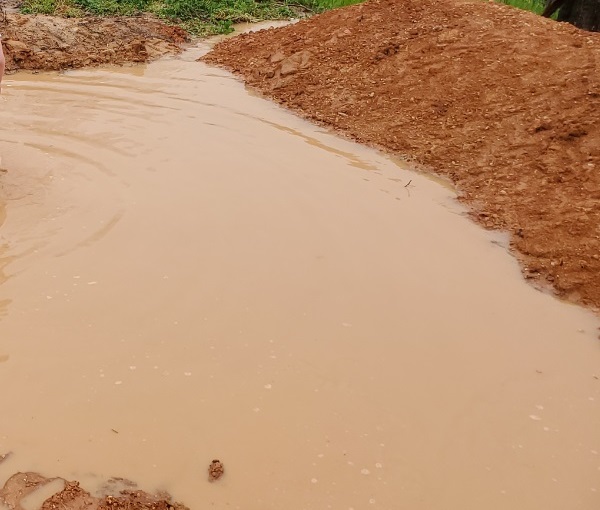
At the moment, the unfinished bed creates a bit of a “pond” on the southeast corner when it rains as it fills until it overflows. I am unsure if this will be an issue after filling with logs and dirt. I could dig down and put a drain in the lowest point, which would seem counterproductive to retaining water, but would keep the lowest area from becoming waterlogged. Note I have drained the water back out to date using a water hose siphon, the hard orange clay does not drain on its own. Once full, the soil height of the bed would be well over the height where the water would overflow. I am torn on whether this is an issue.

After digging, I have also begun putting semi-rotting logs into the hole. The plan is to fill the whole bed with one layer of large (mainly 12+”) logs, cover with some of my worse looking topsoil lightly amended which would be packed between the logs, followed by some of the better-looking topsoil more heavily amended on top of that as the final planting surface. My hope is to finish most of that work this coming weekend. I have some seeds just now started in my windowsill (Zone 7A) waiting for the bed to be finished, and the frost dates to pass.

Any suggestions on drainage or any other feedback would be greatly appreciated.
Buried-Wood-Bed-1.jpg
Topsoil Removed
Topsoil Removed
Buried-Wood-Bed-2.jpg
Piles of Topsoil
Piles of Topsoil
Buried-Wood-Bed-3.jpg
Empty Bed
Empty Bed
Buried-Wood-Bed-4.jpg
Water Filled Corner
Water Filled Corner
Buried-Wood-Bed-5.jpg
Water Filled Corner
Water Filled Corner
Buried-Wood-Bed-6.jpg
Logs in Bed
Logs in Bed
Buried-Wood-Bed-7.jpg
Logs in Bed
Logs in Bed
 
John Young
Posts: 150
32
  • Likes 1
  • Mark post as helpful
  • send pies
    Number of slices to send:
    Optional 'thank-you' note:
  • Quote
  • Report post to moderator
I got a few pictures of the bed after a recent rain. Only the bottom corner ends up with standing water, I am not sure but I don't think it will be an issue as the soil level will be much higher than the level that the water stands at. I can always dig it out later if it becomes an issue.

I plan to finish this bed over this weekend if at all possible. I started some seeds 5 days ago inside in the windowsill, the okra and tomatoes have started to poke through. Good motivation to get the bed done, other than we are getting a frost tonight and it is about two weeks till our average last frost date.
Buried-Wood-Bed-8.jpg
[Thumbnail for Buried-Wood-Bed-8.jpg]
Buried-Wood-Bed-9.jpg
[Thumbnail for Buried-Wood-Bed-9.jpg]
Sprouting-Tomatoes-and-Okra.jpg
[Thumbnail for Sprouting-Tomatoes-and-Okra.jpg]
 
John Young
Posts: 150
32
  • Likes 1
  • Mark post as helpful
  • send pies
    Number of slices to send:
    Optional 'thank-you' note:
  • Quote
  • Report post to moderator
I was able to get all the logs loaded into the garden bed yesterday, for one layer of large logs across the whole bed. I took some of the "topsoil" I had piled and began to cover them up. Used a rake and shovel to push the dirt between the logs, and once they had dirt around them carefully drove the tractor across them to help the dirt pack in. Then I ran a sprinkler on the surface to wet the soil, and used my rubber boots to pack the dirt further between the logs. If I had to do it over again, I would have cut some medium sized branches as spacers to hold the logs slightly further apart so that the dirt could pack between them easier. My basic plan is to continue to get the dirt packed and settled between the logs, and then to put all my better topsoil/compost/amendment pile on top. So the less good dirt would be packed between the logs, and the better dirt would be the top layer to plant in.
Buried-Wood-Bed-A0.jpg
[Thumbnail for Buried-Wood-Bed-A0.jpg]
Buried-Wood-Bed-A1.jpg
[Thumbnail for Buried-Wood-Bed-A1.jpg]
Buried-Wood-Bed-A2.jpg
[Thumbnail for Buried-Wood-Bed-A2.jpg]
Buried-Wood-Bed-A3.jpg
[Thumbnail for Buried-Wood-Bed-A3.jpg]
 
John Young
Posts: 150
32
  • Likes 2
  • Mark post as helpful
  • send pies
    Number of slices to send:
    Optional 'thank-you' note:
  • Quote
  • Report post to moderator
So I have finished the bed today. After letting the first round of topsoil settle between the logs, I added some heavily amended topsoil on top of the whole area. I initially packed the soil down to allow me to assess the soil level and elevations, spread the soil out, and easily do my layout.  So basically there is between six inches and a foot of soil on top of the logs depending on the spot, and the log layer is a foot or two deep everywhere.

I did my layout with four foot wide beds and two foot wide paths between them, which allowed me to comfortably fit 6 beds within the 40’ wide space. I ran the beds to about a foot from the edge, so about 22’ long in the 24’ long space.  I dug out some of the higher places in the paths to get them reasonably level and smooth, and put the displaced dirt on the beds. Once I finished the layout and the flattening, I used my tractor and 4’ wide tiller to till the garden beds (one last time) before planting, which wouldn’t have been necessary except I had previously compacted the dirt during filling. The tractor tires stay in the "path" because they are wider than the tiller.

Once I finished that, I did mixed plantings of annual vegetables in the six wide  beds. The beds got vine plants (squash, zucchini, butternut, cucumber, watermelon, pumpkin) to the south (to expand out), next tomatoes or peppers, and remaining large plants (Corn, okra, potatoes, peas, beans, popcorn) to the north. All of the beds got smaller plants mixed in along the sides, such as carrots, lettuce, celery, cilantro, and onions. The plants that were recommended for such had been started inside, the reminder were direct seeded.  

Thus far, I am happy with the end result. Probably a few smaller things I would have done differently with hindsight, but I am hopeful the garden works well this year.
B0.jpg
[Thumbnail for B0.jpg]
B1.jpg
[Thumbnail for B1.jpg]
B2.jpg
[Thumbnail for B2.jpg]
b3.jpg
[Thumbnail for b3.jpg]
b4.jpg
[Thumbnail for b4.jpg]
 
John Young
Posts: 150
32
  • Likes 2
  • Mark post as helpful
  • send pies
    Number of slices to send:
    Optional 'thank-you' note:
  • Quote
  • Report post to moderator
I was able to spread some wood chips on the paths between my garden beds. I hope this holds in some extra moisture and helps improve the soil.

I apparently didn't compress the soil mix enough and/or used too much perlite when I made my seed starting mix. When I transplanted my started plants the soil fell apart a bit during the process. I ended up reseeding several of the small plants that were not looking so hot after transplanting.
Buried-Wood-Bed-C1.jpg
[Thumbnail for Buried-Wood-Bed-C1.jpg]
Buried-Wood-Bed-C2.jpg
[Thumbnail for Buried-Wood-Bed-C2.jpg]
 
Posts: 9
Location: Illinois
5
4
goat chicken
  • Likes 1
  • Mark post as helpful
  • send pies
    Number of slices to send:
    Optional 'thank-you' note:
  • Quote
  • Report post to moderator
This looks like a very nice garden, thank you for all the pictures. You certainly put a lot of work into it! How has it turned out so far?
 
Posts: 57
Location: Vancouver Island
17
7
  • Mark post as helpful
  • send pies
    Number of slices to send:
    Optional 'thank-you' note:
  • Quote
  • Report post to moderator
How did your garden grow last year? Have you needed to change anything? I have a low lying, dampish spot which I wish to build up by a couple of feet to then use for conventional beds and I am considering starting in a similar way. Like a hugelkulture bed without the hugel. I have a shortage of really nice soil and plenty of poorer soil so would incorporate lots of organic stuff as I go, a bit like a lasagne bed. Time to do it is now!
 
As if that wasn't enough, a dog then peed on the tiny ad.
Free Heat movie
https://freeheat.info
reply
    Bookmark Topic Watch Topic
  • New Topic