• Post Reply Bookmark Topic Watch Topic
  • New Topic
permaculture forums growies critters building homesteading energy monies kitchen purity ungarbage community wilderness fiber arts art permaculture artisans regional education skip experiences global resources cider press projects digital market permies.com pie forums private forums all forums
this forum made possible by our volunteer staff, including ...
master stewards:
  • Nancy Reading
  • Carla Burke
  • r ranson
  • John F Dean
  • paul wheaton
  • Pearl Sutton
stewards:
  • Jay Angler
  • Liv Smith
  • Leigh Tate
master gardeners:
  • Christopher Weeks
  • Timothy Norton
gardeners:
  • thomas rubino
  • Jeremy VanGelder
  • Maieshe Ljin

batch box conversion - 2 questions about port and secondary air supply

 
Posts: 29
6
  • Mark post as helpful
  • send pies
    Number of slices to send:
    Optional 'thank-you' note:
  • Quote
  • Report post to moderator
Howdy friends,

I've had a 6 inch  J-tube RMH functioning well for two winters - but am ready to upgrade to a batch box.

1) Peter van den Berg's specs from Erica and Ernie's book, say the port depth should be two inches - I am wondering if 2.5 inches would work (so I don't have to trim the brick's thickness). I don't want to put the whole thing together and not have it work because of a half inch...

2) I am liking the idea of bringing the secondary air from the top (my heat riser is in the barrel, so the egress is not covered by the barrel and it just seems more elegant (and easy) to go in from above, like Peter's version pictured in Erica and Ernie's book). I am wondering if the P-tube has to be 2 3/16" x 5/8" - or if I can just find a tube that has the same cross sectional area, and open right above the Port.

I will try to find my old pictures of J-tube construction process - as well as my new construction - and how it all works.
 
gardener
Posts: 500
Location: Victor, Montana; Zone 5b
228
hugelkultur forest garden composting toilet building rocket stoves
  • Likes 1
  • Mark post as helpful
  • send pies
    Number of slices to send:
    Optional 'thank-you' note:
  • Quote
  • Report post to moderator
Hi Karl, sounds like a fun project. I'm sure others will chime in, but here is my insight.

1) the half an inch won't matter for the depth of the port. It is simply sized that way because of the thickness of the fire bricks commonly used.

2) The p channel can definitely go from the top, mine is on my 8", but it does make it more difficult to replace if the need should arise. The floor channels simply pop out and can be replaced with much more ease. (if this isn't what you meant please let us know). As for the size of the p-channel, the amount of air allowed is what matters most so any size is useable. I believe that the dimensions of 2 3/16" simply corresponds to the size of the port itself and therefore allows the maximum amount of air to be injected into the port. Other builders may have some more insight, but I don't believe it will make much of a difference. You will still want to have the p-channel overhang the port and have the port side open as described on Peter's site so that the air is inject more easily into the port.

https://batchrocket.eu/en/building#dimension
 
Karl Wilson
Posts: 29
6
  • Mark post as helpful
  • send pies
    Number of slices to send:
    Optional 'thank-you' note:
  • Quote
  • Report post to moderator
thanks Daniel!

after following that link I have another question - ha ha

they are saying the heat riser should be equivalent to system diameter (6") - on the J-tube I just took the square root of the area - 5.31" - but seems like they are saying the corners are dead air so equivalent needs to be closer to 6" square - hmmm - maybe 5 3/4"?

yeah still not sure how to do the secondary air - need to learn how to weld...

 
Daniel Ray
gardener
Posts: 500
Location: Victor, Montana; Zone 5b
228
hugelkultur forest garden composting toilet building rocket stoves
  • Likes 1
  • Mark post as helpful
  • send pies
    Number of slices to send:
    Optional 'thank-you' note:
  • Quote
  • Report post to moderator
yes, as long as you have the same area as the pipe, you will be fine. Many are using the 5 minute riser now which is not squared up, but uses the same diameter pipe. If doing a square riser, stick with the 6" diameter, it doesn't hurt to avoid any bottle neck.

As for welding, I just took my pipe to a fabrication shop and they cut and welded it to my specifications for about $15. Saved me some work that I'm not comfortable with.
 
gardener
Posts: 3471
Location: Southern alps, on the French side of the french /italian border 5000ft elevation
194
  • Likes 2
  • Mark post as helpful
  • send pies
    Number of slices to send:
    Optional 'thank-you' note:
  • Quote
  • Report post to moderator
Karl Wilson, the measurements are  quite strict.

Port width and height are not that movable. If it is the thickness of the brick, and really the depth, you're talking about 2.5/63.5mm should be all right.

For the heat riser.  Square should be considered as a round of the same width.  Boundary layer stick a lot in the corners.


https://en.wikipedia.org/wiki/Boundary_layer

Careful with doing square heat riser, as if you go too rectangular, it will not work as well.  Plus heavy firebrick has a lot of mass, and the rocket effect will not start as fast. And at the bottom of the riser, you really need to go octagonal for the ram horns to form well. Mind you, that might be not as necessary with recent developments. https://donkey32.proboards.com/thread/3710/dsr1-vortex-aspects-dsr3

Better yet. Go for a five minute riser.
https://permies.com/t/143274/Introducing-Minute-Riser

 
Karl Wilson
Posts: 29
6
  • Likes 1
  • Mark post as helpful
  • send pies
    Number of slices to send:
    Optional 'thank-you' note:
  • Quote
  • Report post to moderator
okay - two more questions - thanks Daniel and Satamax for your wisdom so far!

1) due to ease of construction and reusing my old bricks - and having to make as few cuts as possible (I am lazy) - I am wondering if I can "adjust" the fire box dimensions a tiny bit - without messing with the function...

adjust width to 8 1/2" - instead of 8 5/8" - 1/8" narrower

less important:

adjust height to 13 1/2" - instead of 12 11/16" - 9/16" taller

even less important:

adjust depth to 18" - instead of 17 1/4" - 3/4" deeper

2) I am thinking of angling the door end slightly inward and using a 1" thick piece of marble countertop as the door - held closed by gravity...

clearly that would alter the depth a little - might split the difference - 18" at bottom - maybe 17" at the top...

what do you all think?

Karl
 
Satamax Antone
gardener
Posts: 3471
Location: Southern alps, on the French side of the french /italian border 5000ft elevation
194
  • Mark post as helpful
  • send pies
    Number of slices to send:
    Optional 'thank-you' note:
  • Quote
  • Report post to moderator
No prob with the dimensions change.
 
Satamax Antone
gardener
Posts: 3471
Location: Southern alps, on the French side of the french /italian border 5000ft elevation
194
  • Mark post as helpful
  • send pies
    Number of slices to send:
    Optional 'thank-you' note:
  • Quote
  • Report post to moderator
Marble for a door is doomed i think!
 
Karl Wilson
Posts: 29
6
  • Mark post as helpful
  • send pies
    Number of slices to send:
    Optional 'thank-you' note:
  • Quote
  • Report post to moderator
I wasn't sure about the marble - seemed like a good idea - maybe I'll get a casserole cover...

you think the marble cannot take the heat? I admit I have no idea... Previously I was using it as a heat shield for the barrel at the head of my thermal mass bed...

thanks!
 
Satamax Antone
gardener
Posts: 3471
Location: Southern alps, on the French side of the french /italian border 5000ft elevation
194
  • Likes 2
  • Mark post as helpful
  • send pies
    Number of slices to send:
    Optional 'thank-you' note:
  • Quote
  • Report post to moderator
Well, i don't think marble would cope with the fast heat spikes too well.  Just find yourself an insert door. And you'll be all right. Even if it is bigger.


Karl Wilson
Posts: 29
6
  • Mark post as helpful
  • send pies
    Number of slices to send:
    Optional 'thank-you' note:
  • Quote
  • Report post to moderator
I will look for a door...

One last question (ha ha) - In my last build I used regular ceramics clay (for making pots etc) and play sand to make mortar - seems like people are saying fire clay and mason sand (?) - the last mortar seemed to work - how important is the fire clay/ mason sand?

fired up a mock-up last night - got the rams horns - fun!

thanks again

Karl
 
rocket scientist
Posts: 6320
Location: latitude 47 N.W. montana zone 6A
3191
cat pig rocket stoves
  • Likes 5
  • Mark post as helpful
  • send pies
    Number of slices to send:
    Optional 'thank-you' note:
  • Quote
  • Report post to moderator
Hi Karl;
Batchboxes run hotter than J tubes so if you can source it, fireclay would be the clay of choice.
Masonry supply houses generally carry it in stock.

For mason sand I use sakrete brand  commercial medium  sand,
Sold in #100 sacks , white in color and very uniform.
It works better and looks better than any other sand I have worked with.
Around here Home Depot sells them for $11.

Bottom line you can make due with almost any clay or sand but fireclay and the above sand make an outstanding mortar.
 
Karl Wilson
Posts: 29
6
  • Mark post as helpful
  • send pies
    Number of slices to send:
    Optional 'thank-you' note:
  • Quote
  • Report post to moderator
Sakrete-50-lb-Gray-Type-High-Heat-Mortar-Mix

would that work?

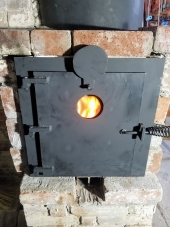
found a nice piece of steel for the door...
 
thomas rubino
rocket scientist
Posts: 6320
Location: latitude 47 N.W. montana zone 6A
3191
cat pig rocket stoves
  • Likes 1
  • Mark post as helpful
  • send pies
    Number of slices to send:
    Optional 'thank-you' note:
  • Quote
  • Report post to moderator
Hi Karl;
Interesting product.  Temp wise it would stand up in a RMH.

Here is the thing about refractory mortar.
It sets up rock solid and it will crack on the joint with the rapid temperature changes in a batchbox.
Clay can crack on joints as well but is easily reapplied with a wet finger...
Believe it or not  with proper support on the outside, dry stacking bricks works very well.

Another disadvantage to refractory is trying to clean it off to reuse a brick.
Clay mortar falls off into your bucket.  Add water and rehydrate to use again.  
In some high heat locations fireclay can turn into pottery and not rehydrate.

As soon as you are away from the core and riser, you can use regular Portland cement to build your bell if you wanted.
 
Satamax Antone
gardener
Posts: 3471
Location: Southern alps, on the French side of the french /italian border 5000ft elevation
194
  • Mark post as helpful
  • send pies
    Number of slices to send:
    Optional 'thank-you' note:
  • Quote
  • Report post to moderator

thomas rubino wrote:Hi Karl;
Interesting product.  Temp wise it would stand up in a RMH.

Here is the thing about refractory mortar.
It sets up rock solid and it will crack on the joint with the rapid temperature changes in a batchbox.
Clay can crack on joints as well but is easily reapplied with a wet finger...
Believe it or not  with proper support on the outside, dry stacking bricks works very well.

Another disadvantage to refractory is trying to clean it off to reuse a brick.
Clay mortar falls off into your bucket.  Add water and rehydrate to use again.  
In some high heat locations fireclay can turn into pottery and not rehydrate.

As soon as you are away from the core and riser, you can use regular Portland cement to build your bell if you wanted.

Then you crush it and make grog (chamote) with it.
 
Karl Wilson
Posts: 29
6
  • Mark post as helpful
  • send pies
    Number of slices to send:
    Optional 'thank-you' note:
  • Quote
  • Report post to moderator
wow - very difficult to find plain old fire clay - haven't found it yet - DANG - frustrating
 
Karl Wilson
Posts: 29
6
  • Mark post as helpful
  • send pies
    Number of slices to send:
    Optional 'thank-you' note:
  • Quote
  • Report post to moderator
while waiting for my fire clay (which hopefully really IS fire clay) I have started to consider feeding secondary air from the bottom.

I have some steel square cross-section tube - 1" OD, 7/8" ID - I was thinking I could use two of those - which is not exactly the spec - but seems to me might work...

thinking of hack sawing a 90 degree bite - and bending the remaining side to 45 degrees (possibly without welding - maybe "claying" around the bend - and simply cutting the top 45 degrees to face the port.

does that sound okay?

should the pipe go to top of port - or half way - or three quarters - or...

also how far back from the port is optimal.

the nice thing about this is that as long as I make the channel right I can still play with the design...

my back is ready for some radiant heat...

I'll take pictures once I get rolling
 
Satamax Antone
gardener
Posts: 3471
Location: Southern alps, on the French side of the french /italian border 5000ft elevation
194
  • Mark post as helpful
  • send pies
    Number of slices to send:
    Optional 'thank-you' note:
  • Quote
  • Report post to moderator

Karl Wilson wrote:
does that sound okay?

Nope, not really.

P channel is quite an important part of the design, and it is quite stringent measurement wise.
 
Karl Wilson
Posts: 29
6
  • Likes 1
  • Mark post as helpful
  • send pies
    Number of slices to send:
    Optional 'thank-you' note:
  • Quote
  • Report post to moderator
howdy friends...

well - I have heat - lots of it!

even with some small alteration of specs.

One more question - and then I will try to post my process and result in photos.

question - I am currently using brick for the door - but of course would like to lose myself in the visual experience - so I want glass - went to junk yard to find an oven door - all I found was a door to a toaster oven and a microwave - any thoughts on the durability of such? or should I keep looking...

photos as soon as my technical abilities allow...

thanks for all the help!
 
Karl Wilson
Posts: 29
6
  • Likes 5
  • Mark post as helpful
  • send pies
    Number of slices to send:
    Optional 'thank-you' note:
  • Quote
  • Report post to moderator
okay - here is the story
20211016_111701.jpg
[Thumbnail for 20211016_111701.jpg]
hole and sand and entrance to mass
20211016_112430.jpg
[Thumbnail for 20211016_112430.jpg]
flourescent light fixture
20211016_114742.jpg
[Thumbnail for 20211016_114742.jpg]
brick supports for core
20211016_143601.jpg
[Thumbnail for 20211016_143601.jpg]
filled with clay stabilized perlite (from old core)
20211018_152841.jpg
[Thumbnail for 20211018_152841.jpg]
stoat interested
20211021_160018.jpg
[Thumbnail for 20211021_160018.jpg]
first layer (and my left foot)
20211026_172812.jpg
[Thumbnail for 20211026_172812.jpg]
second layer
20211027_142626.jpg
[Thumbnail for 20211027_142626.jpg]
three
20211027_145024.jpg
[Thumbnail for 20211027_145024.jpg]
four
20211027_151121.jpg
[Thumbnail for 20211027_151121.jpg]
five
20211027_185445.jpg
[Thumbnail for 20211027_185445.jpg]
five finished
20211028_065945.jpg
[Thumbnail for 20211028_065945.jpg]
holloween
20211029_162535.jpg
[Thumbnail for 20211029_162535.jpg]
with lower barrel
20211029_170059.jpg
[Thumbnail for 20211029_170059.jpg]
cobbing in manifold
20211031_132731.jpg
[Thumbnail for 20211031_132731.jpg]
form for perlite brick
20211031_162133.jpg
[Thumbnail for 20211031_162133.jpg]
clay stabilized perlite brick
20211031_162149.jpg
[Thumbnail for 20211031_162149.jpg]
clay stabilized perlite in manifold
20211101_153559.jpg
[Thumbnail for 20211101_153559.jpg]
heat riser
20211102_150413.jpg
[Thumbnail for 20211102_150413.jpg]
first little fire
 
Posts: 126
26
  • Mark post as helpful
  • send pies
    Number of slices to send:
    Optional 'thank-you' note:
  • Quote
  • Report post to moderator

Karl Wilson wrote:while waiting for my fire clay (which hopefully really IS fire clay) I have started to consider feeding secondary air from the bottom.

I have some steel square cross-section tube - 1" OD, 7/8" ID - I was thinking I could use two of those - which is not exactly the spec - but seems to me might work...

thinking of hack sawing a 90 degree bite - and bending the remaining side to 45 degrees (possibly without welding - maybe "claying" around the bend - and simply cutting the top 45 degrees to face the port.

does that sound okay?

should the pipe go to top of port - or half way - or three quarters - or...

also how far back from the port is optimal.

the nice thing about this is that as long as I make the channel right I can still play with the design...

my back is ready for some radiant heat...

I'll take pictures once I get rolling


P channel should be a stainless steel or some high heat allow. Inwent through several and now have rvs and its Still going strong
 
Karl Wilson
Posts: 29
6
  • Mark post as helpful
  • send pies
    Number of slices to send:
    Optional 'thank-you' note:
  • Quote
  • Report post to moderator
Thanks Fraser,

I ended up using the two 7/8" ID (I think stainless) steel square tubes - cut at 45 degrees - and welded by a friend.

They are working well so far - but will of course be easy to change if necessary

In fact the whole thing is working a bit too well for a 13' yurt - so I am going to try expanding my mass.

For the last three years (with J-tube) the exhaust exit was warm to the touch - now it is hot (touchable but hot). And I sort of have an almost sauna when I have a fire.

K
 
Hey, check out my mega multi devastator cannon. It's wicked. It makes this tiny ad look weak:
Rocket Mass Heater Jamboree And Updates
https://permies.com/t/170234/Rocket-Mass-Heater-Jamboree-Updates
reply
    Bookmark Topic Watch Topic
  • New Topic