• Post Reply Bookmark Topic Watch Topic
  • New Topic
permaculture forums growies critters building homesteading energy monies kitchen purity ungarbage community wilderness fiber arts art permaculture artisans regional education skip experiences global resources cider press projects digital market permies.com pie forums private forums all forums
this forum made possible by our volunteer staff, including ...
master stewards:
  • Carla Burke
  • Nancy Reading
  • John F Dean
  • r ranson
  • Jay Angler
  • paul wheaton
stewards:
  • Pearl Sutton
  • Leigh Tate
  • Devaka Cooray
master gardeners:
  • Christopher Weeks
  • Timothy Norton
gardeners:
  • thomas rubino
  • Matt McSpadden
  • Jeremy VanGelder

Insulation materials for an existing house

 
  • Mark post as helpful
  • send pies
    Number of slices to send:
    Optional 'thank-you' note:
  • Quote
  • Report post to moderator
Hello all,

I'm a long time lurker. I've learned so much here. Thanks.

I thought I would ask if anyone has an idea/opinion on how to improve the R-factor on our existing house walls that basically have R-factor Zero? We have stucco walls with 1x10 boards, 2x4 studs then 1x10 boards then stucco again.

I'm looking for an alternative to traditional pink insulation.

I was thinking about spay foam insulation. The costs seem to be too expensive to contract it out for a small house like ours. <800 sq feet. It seems difficult to find the product, and train on the equipment to do the installation. Am I wrong?

Any other ideas?

Thanks
 
pollinator
Posts: 4025
Location: Kansas Zone 6a
284
  • Mark post as helpful
  • send pies
    Number of slices to send:
    Optional 'thank-you' note:
  • Quote
  • Report post to moderator
They make special slow-rise foam for filling existing walls--the normal stuff will blow out all the stucco!!! Yes it is expensive, but requires minimal damage to the walls to install and it is by far the most energy efficient so it will pay for itself, eventually.

The other option for existing walls is cellulose. Packing existing walls is not easy, and you have to cut several holes into each stud cavity so you have a LOT more patching to do. There are instructions online on how to do it with the rental equipment from the big box store (free if you buy the insulation from them) so it is pretty DIY affordable if you have the skills.


lorance romero
Posts: 39
2
dog tiny house solar
  • Mark post as helpful
  • send pies
    Number of slices to send:
    Optional 'thank-you' note:
  • Quote
  • Report post to moderator
Scott, thanks for the info.

I did consider cellulose - I'm going to take down the interior 1x10s and I was thinking cellulose was loose and had to be blown in so would I need to put up some sort of barrier to keep the stuff in place? If so, should I just use a plastic or maybe EPS?
 
R Scott
pollinator
Posts: 4025
Location: Kansas Zone 6a
284
  • Mark post as helpful
  • send pies
    Number of slices to send:
    Optional 'thank-you' note:
  • Quote
  • Report post to moderator
You could do poly if you want a vapor barrier, or Tyvek if you want it breathable.

Or you could look into wet sprayed, which wets down the cellulose so it sticks to the wall. Run a scraper to make it flush with the studs, vacuum up and re-use the extra in the next wall.

Or you can only take down a couple of the 1x10's, like the middle and the top, and put them back when done filling.

If you are taking down the interior 1x and plaster, the insulation can be a lot easier. But you are doing a lot of work.

There are guys that can dense-pack cellulose through holes only in the bottom of the interior wall so you can cover them with baseboard, no patching required.
 
Posts: 9002
Location: Victoria British Columbia-Canada
707
  • Mark post as helpful
  • send pies
    Number of slices to send:
    Optional 'thank-you' note:
  • Quote
  • Report post to moderator
For proper compaction, cellulose should be blown from top and bottom. Fill bottom holes first. A weight should be dropped down each hole to identify fire stops or other blockages.

If drilling through stucco from the exterior, take the time to match color and texture when patching. Here's a method that I perfected when I was 15. (My dad had an insulation company. ) On pebble dash stucco, lay out a tarp against the wall and sweep the wall with a stiff push broom. The debris that is collected will match very well when it is pushed into suitably colored mortar patches.
 
Posts: 136
Location: Winnipeg, Manitoba
1
  • Mark post as helpful
  • send pies
    Number of slices to send:
    Optional 'thank-you' note:
  • Quote
  • Report post to moderator
Where do you live and what is the climate like in your area?
 
lorance romero
Posts: 39
2
dog tiny house solar
  • Mark post as helpful
  • send pies
    Number of slices to send:
    Optional 'thank-you' note:
  • Quote
  • Report post to moderator
I live in central New Mexico. Summers are generally in the 90s and Dry
Winters are mild, compared to Canada. We rarely get below 20 F. Thanks for asking.

I learned about a product called "Ultra Touch Denim" - sounds interesting, a little better R factor, comparable in price to fiberglass, not itchy, looks like it's easy to use. Anyone use it?

I also learned about another product called Roxul, it's suppose to be a wool-like product and comparable in price, also not made of fiberglass, not itchy and easy to work with. Anyone familiar with this?

One thing I've learned that when you're talking about R factor the biggest thing is thickness of walls - the thicker your walls the more R factor potential you have. According to one chart you would need 15 inches of wall space to achieve R50. Doesn't seem very practical in a redo situation. Any thoughts?
 
R Scott
pollinator
Posts: 4025
Location: Kansas Zone 6a
284
  • Mark post as helpful
  • send pies
    Number of slices to send:
    Optional 'thank-you' note:
  • Quote
  • Report post to moderator
How to retrofit a wall to thicker R value: http://www.builditsolar.com/Projects/Conservation/MooneyWall/MooneyWall.htm

I have used denim insulation. You could use it to make a nice futon mattress, but COMFY enough to sleep on as is.

 
Sean Rauch
Posts: 136
Location: Winnipeg, Manitoba
1
  • Mark post as helpful
  • send pies
    Number of slices to send:
    Optional 'thank-you' note:
  • Quote
  • Report post to moderator
are you planning to gut the exterior walls from either the inside or the outside exposing the framing? If you are exposing the framing then I'd suggest Roxul as an ok solution but often times old framing isn't exactly consistently spaced and any batt solution wont really work all that well. the other option is an open cell spray foam which is a lower R value than the closed cell stuff but I don't think you really need the vapour control in your area. Densepack celulose is a pretty green solution that works well and can be installed without gutting the wall system. I doubt any kind of air/vapour barrier is needed where you live but I don't know your climate all that well. The final solution is finding a way to input some thermal mass into the building which can have a million solutions.

I would imagine your best bang for the buck would be to insulate the attic space, R30-40 of a loose fill blow in would probably be way more than enough, if you have vaulted ceilings you could simply add 6" of foam EPS strapped to the existing roof and cover with whatever roofing system you like, the terracotta stuff that I see down south all the time would probably work really well over EPS, metal is good too.

After you have done the basic wall and roof systems then take the time to foam in all your windows and doors, drafts are a real negative for efficiency and don't do anything to help wit comfort.
 
Posts: 554
Location: Asheville NC
8
  • Mark post as helpful
  • send pies
    Number of slices to send:
    Optional 'thank-you' note:
  • Quote
  • Report post to moderator
Yeah, while its easy to notice the thermal discomort of walls (mainly around windows from air leaks) following Seans advice about boosting attic insulation is probably lower hanging fruit. Always airseal the ceiling plane before adding insulation up there. Airsealing and adding insulation to the attic is dirt cheap compared to retrofitting walls and usually has more measurable success.

Not sure about your foundation details but there is usually more opportunity for cost-effective results by focusing on air sealing the lower and upper areas of the home compared to the walls. Not saying to ignore the walls but they should come after air sealing the foundation and airsealing/insulating the attic in a cost-effective weatherization plan.
 
lorance romero
Posts: 39
2
dog tiny house solar
  • Mark post as helpful
  • send pies
    Number of slices to send:
    Optional 'thank-you' note:
  • Quote
  • Report post to moderator
Thank you all for your input. I appreciate the point about attic insulation. However, on our house we don't have an attack -- just a small false ceiling and then roof rafters. Old school for sure.

I'm going to do more research and as I demo the place the best way to go will probably reveal itself. I'll let you know. Thanks
 
Sean Rauch
Posts: 136
Location: Winnipeg, Manitoba
1
  • Mark post as helpful
  • send pies
    Number of slices to send:
    Optional 'thank-you' note:
  • Quote
  • Report post to moderator

lorance romero wrote:Thank you all for your input. I appreciate the point about attic insulation. However, on our house we don't have an attack -- just a small false ceiling and then roof rafters. Old school for sure.

I'm going to do more research and as I demo the place the best way to go will probably reveal itself. I'll let you know. Thanks


If I could make a suggestion for your project, start out with a plan. You need to figure out what you want the end state to be and then figure out what you need to get there. If you just start gutting without a plan and a budget you can end up wasting a lot of time and money.
 
lorance romero
Posts: 39
2
dog tiny house solar
  • Mark post as helpful
  • send pies
    Number of slices to send:
    Optional 'thank-you' note:
  • Quote
  • Report post to moderator
Sean, good point about a plan.

I've banged this around my head for about a year now. I have a vision of what I want it to be in the end.

I sometimes think that the best solution would be to just tear down the whole kitchen addition and start from scratch. It seems it's easier to start over than to redo but I'm trying to get my head around the idea of dealing with what I have rather than forcing the world to my bidding. This is one of the things that draws me to permaculture.

So often in my years. 57, I've heeded the bulldozer's dance rather than paying attention to what the earth is trying to tell me. I'm trying to listen better.

That being said - a plan makes sense. Thanks for that input.
 
Posts: 69
18
8
  • Mark post as helpful
  • send pies
    Number of slices to send:
    Optional 'thank-you' note:
  • Quote
  • Report post to moderator
Here are a few things I learned from having gone through weatherizing myself, in order of importance:
1. Seal up leaks
2. Seal and insulate attic and basement/crawl space/sill plate- as Brian said, first seal the leaks, then insulate. The idea is that the house is like a chimney; it pulls air in from below (often around the sill plate) and out through the roof. Could you dense pack cellulose between the ceiling and the roof?
3. Then deal with the walls and windows.

Also, there are places that sell used foamboard insulation cheaply. We talked to people at a place called Insulation Depot who were really helpful (we didn't end up going that route). If you could put this around the outside of the house or inside the framing, it removes the thermal bridge (http://en.wikipedia.org/wiki/Thermal_bridge) which really improves the insulation value. This can also work for the basement/crawlspace walls and sill if they are flat (our basement is stone, so we had it sprayfoamed with closed cell.)

Hope this is helpful,
Anna

 
Brian Knight
Posts: 554
Location: Asheville NC
8
  • Mark post as helpful
  • send pies
    Number of slices to send:
    Optional 'thank-you' note:
  • Quote
  • Report post to moderator
I think the most cost-effective strategy for upgrading existing walls involves airsealing the gap bewtween the window jamb and framing. Removing the trim and airsealing this location would probably be a great use of resources.
 
lorance romero
Posts: 39
2
dog tiny house solar
  • Mark post as helpful
  • send pies
    Number of slices to send:
    Optional 'thank-you' note:
  • Quote
  • Report post to moderator
Howdy folks,

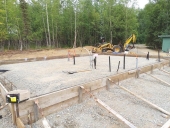
I been working all week and wanted to share with you some pics of what the house looks like after all the demolition.
HPIM1293.JPG
[Thumbnail for HPIM1293.JPG]
kitchen area before
HPIM1302.JPG
[Thumbnail for HPIM1302.JPG]
kitchen area after
 
lorance romero
Posts: 39
2
dog tiny house solar
  • Mark post as helpful
  • send pies
    Number of slices to send:
    Optional 'thank-you' note:
  • Quote
  • Report post to moderator
These houses were built with 2 - 1"x10"x7' rough boards placed back to back and then stucko on the exterior walls with no insulation. There was only one 1x10x7' board on the interior walls. Inbetween the boards were rags. Newspapers, cardboard, an even an old table cloth covered the interior walls under a very thin coat of plaster. So basically the R factor was -- Well -- not much.

Here's a better picture of the walls.
HPIM1300.JPG
[Thumbnail for HPIM1300.JPG]
kitchen walls
 
lorance romero
Posts: 39
2
dog tiny house solar
  • Mark post as helpful
  • send pies
    Number of slices to send:
    Optional 'thank-you' note:
  • Quote
  • Report post to moderator
The 2x4s in the previous picture were put in place to support the roof since I removed an interior wall since it's load barring. Here's a better pic of the wooden walls.

So thanks for the suggestions on insulating the cracks. Since this is kinda like a log cabin maybe some chinking material would be best.

Also, I have made a plan of what we are going to do. I plan on using 2x6s and just make a new wall up against the wooden planks and then I will fill with insulation. The insulation type TBD still.

Do you all find this worthwhile/entertaining? Should I continue to update/post?

Please keep the advice coming. I find it very useful.
HPIM1303.JPG
[Thumbnail for HPIM1303.JPG]
better view of wood walls
HPIM1304.JPG
[Thumbnail for HPIM1304.JPG]
Entire view
 
R Scott
pollinator
Posts: 4025
Location: Kansas Zone 6a
284
  • Mark post as helpful
  • send pies
    Number of slices to send:
    Optional 'thank-you' note:
  • Quote
  • Report post to moderator
Yup, interested.

And you don't need to spend the expense of 2x6 just to get a 6" cavity to fill. You can use 2x4s spaced out using spacer blocks at the floor and ceiling. That will remove thermal bridging from the wood, too.

 
lorance romero
Posts: 39
2
dog tiny house solar
  • Mark post as helpful
  • send pies
    Number of slices to send:
    Optional 'thank-you' note:
  • Quote
  • Report post to moderator
R. Scott, what do you mean by thermal bridging?
 
Sean Rauch
Posts: 136
Location: Winnipeg, Manitoba
1
  • Mark post as helpful
  • send pies
    Number of slices to send:
    Optional 'thank-you' note:
  • Quote
  • Report post to moderator
Depending on your goals you could simply strap the exterior with 4-6" of EPS and then cover with siding or whatever finish you choose. Probably simpler and cheaper than simply framing the outside of the walls.

What kind of temperatures do you get year round? IIRC you are in the desert?
 
R Scott
pollinator
Posts: 4025
Location: Kansas Zone 6a
284
  • Mark post as helpful
  • send pies
    Number of slices to send:
    Optional 'thank-you' note:
  • Quote
  • Report post to moderator

lorance romero wrote:R. Scott, what do you mean by thermal bridging?


Thermal bridging is when the heat is transferred by conduction through a solid frame structure. Like the metal sill plate of an exterior door gets cold so fast. If you put the studs up tight to the 1x10 they will conduct the heat and bypass the insulation.

FWIW, my neighbor had his basement sprayed and the finish was smooth enough you could paint right over it and it looked like plaster.
 
lorance romero
Posts: 39
2
dog tiny house solar
  • Mark post as helpful
  • send pies
    Number of slices to send:
    Optional 'thank-you' note:
  • Quote
  • Report post to moderator

Depending on your goals you could simply strap the exterior with 4-6" of EPS and then cover with siding or whatever finish you choose. Probably simpler and cheaper than simply framing the outside of the walls.


Sean, Sorry I didn't make it clear. On the exterior side of the 1x10s there is stucco. So I probably don't want to do anything outside.

What kind of temperatures do you get year round? IIRC you are in the desert?


This morning it was 9 degrees F. But mostly winter temps are around 32 degrees F during the winter months. 90s in the summer.

Thanks for asking.
 
lorance romero
Posts: 39
2
dog tiny house solar
  • Mark post as helpful
  • send pies
    Number of slices to send:
    Optional 'thank-you' note:
  • Quote
  • Report post to moderator

Thermal bridging is when the heat is transferred by conduction through a solid frame structure. Like the metal sill plate of an exterior door gets cold so fast. If you put the studs up tight to the 1x10 they will conduct the heat and bypass the insulation.


Sounds like thermal bridging is counterproductive to my goals.

And you don't need to spend the expense of 2x6 just to get a 6" cavity to fill. You can use 2x4s spaced out using spacer blocks at the floor and ceiling. That will remove thermal bridging from the wood, too.


You just saved me a bunch of money! I'm gonna try this.
 
Sean Rauch
Posts: 136
Location: Winnipeg, Manitoba
1
  • Mark post as helpful
  • send pies
    Number of slices to send:
    Optional 'thank-you' note:
  • Quote
  • Report post to moderator
So are you planning to add framing to the inside or outside of you walls?

If inside I would honestly just sprayfoam the 2x4 cavities as they are with a closed cell and be done, maybe add a 2x2 strapping at each stud and around the windows if you wanna reach 4" of foam, then cover with drywall.

If outside just cut off the rafter tails and wrap the whole structure in home wrap and foam or another system.

Your climate isn't really extreme, humidity isn't really an issue so I don't know how extreme you need to get r20 is prolly a good target nber for you.
 
Always respect your superiors. If you have any. - Mark Twain / tiny ad
GAMCOD 2025: 200 square feet; Zero degrees F or colder; calories cheap and easy
https://permies.com/wiki/270034/GAMCOD-square-feet-degrees-colder
reply
    Bookmark Topic Watch Topic
  • New Topic