So, this is my fifth or sixth attempt at making a
RMH. I've encountered some issues that weren't expected and I think I might have figured them out but I'd still like some folks who've done more than a handful of these to tear it down and tell me what I've done wrong. I've included some pictures for visual reference so please feel free to shoot holes all in my design. I'd rather be told that I'm wrong now then find out the hard way when I install it.
The first picture is what I was planning on using as a riser. It's a piece of refurbished flue pipe that I found just laying around and the previous owner just wanted it gone. So, I snatched it up. After doing some research, it was suggested that I use something with a rougher interior for maximum turbulence to aid in the gasification reburn. But, after watching several videos of people using stove pipe as interior lining (even the wise and famous Wisners) I wonder how necessary the texture of the lining truly is to the process. The flue pipe is about 3 1/2 feet long and 8"x8" O.D. squared. The
RMH I've featured in the majority of my photos is built with a riser opening to match this pipe but I have experimented with smaller openings on smaller, hastily built
heaters trying to decide on a finally product and size for installation. So, suggestions on riser material, height, width, etc. would be greatly appreciated.
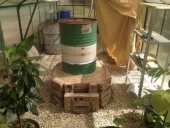
The second picture was taken to show the overall size and build of the current favorite design. The burn chamber is three bricks high (approx. 6") not including the cover bricks, four bricks long (approx. 32") and 1 1/2 bricks wide (approx. 14"). Like I said before...I've done some experimenting with size vs. draft vs. burn so on and so on and this, so far, is leading the pack. Not only because it seems to be the easiest to start, burn,
feed and keep running but, also, because it uses more of the materials I have handy with little investment into it. Feed chamber height is seven bricks laid flat high (approx. 14") and it's the same dimensions as my riser hole (approx. 8"x8" O.D.) but the
wood I am planning on using with be cut into two foot sections roughly and will mostly be seasoned cut wood busted down to appropriate size. (my son needs a summer job and conditioning for fall football...lol) One issue that I have run into is that there is some blowback from the fire back up the feed tube...no flames, just smoke. I temporarily corrected this issue by covering half of the feed tube with another brick. The smaller opening and it's placement (I covered the back half of the hole away from the burn chamber) seemed to help my draft. Why...I don't know but I suspect that the position of the cover brick is causing the incoming air to be forced down to the burning wood as opposed to be being sucked into the burn chamber from a much shallower angle. And, perhaps my draft has increased slightly because my intake hole is smaller thus causing air to move faster into the "vaccum" created by the hot air rising up the riser. I'm thinking of decreasing the height of my burn chamber by one brick (approx. 2") to force my draft to the fire. I think what might be happening is that the draft has
enough room to skate by the wood at the top of the burn chamber and not carry the smoke from the fire in the back of the feed tube with it thus allowing it to rise out of the feed tube slightly. My riser base is eleven flat bricks high from the floor (approx. 22") with my flue tube sitting on top so all in all my riser is pushing 60" if not surpassing it. That is just a guesstimation since I've not actually measured it but it's pretty close.
The third picture is that of my feed tube. Notice how all the wood is pushed directly next to the burn chamber. I found that, if I rested my wood to far from the burn chamber then once the wood burned down and dropped the draft wouldn't catch the fire or smoke and prevent it from coming back up the feed tube. Hence my temporary fix with the single brick you see sitting on the feed chute. To correct this in the near future, I'm thinking of redesigning my feed tube to make it smaller in diameter than my riser tube. Currently they are eyeball gauged to be the same size. I'm hoping with a smaller feed tube that my draft will be moving all the way to the back of the feed tube and picking up all the not-so-nice stuff there to be carried to combustion. A lot of videos on some pretty respected sites show that the wood goes in straight up and then falls down as it burns. I love this design feature but have only seen it work on the smallest of my experimentations...at least work as advertised. What I have noticed, with the exception of the Mr. Wisner's design where he is demonstrating how the draft works on a rocket, is that the wood tends to fall at an angle as it burns off at the ends. eventually, it is laying flat in the bottom of the feed tub being consumed by the fire. Once it is burned up to the back wall of the tube, my draft is no longer catching the smoke and fire and it's allowing them , both, to travel back up the tube into the space I am occupying. So, any wisdom on this issue would be greatly appreciated.
I'll post the rest of my pictures and comments in a reply to this post so please scroll down to continue reading.


![[Thumbnail for photo-(2).JPG]](/t/35262/a/16464/photo-(2).JPG "Filename: photo-(2).JPG
Description:")
![[Thumbnail for photo-(4).JPG]](/t/35262/a/16465/photo-(4).JPG "Filename: photo-(4).JPG
Description:")
![[Thumbnail for photo-(7).JPG]](/t/35262/a/16466/photo-(7).JPG "Filename: photo-(7).JPG
Description:")
![[Thumbnail for photo-(5).JPG]](/t/35262/a/16467/photo-(5).JPG "Filename: photo-(5).JPG
Description:")
![[Thumbnail for photo-(3).JPG]](/t/35262/a/16468/photo-(3).JPG "Filename: photo-(3).JPG
Description:")
![[Thumbnail for photo-(6).JPG]](/t/35262/a/16469/photo-(6).JPG "Filename: photo-(6).JPG
Description:")