• Post Reply Bookmark Topic Watch Topic
  • New Topic
permaculture forums growies critters building homesteading energy monies kitchen purity ungarbage community wilderness fiber arts art permaculture artisans regional education skip experiences global resources cider press projects digital market permies.com pie forums private forums all forums
this forum made possible by our volunteer staff, including ...
master stewards:
  • Carla Burke
  • Nancy Reading
  • John F Dean
  • r ranson
  • Jay Angler
  • paul wheaton
stewards:
  • Pearl Sutton
  • Leigh Tate
  • Devaka Cooray
master gardeners:
  • Christopher Weeks
  • Timothy Norton
gardeners:
  • thomas rubino
  • Matt McSpadden
  • Jeremy VanGelder

An outdoor hole in need of proper bearing walls

 
Posts: 5
Location: Aalborg, Denmark
  • Mark post as helpful
  • send pies
    Number of slices to send:
    Optional 'thank-you' note:
  • Quote
  • Report post to moderator
Last spring, I got this brilliant idea to curve the landscape I'm on, it was way too flattened for my taste, and as such I hurriedly dug a hole about a metre and a half deep at it's deepest point. Out of a mixture of stubbornness and curiosity, I decided that I didn't want to export anything I dug up, therefore soil that was dug up was laid around the hole, and in nearby places to form curves and small hills, with small swales having already been installed at the bottom some of the places, though not inside the hole.

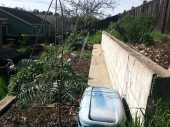
The thing is, I was highly optimistic and a bit lazy when it came to the later stages of this. I put in some stone tiles alongside the walls, yet it isn't a sustainable solution at all. You can see the actual stones I refer to in the photos listed.

The grand issue is still the walls, how do I secure their position, in order to make sure they do not erode away?

I've been thinking about big stones with clay mortar, but I think it will probably end up badly as I live in Denmark where rain is quite a common occurrence.

Another thing I've done is planted different plants with different roots alongside the walls, taproots and spreading roots in an attempt to create a naturally strong and sturdy wall as time progresses, however I didn't have enough perennial plants at my disposal through the summer for the whole thing, which is why you see a lot of White Mustard as a temporary cover.


The soil that was dug up was primarily sandy, and it is sitting on top of a huge pile of chalk.


Therefore, dear friends, what would you do in my position?

A thing I have to point out though, is that I'd very much like to refrain from using cement.

EDIT: I'm having a bit of trouble with the photos, they don't really want to be shown here despite the "[ img ]" command. Therefore, Here's a direct link to all three
 
pollinator
Posts: 11853
Location: Central Texas USA Latitude 30 Zone 8
1261
cat forest garden fish trees chicken fiber arts wood heat greening the desert
  • Likes 1
  • Mark post as helpful
  • send pies
    Number of slices to send:
    Optional 'thank-you' note:
  • Quote
  • Report post to moderator
Personally, if it were a hole of mine, I would dig it out more so that the walls are at the angle of repose.  Angle of repose is different for different soils.  Our clay soil will hold quite steep walls, but a sandy soil will need to have walls that are much less steep.

 
Kasper Jensen
Posts: 5
Location: Aalborg, Denmark
  • Mark post as helpful
  • send pies
    Number of slices to send:
    Optional 'thank-you' note:
  • Quote
  • Report post to moderator
Ah, thank you Tyler!

It may actually become a thing, when I demolish an old shack currently in the way in the coming season.
 
gardener
Posts: 5174
Location: Cincinnati, Ohio,Price Hill 45205
1011
forest garden trees urban
  • Likes 1
  • Mark post as helpful
  • send pies
    Number of slices to send:
    Optional 'thank-you' note:
  • Quote
  • Report post to moderator
I think your walls will hold just fine-with a little help.
I would drive 3' long pieces of rebar into the earth directly in  front of the stones.
That's pretty much all it should take.
Perhaps use some horizontal rebar between the stones and the vertical lengths,just to tie things together.

Nice hole, it should make for nice micro climates!
 
Rocket Scientist
Posts: 4530
Location: Upstate NY, zone 5
576
5
  • Likes 1
  • Mark post as helpful
  • send pies
    Number of slices to send:
    Optional 'thank-you' note:
  • Quote
  • Report post to moderator
I fixed your images. Nice landscaping! It should become a pleasant place for sitting.

I have a question first: are all the stone slabs the same size? Some of them appear to be buried deeper than others, if that is the case. If they are buried at least half their height, they will probably be stable. I would also lean them back a little against the bank. That will be a more long-term solution than rebar, though the rebar may work well enough.

I would agree with Tyler's suggestion to move some more earth to make the steepest slopes more gentle, in combination with the deeply set slabs.
 
Kasper Jensen
Posts: 5
Location: Aalborg, Denmark
  • Mark post as helpful
  • send pies
    Number of slices to send:
    Optional 'thank-you' note:
  • Quote
  • Report post to moderator
Thanks William and Glenn!

One things for sure, this post was a great idea. Never would I have thought about rebar without your help. Rebar would be perfect for climbers as well, which basically translates into even more food!

The stone slabs are all the same size, but as you keenly observed, they're barely buried, only about 1/8th I suppose.

Widening the whole thing in order to decrease the steepness, and burying the slabs further is definitely appealing, my internal vision of the thing just rearranged itself, and it is pleasing!

Glenn, as to the photos, were the error on my behalf, and if so, what was it?
 
steward
Posts: 1387
Location: Northwest Montana from Zone 3a to 4b (multiple properties)
216
11
hugelkultur forest garden hunting books chicken wofati
  • Likes 1
  • Mark post as helpful
  • send pies
    Number of slices to send:
    Optional 'thank-you' note:
  • Quote
  • Report post to moderator
Kasper, your original links were to the place the pictures are stored, but it was missing the picture file extension. In this case it was the ".jpg", although it could be one of the other common extensions like png, tiff or even jpeg. Glenn added those to your post for you and voila! I usually will right click my mouse on the picture and click the "copy image address" in the drop down menu that shows up. You can also directly attach from your computer up to three pictures to any post you make. Hope that helps you out.
Content minimized. Click to view
 
Kasper Jensen
Posts: 5
Location: Aalborg, Denmark
  • Mark post as helpful
  • send pies
    Number of slices to send:
    Optional 'thank-you' note:
  • Quote
  • Report post to moderator
Ah, thanks Bill. That clears up the matter perfectly.
 
Do not set lab on fire. Or this tiny ad:
GAMCOD 2025: 200 square feet; Zero degrees F or colder; calories cheap and easy
https://permies.com/wiki/270034/GAMCOD-square-feet-degrees-colder
reply
    Bookmark Topic Watch Topic
  • New Topic