The title is simple, but is a rather profound problem, creating a new field is a daunting task considering its permanency, yet doing so on a budget is not easy either. Over the last few weeks I had a lot of set-backs, but I was able to complete my field yesterday and feel confident in saying that I did it both properly, and inexpensively. For those that care, here is how I accomplished it using equipment most homesteaders and Permicultural People already have (or can easily borrow).
In my case the field was ten acres; neither a huge field, but not exactly so small that it could be easily done by hand. Formerly it was a corn field and being crop rotated back into grass. It was also experiencing some severe erosion, but that was dealt with in other ways and beyond this post.
(1) The first thing you want to do is start with a soil sample. "It is just a guess unless you test" is my mantra and since it takes a week or two to get the results back, it is best to get started on this quickly so you get the results back in time.
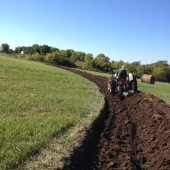
(2) The next set is to plow the sod under with a moldboard plow. I use a specific implement here because it is needed. A multiple bottom plow saves time, but honestly a single bottom plow works better. I used a single bottom plow and it took me 3 days and 15 gallons of fuel, but did a nice job. Either way, you want to go as deep as you can. You want to get more then just the sod cut, you want the dirt underneath rolled up too. I understand the concept of no-till farming, but this is field remediation or crop rotation so tilling is justified.
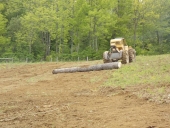
(3) After moldboard plowing, you want to get a log that is 30 feet long or so, attach a cable to each end, and then attach it to a
tractor, team of horses, or other means. The bigger the log the better. I ended up using a 24 inch diameter log 30 feet long, but even my bulldozer could not pull it. I used my skidder which shows how much power it takes to drag a log and the soil it draws, of that length. You do not need a log of that size, but it has to be that length, and here is why. A long log is what makes your field flat in plane. A shorter log will put more bumps in your field. So a 30 foot log 8 inches in diameter is better than a 8 foot log two feet in diameter at this stage in the game. The smaller the log, the more passes you will have to make, but you want the field smooth
enough to drive over with relative ease. I dragged my field twice to get the field somewhat smooth. I say somewhat because a 30 foot log is going to have a lot of "holes", that is it might cut on the ends, but not grade at all in the center, or might grade in the center, but not on the ends. Again drag a 30 foot log as big as you can pull with what you have.
(4) By this point you
should have your soil analysis back. You can choose to apply there amendments to get your soil where you want, or not. I will say that this is a good time to do it though. Since it will be "incorporated into the soil", (tilling) you can get everything you need now without smothering the grass in future years when the new field is sodded over.
(4A) I lacked a spin fertilizer spreader so I bought a used one
online for $100, but it broke!

(4b) For lime I found Mill Lime for $22.50 per ton that comes from a
local paper mill, but only came in 30 ton loads. I used that, but it tends to "cake up" so the cone spin fertilizer spreader would not work. The lime company let me rent a lime spreader for $100, and I was able to use my small 25 HP Kubota Tractor (with loader) and spread 30 tons (on two fields) in 8 hours time.
(5) For seed I was dictated by a the grant for a conservation mix which was 9 pounds of red clover to the acre, 9 pounds of timothy to the acre, and 50 pounds of oats to the acre. The red clover is for nitrogen fixation, the timothy for excellent sheep fodder, and the oats is to discourage weeds. Since my spin fertilizer spreader was broken, and in a time crunch, I built my own using stuff I already had around the house.
(5A) To build my spin spreader to get even distribution of seed, I used my tractor and trailer, mounted a 1/2 inch electric drill to its center by U-bolt, then powered it by putting a generator on back of the trailer. For a spinner I used a 5 gallon
bucket lid, cut two pieces of angle iron and bolted them to the bucket opposite hand to throw the seed, then mounted a threaded rod to tighten on the bucket lid and be chucked into the drill. To spread seed, my wife drove the tractor while I used a
coffee can to dump premixed seed into the spinner (powered by the drill). It cast only to one side but by about 16 feet. We were pleased with the coverage area, and amount of seed on the soil.
(6) This step is the hardest, picking rocks! You cannot have a flat field without picking rocks as the log will not smooth out soil if it is bouncing over a lot of rocks. This is just plain one arduous task, but required.
(7) The last step is to cultipack, which is to compresses the soil, make the field smooth enough so equipment can quickly get over the field, and cover the seeds. Here you can pull the 30 foot log over the field again, or chose to modify it. If you chose to use the 30 foot log, you might have to make a lot of passes, going one way then the other to fill in all those holes, but you will have a very level and smooth field. Me, I modify the log by cutting it to 12 feet. This allows the log to grade less of a width and roll a bit more with the contours. For me it is a good balance of a relatively flat field, without spending hours leveling it.
After doing these 7 steps, you should have a very decent field with few weeds, good nitrogen fixation, good fooder, and is smooth to drive over with no expensive equipment to buy or contract out.


