Andrew Schreiber

+ Follow
since Apr 01, 2012
Merit badge: bb list bbv list
Biography
I live and work in an intentional community and sustainability research cooperative called Windward.
I am working mostly on a implementing large scale agroforestry practices at Windward.
Windward offer's apprenticeship/fellowship opportunities, workshops and other events for those interested in seeing how we are putting together a whole-village permaculture system. (including energy, industry, shelter, clothing, as well as food.)
I am a big student of Sepp Holzer, Darren Doherty and Masanobu Fukuoka, and an avid follower of what Paul is doing. I try to contribute on this blog when I have some spare time.
Please don't hesitate to message me )
For More
Zone 6a, Wahkiacus, WA
Apples and Likes
Apples
Total received
In last 30 days
0
Forums and Threads

Recent posts by Andrew Schreiber

wow, that Batchrocket.eu site is very helpful!  

Thank you for that resource.

I ran calculations on their spreadsheet.  Here is what got.

Heat loss of the building to be heated:  15kW

A 250mm (10in) riser system running 2 double burns a day roughly 50lbs of wood per fire can meet that need.

with a 10in riser diameter, the internal surface area of the bell would need to be roughly 160 square ft

7 years ago
I have been looking at this design along side earnie and erica's

https://midwestpermaculture.com/2016/04/epic-greenhouse-rocket-mass-heater/


It has the large batch capacity, but also uses the j-tube design.
7 years ago
To answer some of your specific questions:

The optimal temp range around the plants in the greenhouse (the souther side) I would like in the greenhouse is in the 40 degrees F range.  Enough that cold winter crops will not die.  

There is also going to be a shower in the greenhouse which should provide some additional warmth/warm humid air.

The coldest temps we get here, in a prolonged manner, are in the negative single digits.  -5 degree F every other winter.  Otherwise the lows are in the single digits.

We can go for more than a week without direct solar gain.  Basically, we get stuck in a frozen cloud every so often.  Doesn't happen every winter, but when it does the temperatures drop.  Otherwise, it is usually pretty clear in the winter.

the Internal volume of the building is a little over 20,000 cubic feet.

The frost line is 24 inches. The footings are not insulated, but the could be. However, the whole building is half buried underground, so there is a large thermal mass that it is tied into.

My thought was to insulate the bottom of the mass heater to get the heat to rise up and into the building instead of into the ground.

Yes, I have seen Geoff Lawton's video of the Annualized Geosolar system in Canada.  I did calculations on doing such a system.  I found out that I would need to bury the pipes roughly 10 ft underground and put about 4 inches of rigid foam insulation over it.   The reality for us is that we do not have 10 ft of soil to dig into. The cost of the piping alone was in the 5k range. While the system is easy and passive to use, the installation seems beyond my grasp.
7 years ago
Hi All, Thank you for your questions and considerations.  

Here is some more info.

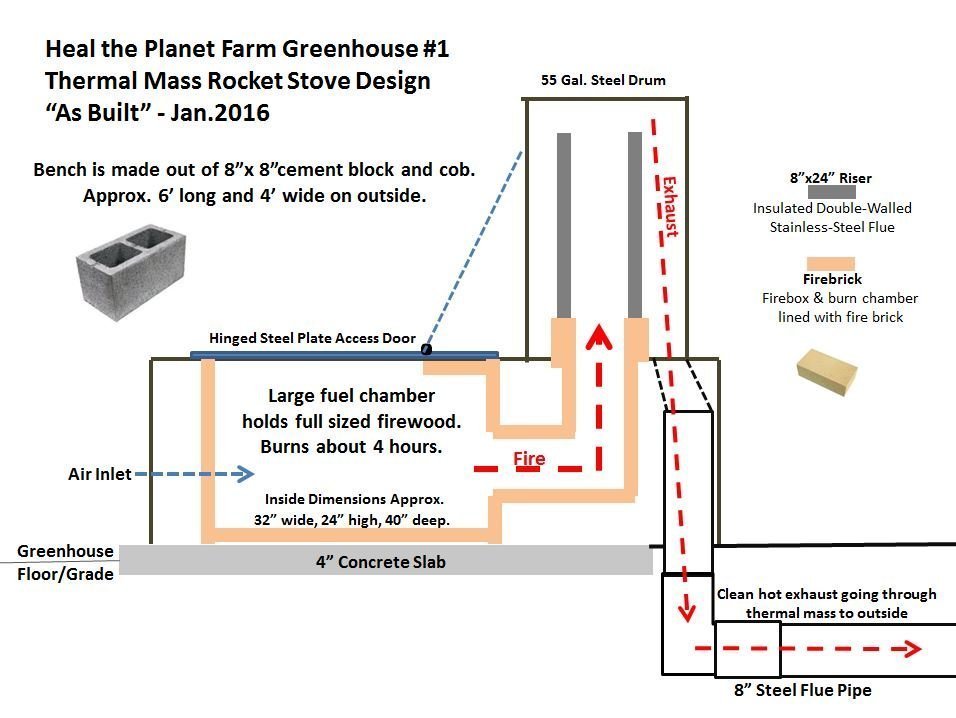
Here is my rough pass at the design from a few years ago:


One big difference in the design is how long I imagine the bench needing to be. But hopefully, this gives y'all a rough sense of what I am talking about.

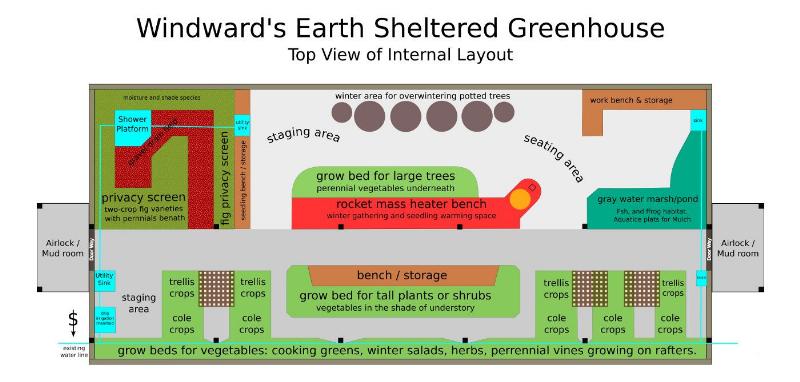
This greenhouse is very much like an earth ship (except concrete and not tires for retaining walls)   The south wall is pretty much all solar gain, and the side walls and northern roof are insulated. So it does not loose as much heat as a hoop house or full greenhouse.   The footings are not insulated,  but are all buried under several feet of earth on the exterior of the building.

The ultimate design is similar to our communities dining hall, both in structural design, shape and square footage.  The main difference is how much solar exposure the polycarbonate south side allows.  

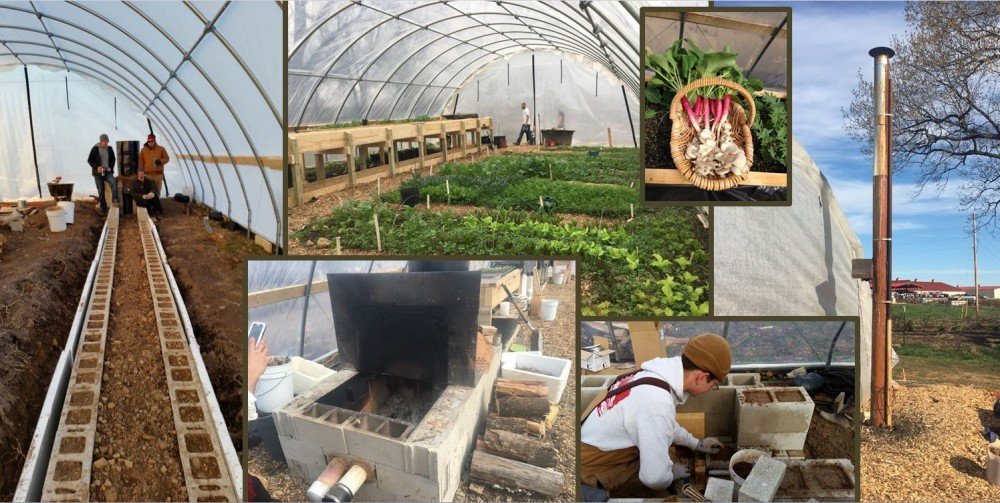
Attached are a few images of the interior I took yesterday
7 years ago
Hi All,

I am working on a large earth sheltered greenhouse build, and am in the design phase for a central Rocket Mass Heater bench.  Hoping to glean some practical experience from folks.

The greenhouse is 60 feet long and 24 feet deep with a northside 6ft wall buried in the earth, and the southern 2ft concrete footings buried 2ft below grade. So the whole building is sunk into the surrounding earth.  So it has a lot of mass to the building.  

You can see more about it on this article:

http://windward.org/2.0/notes/2015/2015andrew06.htm

The greenhouse interior is about 16ft tall, so the exit stovepipe will have 16ft+ of straight up rise.

I am working from Earnie and Erica's book, particularly the greenhouse 8" example in the book.  In that example the bench has 40ft of pipe that runs in a straight line and does not take a 180 degree turn.

My desire is to have a simlarly long bench  (roughly 34ft instead of 40ft)  but have the pipe double back on itself (a 180degree turn) and head back to the heat riser before heading up and out of the building..

So functionally, I would have almost twice the length of pipe as the design on paper.  I understand that I need to help such a system establish and maintain a good draft.  The design elements that I intend to employ to do that include:

1.) the exit flue is next to the barrel, so it is heated by the initial fire.
2.) minimal bends, only one 180 degree bend.
3.) have pipe running through mass always on an inclining plane to the vertical exit flue.
4.) The 16ft+ rise on the exit pipe.

Other design considerations which I am aware might help, but don't have a clear image of how to do include:
1.) have a means of lighting a small fire (a candle or piece of paper) in the exit flue to establish initial draw.
2.) make the heat riser taller and very well insulated.
3.) create a way (in the manifold) to vent initial fire directly into exit flue to establish draw.

To be clear about my questions for y'all:
1,.) is a 60ft long system even feasible? If not, is there generally regarded an upper range of length?
2.) are there other particular design considerations for a long system that I should bear in mind?
3.) any good examples of manifold that allow initial venting of stove directly to the exit flue to warm it up?
7 years ago
Three days of hands-on learning, March 27-29 2017
Cost: $30
Contact: Windward@gorge.net to register.
Pay via paypal,  link at this address: http://www.windward.org/springbreak


Folks at a similar course in 2015  standing behind a large hugelkulture "nurselog" bed they constructed, seeded, and planted.

What's this course all about?

The overarching theme of the course is an exploration of the practical details of building a land-based economy.

That is, how to work with the nature and character of land to build a productive ecosystem capable of providing the raw materials (food, fuel, medicine, craft materials, clothing materials, etc) for communities, even on marginal land like Windward's.

We will explore these concepts by working directly with the primary economy of plant-based ecosystems - making water retentive growing spaces, conditioning the soil in native ecosystems, and propagating and planting productive native shubs, trees, and herbs.

Over the 3 days we will explore...

Windward's village-Scale Permaculture Systems


On day one, we will tour of the Windward's main hillside and it's permaculture designed systems.

These includes intensive annual gardens, terraced grow beds planted with a polyculture of annual and perennial plants, contour hugelkultur gardens supporting a young woodland garden, pollinator garden, medicinal garden, greenhouses, community spaces, and more.

Water Harvesting Earthworks and Hugelkultur


A view of Windward's main hillside, with it's contour hugelkultur and young woodland garden.

In the afternoon on day one, we will build a hugelkultur "nurselog" garden bed on countour to prevent erosion and provide a body of soil to feed and nourish a developing food forest.

Building a Polyculture of Herbacious Plants for semi-arid food forests


Instructor, Andrew Schreiber, tours the medicinal section of a hugelkultur garden.

On day two we will finish the hugelkultur bed and then head to the outdoor clasroom to explore the process of designing a polyculture for our new bed.

We will explore plant morphology, life span, ecosystems services, synergistic interactions, and other considerations that affect the functional evolution of the bed in relation to our goals, as well as the whole-system of which it is a part.

We will then take the seeds of these plants and begin treating them in preparation for planting.

In addition to working with seeds, we will learn to propagate herbs by division, which we will get to practice on several species of plants.

Agroforestry, Silvopasture, and Tree Planting.


A view of a contour slash windrow being constructed in 2016


On day three we will use simple tools to layout contour lines in a silvopasture system, and then move slash (branches and logs) from stewardship forestry work onto the contour lines to create windrows to be planted as multifunctional hedgerows in the future.

We will explore the simple and subtle benefits of this kind of slash treatment, and how it helps condition the soil in preparation for planting trees. Next we will look at an older windrow and begin to plant a polyculture of trees and shrubs that will form a hedgerow / living fence.


the nursery with the trees we plan to plant

Throughout this process we will be discussing the broad acre stewardship forestry work at Windward, and explore the multi-faceted approach to ecosystem management aiming to generate a variety of materials (such as basketry whips, firewood, food, medicine, and animal forage) for the Windward community.

Other Details

Cost and Registration


The price of the course is $30 ($10 per day).

Living closely with the land in a cooperative and intergenerational community enables instructors Windward to offer in-depth educational experiences for next to nothing.

You can can continue the cycle of paying-it-forward by letting your friends know of the course and the other opportunities offered by the Windward such as three month apprenticeships and our annual open house event

Payment can be made via paypal (see button below), check or cash in the mail.

There are only 30 slots available! RSVP at Windward@gorge.net to reserve your place.

Registration has been extended to March 15th.


Arrival, Departure and Accommodations


We like to keep departure times flexible in case you want a little more time the hang out, connect, spend time in the forest, and otherwise not rush back to the city.

Participants are encouraged to arrive a day early (on the 26th) and depart on the 30th.

The accommodations are primarily camping in our 40 acre campground.

The campground features a covered camping structure with 8 large bunks, as well as a multitude spaces for car camping.

If there is enough interest due to inclement weather or temperature sensitive individuals, we can also make available a cabin which is still partially under construction for the use of folks to set up their sleeping bags out of the elements.
7 years ago
Hi Vern,

I'm in Klickitat county WA,  in Wahkiacus up on the north side of the plateau carved out by the Klickitat River.  Where are you at?
7 years ago
a few questions for you, to help guide me:

1.) are you particularly attached to the welded metal truss idea?  Seems odd to have big metal roof on a earthbag building.

2.) what are the load specifications for you region of the phillipines?  I presume that the roof mainly has to  deal with dynamic loads from high winds.  This to me suggests it is more important how the roof is connected to the walls and bond beams.

3.) are there other long-lived buildings in the area that you can look at to gleam an appropriate structural system for the roof?
7 years ago


1.) as far as soil is concerned, you want a soil that is as vibrant and nutritious as any garden. There are lots of ways to accomplish this.  The main thing that I would suggest is that whatever soil you are planting directly into (i.e. the "top" soil) be very active and alive  if you want the plants to do well.

Mixing rice hulls into the soil, and then planting into that soil before the rice hulls have decomposed,  with tend to starve the soil of macronutrients (NPK) as the bacteria work on breaking down the rice hulls. It would be better to compost everything well before planting into,  just like any garden.   You can look up "soil nutrient immobilization" for more details on that.

Also,  when working in a greenhouse,  it is important to keep the soil very alive and  full of nutrients  because there is on 18" of soil there in an box which is isolated from the outdoors.  The typical ecosystem services  of an outdoor garden are not present,  so you need to be ready to provide them if you want to maximize yields in a small space - which is usually what folks are after with greenhouses.

2.) I don't fully understand the designs, but I think that the rocks on top of the foam would likely cause damage to the foam which may not be desireable.  

The manner in which you are insulating and using an IBC and air-water heat exchanger is not something that I've ever seen done before, so I can provide no real answers.  

- the design seems to use a lot of materials and tech for a small space. I also have concerned about placing 300 gallons of water on top of closed cell insulation panels.  My sense is that it will crush the foam.   Also, having the water tanks down underground  may make it difficult to access and maintain.

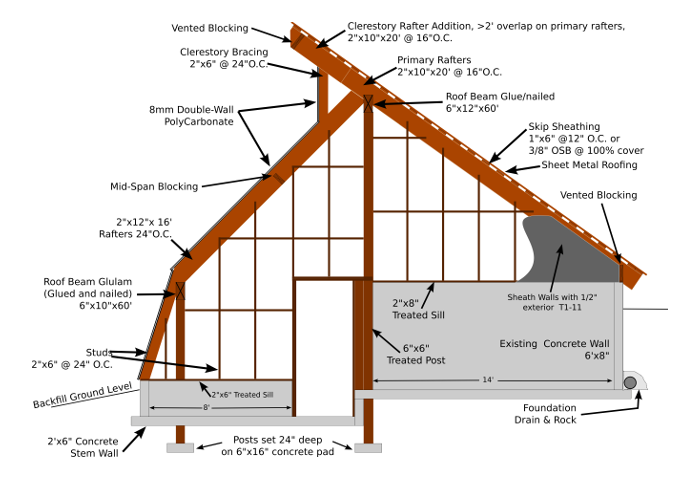
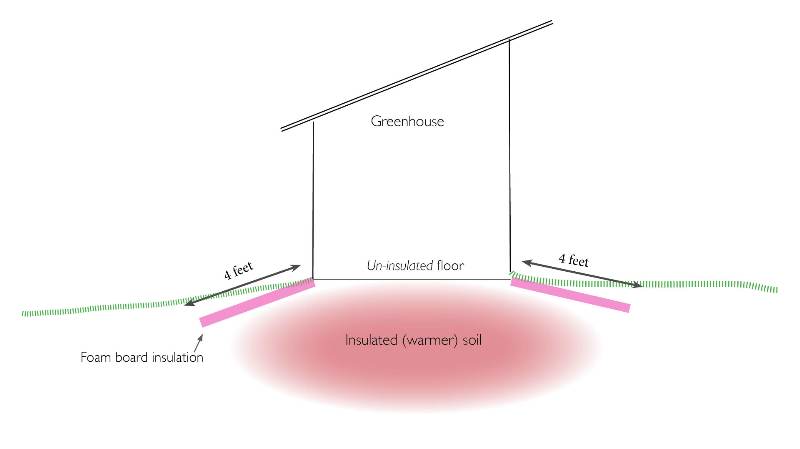
If you are interested, the below image portrays a typical manner in which greenhouses, passive solar homes (and other structure looking to isolate a large thermal mass under the building to provide temperature regulation) insulate their foundation.


it uses a lot less material, and is quite effective.


7 years ago
Yes, patch them with a mix that is heavy on the sand.  It could be that your cob mix was not sandy enough to begin with,  or a combination of  not enough sand and not enough fiber.  

1cm from the get go is a big crack IMO.  If the original mix was not optimal, you may find that the over continues to crack as it heats and cools.  Patching it will help, but it may never be as durable as an oven made with a proper mix.  Again, assuming it is an issue with the initial mix.
7 years ago
cob