James Dempsey

+ Follow
since Jul 09, 2023
Merit badge: bb list bbv list
Biography
My 'backyard' biochar kiln is a modified version of: https://biochar-international.org/wp-content/uploads/2019/07/J-ROs_Jan_2012.pdf
For More
N California
Apples and Likes
Apples
Total received
In last 30 days
0
Forums and Threads

Recent posts by James Dempsey

re  

James Dempsey wrote:    "Seeking advice -  30g retort (in 55g oven) supported over a 55g TLUD, with a 6' afterburner:   the support rack over the TLUD .. bends during a burn under the load.          Question:  what material can I use .. will last more than a couple of burns without bending under the heat and load?  "

I  did a little research and discovered that common steel (carbon steel, galvanized with zinc, or straight iron) is not adequate to those temperatures (>1200degF) under load but stainless steel is (alloys #304 and better #316, which contain in particular more chromium and molybdenum which maintain strength at higher temperatures).   Unfortunately, new stainless steel box tubing (two ~1"x16.5", and two ~2"x20") cost a lot - so where could I scavenge something used like that?        I'm now looking for discarded 'chromoly' bicycle frames:   'chromoly' is steel alloy #4130 with chromium and molybdenum, which for bicycle frames makes it much lighter with the right amount of strength & flex -- I'm hoping incidentally also suiting the high temperature strength I'm looking for.

Any insight you have is much appreciated ...

[   my backyard biochar kiln design was informed by:
    https://cdn.permaculturenews.org/files/biochar_john_rogers-jan8-2012.pdf
    https://biochar-us.org/sites/default/files/presentations/3_4_2_Baker_Norman_0_USBI_TLUD_biochar_2016.pdf   ]

1 year ago
responding to John S:    
    If I was in an area geographically less subject to air particulate issues (as well as immediate neighbors, and regulations I understand, respect and support) I might have considered sticking with an open TLUD alone and save extra trouble of fabrication, and if I had the energy & time to carefully tend ongoing burns to minimize smoke and optimize output  -- but I don't want to, more interested that the device do more of the work if that can be arranged ...  your thoughts are still correct:  there are fortunately a variety of ways to go about it to suit different folks in different circumstances.
    The volume to place wood into the 30g retort is (presumably) 30g;  the volume to place wood into the 55g TLUD in my case is 55g less the primary air diffuser (bottom 3" of the barrel interior) and less about 4" below the modified lid at the top to accommodate my secondary air blower intake.   Yes, you are correct I think that the resulting volume is larger for the TLUD that I use,  vs. the 30g retort.     However...
    By "size range of wood feedstock", I mean that in order to optimize my particular retort-over-TLUD setup, what seems to work best in my experience for the (untendable) TLUD is a smaller feedstock size range -- generally under 1" smallest dimension of a given piece (which could potentially be up to say, 38" long?), and if I use any of the very abundant 2" feedstock that I most desire to use, that requires in my experience to add a larger portion of <3/4" to compensate.   In the retort I use larger feedstock size range, usually as much 2" feedstock as I can fit (that is, pieces 2" x 2-10" x 8-30") filled out with smaller material as space allows.  Solid wood will produce more biochar end product than the equivalent volume occupied by pieces since the pieces will have more air space and surface area (and in the TLUD subject to oxidation to ash).  There does need to be sufficient space between pieces in the retort for water vapor and then volatiles (wood gas) to pass through and out the bottom, as well as heat to penetrate, so in both my TLUD and retort they don't work well packed tightly -- end up with undercooked pieces that need to run through again, certainly for any pieces larger than 2" (in their smallest dimension).
    ... the other issue with my dual retort-over-TLUD setup is that the TLUD is not necessarily 'done' at the same time as the retort:  the retort can be left to run itself out and cool to be harvested at my leisure, but not the TLUD.  On the TLUD I can seal the primary and secondary air intakes as well as the hole in the top lid while it still burns, but the latter generally only after the retort furnace blast (and need for secondary air) has run it's course - I've learned to tune the feedstock mixture (size ranges, and e.g. in the retort use some softwood along with hardwood feedstock for sufficient volatiles i.e. wood gas) such that when the retort is puffing it's last gasp is the time to seal the TLUD.  I water down the TLUD contents and when I'm satisifed the seal is good (not letting any oxygen get in) I generally leave the whole rig to cool overnight before disassembly.  And that works pretty well.   A little ash to sift or rinse out in the TLUD's output of mostly medium/small/fine bits, no ash in the retort output of mainly large/medium chunks.  
    The resulting output volume of each is similar (a full wheelbarrow for each, possibly more from the TLUD but not that I have noticed), after I have accounted for differences in suitable size range of feedstock for each, in the setup prior to the burn, given the operational limitations of this setup.  I suppose a more accurate and meaningful measure would be to grind the respective output as I do after innoculation, and then measure the 0-1/8" granular dust volume and the 1/8-3/8" bits volume for each (TLUD and retort).
1 year ago
reply to John S ..  there are tradeoffs with my setup (retort over TLUD) -- sure I could just use TLUD and tend it closely to minimize ash, but I prefer the benefit of my current arrangement with respect to having learned the right feedstock mix (size range smaller for TLUD than retort which suits my feedstock on hand; species e.g. variability in wood gas volatiles & latent moisture for a given seasoning) such that I put more attention to setting things up right then I don't have to tend the burn other than watching for the burn phase changes to adjust the forced air (I use variable speed fans (hair dryer with the heat element off at the bottom of TLUD =  primary air, computer fan with PWM speed control into the top of the TLUD barrel = secondary air).   Over all I'm satisfied with the balance/tradeoffs between TLUD and retort, in particular given that I have a huge pile of Liriodendron=tulip tree wood split to 2" which is my greatest feedstock -- generally too big for TLUD but can do a higher proportion of larger pieces in the retort.

reply to Phil S .. G'day mate! I was fortunate to be an exchange student in Christchurch many years ago, and hold great affection for kiwis and New Zealand..   Our particular air pollution regulatory arrangement will be dominated by far greater concerns than hobby biochar enthusiasts -- history of irresponsible barrel-burners,  wildfire catastrophe and associated misplaced hysteria (I mean was this not foreseen and largely preventable:  where people build & insurance subsidy, forest management practices, climate change),  ag burning of orchard trimmings (seems to me a wide open opportunity for promoting flame cap burning methods towards orchard benefits of biochar) as so on.
1 year ago
The anaerobic fermentation of sugar (livestock molasses is quite cheap) is intended to acidify the bio char through lactofermentation, in other words production of lactic acid, like making kimchi or sauerkraut.    I understood somewhere that this acidified biochar is then particularly good at absorbing ammonia, the stinky nitrogen gas of livestock litter or urine, for example.  Keeping hold of nitrogen in the biochar I expect is probably the one most valuable asset of biochar as a soil amendment, aside from improving tilth with respect to moisture retension at the same time as aeration.  Microbial benefits go along with all that.  Just my simplified understanding, poorly articulated..
1 year ago
I respect my local air pollution ordinance so can’t do open burn kilns.  I like the 30g retort, which ends up producing as much product as the 55g tlud after ash removal; just as soon skip sifting or rinsing out the ash.  But doing both together works well for me, now that I’ve figured out feedstock moisture and size composition, and how to control primary and secondary forced air.    Although perhaps I’m running it all too hot, resulting in bent support frame..
1 year ago
Seeking advice - my backyard kiln is a 30g retort (in 55g oven) supported over a 55g TLUD, with a 6' afterburner:   the support rack over the TLUD I've used is a rack made of old bedframe angle iron (1/8" thick? steel), however it bends during a burn under the load.   It get very hot there, not just over the TLUD but also right under the retort furnace -- the steel turns red, but not white that I've noticed.  I assume that this is around 1200degF, meaning that the retort may be baking at the target high temperature of perhaps 800-1000degF.    The problem is that the load must stay level through the burn or it could fall  (btw I use 4 chains to hold the afterburner stack upright over the retort oven).  Using compensating spacers to level out the 30g retort and 55g retort oven is a bit precarious.  I'm looking for a more lasting solution.

Question:  what material can I use (hopefully not too expensive and not too difficult to fabricate into a support rack) that will last more than a couple of burns without bending under the heat and load?  Ok I might be willing to pay a metal shop fabricate something suitable (what am asking for?) given my time does have value, and I've gone through several angle iron racks that take time to cut and bolt together.

In the works to try unless you have a better suggestion :
     - stacks of (scavenged) limestone tile, with pieces of steel sheet metal to distribute the weight over that brittleness:   will it turn into lime dust during a burn?
          I've tried looking for used ceramic tile, however unless the tile is marked what I've seen to date is not convincingly the higher heat resistant ceramic type necessary.
     - heavy (3/16" thick? steel) 1" and 2" steel pipe (scavenged free), bound with pipe clamps (drilling holes to bolt it quite a hassle, although perhaps necessary)
     - heavier 1/4" thick steel 1-2" steel box rod i.e. square pipe, with holes to bolt together or without just gravity.  Perhaps some used exercise equipment at thrift store has sections with holes I could adapt.

thank you for your constructive suggestion ...

[   my backyard biochar kiln design was informed by:
    https://cdn.permaculturenews.org/files/biochar_john_rogers-jan8-2012.pdf
    https://biochar-us.org/sites/default/files/presentations/3_4_2_Baker_Norman_0_USBI_TLUD_biochar_2016.pdf
]
1 year ago
Followup:   I tried this inexpensive apple scratter a.k.a. fruit crusher  https://ejwox.com/products/fruit-and-apple-crusher-with-wheel

apple crusher review

Context:  my goal in crushing (backyard scale operation) is to replace/reduce non-renewable nursery pot media ingredients (perlite, peat moss), and use any granular dust that sifts out to layer into compost/worm barrels (for details see my 7/9/23 post).  Secondary purpose is to productively dispose of woody debris -- in part, I was curious if I could offset carbon from travels with my backyard biochar operation:  a back-envelope calculation was that a trip to Europe from California would require me to scale up my operation to process the entire residential block's woody debris for a year -- I 'could' have done that with the retort-on-TLUD barrel kiln I have, ok probably burning out the barrels a couple of times.  Donate that productivity to community gardens, City tree-plantings, the neighbors' French drain?  Instead I paid the C offset of $80.42 for the two of us   https://sustainabletravel.org/our-work/carbon-offsets/   -- I did notice at the time that C offsets could be applied towards industrial scale biochar operations through a different agency.

The fruit crusher-with-wheel is better constructed than I was expecting given the shipped cost of $130.  I bolted the crusher (using the predrilled holes on the crusher frame arms) onto a sturdy old workshop table made of 4x4 legs, 2x4s and 1" plywood, by cutting out a pass-through hole adjacent to one side of the table using a rotary then jig saw.  I created a dust chute using a heavy 2-gallon plastic shipping bag with end cut off  (long enough chute to extend loose into nested receiving sieves over a 5 gallon bucket), then used aluminum foil duct tape to carefully secure the top opening of the chute to the inside bottom of the hopper around the grind blades .. would have been easier to secure the chute prior to mounting the crusher to the table.  
    In operation I was glad to have purchased the wheeled-handle version, which has 3 heavy metal welded spokes that I ended up using as a two-handed crank operation to go through my wet feedstock, since just using the handle on the wheel seemed to be on the verge of lateral force bending the 'spindly' crank axle.  Also I pushed the limits of this device to go a bit faster, which resulted in a broken tooth -- two-handed operation is necessary with attention to being responsive to the most resistant biochar chunks -- ok, I was using the oldest biochar feedstock on hand which came from the early part of learning curve on kiln operation, so I did have some underpyrolyzed chunks in that batch.  Nevertheless given my variable albeit seasoned, tree/yard waste feedstock wood variety, and without actually measuring moisture content at <15% prior to pyrolysis, the crushing operation should be attentive to the most resistant (perhaps 1 in 100) bits and take care of the tool.  Very doable.  The crank movement is reversible, which is necessary to extract any recalcitrant bit.  The missing tooth is on the outside edge so doesn't seem to compromise ongoing function.  So far I have only tested to 10 gallons of crushed and sifted product, so we will see how durable this grind tool is over time, now that I'm adjusting to resistance sensitivity.
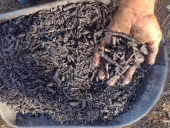
    The resulting particle size distribution is very satisfying to my purpose:  for every 5 gallon bucket of 1/8-3/8" wet particles, I got about 1 g of <1/8" passing through -- placing the >3/8" chunks back into the feedstock (about 2 gallons).  I use 'gold panning classifiers' a.k.a. soil sieves, three nested over a 5g receiving bucket under the crusher dust chute:  sizes 8-mesh (i.e. 8 holes per inch = slightly less than 1/8" size passing through, some longer but thin bits), under a ~2.3-mesh (different brand using plastic not wire, ~7/16" holes), under a 2-mesh (1/2") that sifts out the larger pieces that need to go through again.  Using the three sieves rather than just the 8-mesh under 2-mesh, makes sifting through much easier and quicker.     https://www.prospectingplanet.com/best-classifiers-for-gold-panning-and-gold-prospecting/

    re feedstock and biochar treatments.   My current wood feedstock mix consists of material all split to maximum 2" thickness (pieces may be up to 27" long, 14" wide) and seasoned at least 1 summer (Northern California interior dry and hot), approximately 85% hardwood/15% softwood guessing by volume:    65% tulip tree (Liriodendron tulipifera), 15% gingko or pine (Pinus sabiniana and ponderosa), 10% chinese pistache, 10% miscellaneous hardwood prunings -- generally if branch is thicker than 1/2" it goes to biochar rather than compost  (Western redbud=Cercis occidentalis, maples, crepe myrtle=Lagerstroemia, firethorn=Pyracantha, Photinia, dogwood=Cornus, camelia, etc.).
    I 'innoculate' biochar using three methods, hopefully complementary -- ?  1. anaerobic fermentation soaking fresh biochar immersed in freshly mixed solution of livestock molasses in water, typically at least 6 weeks if 80degF (longer if cooler season).  2. anaerobic fermentation soaking fresh biochar immersed in freshly mixed solution of urine (mine saved in bathroom jugs, arbitrarily whatever I've saved up by the time I need to immerse a kiln-load) in water, similar incubation period.  3. fresh biochar soaked in worm barrel tea (red worms actively processing kitchen scraps + fall leaves, shredded paper; hole in bottom of 30g barrel over a 5g bucket allows water pass-through for a 'tea', have to be careful how to use this directly on plants although roses consistently love it sprinkled over the whole plant) immersed for a couple of days to weeks as convenient.  I recently got ahold of a pH meter to ensure adequate fermentation.  The sugar fermented biochar I understand is employed to absorb substrate-volatile ammonia (for example as used in animal bedding to reduce smell and capture nitrogen), which should be complementary to the other two innoculation methods.. (?)     My neighbor has recently obtained chickens, so I will be employing some ground molasses-fermented biochar in her coops (recover some of that phosphorus-rich poop to enter the mix) and see if she notices any difference in smell, cockroaches, etc.
    My intent is to sample equal portions of these innoculant treatments to drain in a barrel for a day before grinding, and store covered but aerated to retain moisture ("activated") until use.
    Part of the interest in fermentation developed from my concern about adding supposedly alkaline biochar to my modestly alkaline native garden soil (I generally sift or rinse ash out of the TLUD product as it is removed from the kiln; there is no ash to remove from the retort product).   I generally add agriculture sulfur (S) when I amend garden soil in any case, and I dust the ground biochar component going into nursery pot media with sulfur as well - perhaps now with fermentation that is not needed.   Always: use an N95 mask when handling S or biochar!
   
Your expert thoughts appreciated -- especially constructive advise  ..  ?


[   I use a controlled forced air Jolly Roger 30g retort in 55g retort oven over a 55g TLUD with a 6' afterburner, informed by:
          https://biochar-international.org/wp-content/uploads/2019/07/J-ROs_Jan_2012.pdf
          https://biochar-us.org/sites/default/files/presentations/3_4_2_Baker_Norman_0_USBI_TLUD_biochar_2016.pdf
]


1 year ago
Anyone have experience using an apple scratter  a.k.a.  fruit grinder ? :  
       backyard small scale manual:   https://winemakerscorner.com/wine-products/manual-grape-and-fruit-crushers/
       motorized:   https://happyvalleyranch.com/Item/Grinders

My target size range is 1/8-3/8" (to offset some non-renewable ingredients in my potting mix),  and to layer the sifted out granular dust into the compost pile/worm barrel.  I understand most are trying to create granular dust with the idea of maximizing surface area as a field soil additive - but that is not my objective.  For example 'how particle size affects drainage in pots' : https://deepgreenpermaculture.com/2020/10/06/how-to-improve-drainage-in-plant-pots-the-proper-way-to-do-it/

Everyone should protect against breathing biochar dust:  wear an N95 particulate mask.  For this reason I appreciate the reduction-in-liquid methods, not so much the driveway approach -- at least in my dry climate area.  Nor the 2x4/sledge in a bucket method - and I'm not looking to work out my bad back at age 60+.  Please consider your cohabitants and neighbors who didn't choose to breath that - some of my neighbors already suffer emphysema.

I've tried mitigating the limitations of those methods, and have also used an antique bar/restaurant ice crusher https://tooltiques.net/Photos13LGS/Nov20th13LGS_018.JPG , which is useful to reduce size to under 1" and may serve as a first pass before running the 3/8"-1" pieces through an apple scratter - I'm hoping?   Please advise if you have tried that.

Or, another approach for my backyard operation targeting production of 1/8-3/8" size biochar?

Thanks for your great ideas!                    

[ I use a modified version of the controlled forced air Jolly Roger 30g retort in 55g retort oven over a 55g TLUD with a 6' afterburner:  https://biochar-international.org/wp-content/uploads/2019/07/J-ROs_Jan_2012.pdf  ]

1 year ago