|

|

|

|

|

|
|
|
|
|
|
|
|

|

|

|

|

|
 8
8


As a farmer, I am a steward of the land and it’s animals.
My job is to feed both people and nature, to build up the world around me.
Farmers are healers of the land and providers of the people.
I will do my best to keep a clean and healthy environment that would be pleasing to God


 11
4
11
4
Iterations are fine, we don't have to be perfect
My 2nd Location:Florida HardinessZone:10 AHS:10 GDD:8500 Rainfall:2in/mth winter, 8in/mth summer, Soil:Sand pH8 Flat


 7
7
How Permies works: https://permies.com/wiki/34193/permies-works-links-threads
My projects on Skye: The tree field, Growing and landracing, perennial polycultures, "Don't dream it - be it! "
8
2
Jordy Buck wrote:My questions are, how long should I soak it to charge it and how strong a solution? Planning on trying both rabbit manure tea and just tossing it in the chicken coup to absorb manure. How do I know when it's full? How could I test the strength?
Christopher said, " Going to try to break to an even 1inch chuck material and then soak in a high nitrogen rich liquid nutrient for about 5 months or so.
Dan said, "I soak mine in compost tea and usually some nitrogen source for 2+ weeks.
Invasive plants are Earth's way of insisting we notice her medicines. Stephen Herrod Buhner
Everyone learns what works by learning what doesn't work. Stephen Herrod Buhner
3
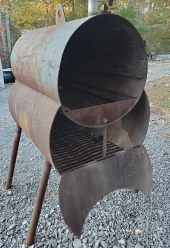
Phil Stevens wrote:
Your barrel burns are looking good. Have you tried angling the drum to change the airflow pattern?
As a farmer, I am a steward of the land and it’s animals.
My job is to feed both people and nature, to build up the world around me.
Farmers are healers of the land and providers of the people.
I will do my best to keep a clean and healthy environment that would be pleasing to God
5
Nancy Reading wrote:Hi Jordy,
Congratulations on your set up. I haven't got very far with my biochar manufacture. Partly because I can't get myself organised to manufacture it on purpose and am still just raking out coals from my wood stove...
I think Phil gave some great suggestions. My take is that it's best to use what you have. Using it for chicken litter sounds awesome and will certainly add the nutrients to the char and crush it for you (which also seems like an issue for people (see this thread for more ideas there).
I suspect that the real reasons no one answers in detail are that "it depends" and those that are doing it successfully either don't want to give away their secrets, or their situation will be different from yours so won't apply anyway.
Although I believe biochar is definately worthwhile for many soils, it is still for the long term and having created the environment for the biology to thrive the only missing ingredient is time. Innoculation just gives you a bit of a short cut to getting that soil biology established, so I wouldn't stress too much about it. I suspect a few days or a week is all that is needed to get a little extra biology into the mix, or just an hour or so good soak if all you are adding is nutrient like urine, or soaking in compost tea.
As a farmer, I am a steward of the land and it’s animals.
My job is to feed both people and nature, to build up the world around me.
Farmers are healers of the land and providers of the people.
I will do my best to keep a clean and healthy environment that would be pleasing to God
6
 4
3
4
3
Check out Redhawk's soil series: https://permies.com/wiki/redhawk-soil
1
2
2
Check out Redhawk's soil series: https://permies.com/wiki/redhawk-soil
1
Check out Redhawk's soil series: https://permies.com/wiki/redhawk-soil
3
1
Check out Redhawk's soil series: https://permies.com/wiki/redhawk-soil
1
1
Check out Redhawk's soil series: https://permies.com/wiki/redhawk-soil
2
Phil Stevens wrote:James, it might be a bureaucratic detail in your local ordinance that prohibits open burning for air quality reasons, but a well-tended flame cap burn using dry wood emits close to zero particulates and very little visible smoke (mostly just at startup and quench time).
2
Check out Redhawk's soil series: https://permies.com/wiki/redhawk-soil
1
Check out Redhawk's soil series: https://permies.com/wiki/redhawk-soil
James Dempsey wrote: "Seeking advice - 30g retort (in 55g oven) supported over a 55g TLUD, with a 6' afterburner: the support rack over the TLUD .. bends during a burn under the load. Question: what material can I use .. will last more than a couple of burns without bending under the heat and load? "
I did a little research and discovered that common steel (carbon steel, galvanized with zinc, or straight iron) is not adequate to those temperatures (>1200degF) under load but stainless steel is (alloys #304 and better #316, which contain in particular more chromium and molybdenum which maintain strength at higher temperatures). Unfortunately, new stainless steel box tubing (two ~1"x16.5", and two ~2"x20") cost a lot - so where could I scavenge something used like that? I'm now looking for discarded 'chromoly' bicycle frames: 'chromoly' is steel alloy #4130 with chromium and molybdenum, which for bicycle frames makes it much lighter with the right amount of strength & flex -- I'm hoping incidentally also suiting the high temperature strength I'm looking for.
Any insight you have is much appreciated ...
[ my backyard biochar kiln design was informed by:
https://cdn.permaculturenews.org/files/biochar_john_rogers-jan8-2012.pdf
https://biochar-us.org/sites/default/files/presentations/3_4_2_Baker_Norman_0_USBI_TLUD_biochar_2016.pdf ]

|
You are HERE! The other map is obviously wrong. Better confirm with this tiny ad:
heat your home with yard waste and cardboard
https://freeheat.info
|