Kendal Webster

+ Follow
since Oct 13, 2025
Merit badge: bb list bbv list
For More
Apples and Likes
Apples
Total received
In last 30 days
0
Forums and Threads

Recent posts by Kendal Webster

Love this idea! I've thrown atlatl but never made one. That was back when I was a teenager, but i loved it. Another similar item on my want to do list is a staff sling. Another simple and effective throwing primitive weapon.
1 month ago
PEM
Well, my wife and I started laying out the bench area with tape on the floor and long story short, we decided the Liberator will live in front of the short wall and exhaust will go straight through it until the bench. All in a straight line.

Here is why:

1. Aesthetically we liked the stove centered on the larger wall, more or less centered in that space. It seemed to "fit" better there and looked "right". Since we determined that a bench could go behind there and wrap around to the long wall, we thought this was going to work out well. HOWEVER in practice this took up a lot more space and became an obstacle when walking out of the kitchen. When looking at laying out the "hearth" area... it was huge and encroaching a lot into the living room space and "flow". We put the Liberator on a furniture dolly so that we can move it quickly and easily and when we put it back in my original location of in front of the short wall, we immediately observed that it took up a lot less space and felt way less invasive and was way less of an obstacle walking out of the kitchen or the entry way.

2. We talked about putting something to the left of the stove to "balance it out" and moved a plant shelf tower thing there and wow! That works! Yes,yes, I know plants won't survive there when the stove is running, but for the other 9 months, it looks lovely. During the 3 months of use, perhaps wood/pellet storage bin, some stacked bricks for more thermal mass, or something else could go there to "balance " the space.

3. It would use a lot less material. Even just the hearth will require less than half the bricks. The bench becomes one basic rectangle with a lot less bricks and way less funky angles and such. Let me be clear here...we are on a bit of a budget and saving as much as possible is very desirable,  but we would have made it work the other way if we really felt it was best. However based on point 1 and 2... it really is better in our minds.

4. Due to the limitations of the Liberator, I think the roughly 9 or 9.5 ft bench is about the most mass that stove will be able to utilize effectively. I believe the manual suggested a flue bench of 10 ft max. I have no experience in calculating stove output vs optimal mass storage and wouldn't even know where to begin. That said, I know Uncle Mud made a bench of half barrels utilizing a flue and cob for a 16 ft run and that worked, in fact I really liked how that looked and considered doing a build similar to that, but my wife and I ultimately decided a bell seems more efficient and building with bricks looks "more refined" and just better.

Pictures. Final "we hope " stove location with plants as described above. And bench layout...yes... stuff got moved into the area but you can still see the basic tape outline.

1 month ago
We currently own everything outright but did incur some credit card debt... we are considering getting a mortgage to pay off the credit cards and a little extra to complete some projects and have a lower monthly payment...but I don't love the idea of getting the bank involved in our property that we currently own free and clear. This is a difficult conundrum for us right now.
1 month ago

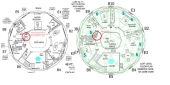
C. Letellier wrote:The little closed triangle behind the frig? (potential stove pipe location first floor)  Not the room.(more later don't have time now.)


Doesn't exist. House not built 100% to plans. We hate "dead space" so it is part of the pantry area.
1 month ago

C. Letellier wrote:List of questions.  Toying with 3 completely separate answers so don't think this is related.

1.  What is in the triangle behind the fridge in the first floor?
2.  Does the under stairs closet contain anything essential?
3.  Where does the in floor heating lines come up?  Tank for that? pump for that?
4.  What if the rocket mass heater changed from a bench to a zig zag wall mass and moved next to the stairs?


Great questions!

1. The triangle shaped room behind the fridge is a pantry. The items stored along the wall where the bench goes is full of non-food items such as extra appliances, empty jars, paper towels, trash bags, etc.
2. Under stairs storage currently contains: brooms, mops, tools that get used frequently, leftover paint and supplies, and is also where the electrical/breaker box is located.
3. All of the in floor heating stuff is in the laundry room. It is a tank less system and utilizes the same on demand heater as the rest of the house. Pretty cool design. I ordered the kit online and received great support throughout install.
4. Next to the stairs is currently the music room. The piano is along the longer wall. Bass and cello and music stands are along the shorter wall.  So...yes, we could change to a zigzag on that wall but I don't like the idea of the stove on the same wall as all the electrical home runs to the panel, and that place is perfect for the piano and the rest of the instruments fit well there too. Lastly, regardless of if it is a mass bench, I've wanted s bench along the other wall since construction began as it is a perfect place to take off/put on shoes and coats and the like. Double purpose makes it even better!

Also, I know heating the pantry is not ideal. We will have a larger and better temperature controlled food storage outside within a year or two. The inside pantry contains frequently used stuffs that really aren't affected by some heat AND without the stove, it is already heated by the i  floor heating...I wish I would have thought about not running the pipe through there, but it also would have been very difficult to  skip based on the plans given us by the kit... simply said, there are several runs that make big loops and skipping that space would have made the loops a lot more difficult. Not impossible, but considering we laid the PEX pipe in December, it was not the most pliant and flexible.

OK, now for a little info on the floor heating,  just for fun.

1. It works WAY better than I imagined it would.
2. It works way differently than I expected.
3. The ENTIRE house is heated comfortably and evenly with a slightly higher temperature on the 2nd story. (Hoping a large fan under the loft that will eventually be built for the cupola will help with that and with cooling in the summer. )

I expected that the floor would be warm and walking barefoot or in socks would be nice... warm feet, warm body. I expected that the air temperature would not have been affected nearly as much, so warm toes and cooler air temps.

What actually happens is that the air temperature is affected greatly and the floor is warmer than it would be, but still feels cool to the feet. The temp controls can be adjusted to work off floor temperature or air temperature or both. It didn't seem to make a lot of difference between floor control and air control. My wife had it set at 70 (yes a few degrees cooler probably woul save some cash on propane but she is a bit cold-blooded so happy wife happy life!). Anyway, the whole hose stayed at 70 all day and all night and there was basically no hot or cold spots in the entire house. It was very comfortable (if on the warm side) everywhere.
1 month ago


Where are you at? We're about 5 minutes outside of Snowflake on Concho Hwy. This place seems to be poppin with homesteaders. I see at least one person hauling water every time I leave our property.

I'm actually very close! We are homesteading 7 miles east and a bit north of Concho Hwy. Only been out here about 4 years and still working on getting things established.
1 month ago
My lovely wife was kind enough to help get this picture showing both locations while I was upstairs too. It helps give perspective.
1 month ago
Here are 2 pictures that correspond to my 2 options.  The first picture is directly above the end of the bench where I could easily use a "T" for a clean out/ inspection / chimney primer if needed. It hits the ceiling at 17'4".

The 2nd location is close to the wall that we will be going through. It would need to go through the top of the bench, and would take up some nice sitting area. It hits the ceiling directly above at 24'1".

Personally I prefer the 1st option provided would get sufficient draw. Yes, I could still exit in the first option and angle to the 2nd location but I would prefer a straight shot for ease of construction/ install/maintenance.

Other pictures are added so you can see perspective if you follow the patterns you will know locations. You can sort of see the "bridge" that is in the area above the entryway/living room  division. You can only see the higher location from the perspective of viewing the stove.

1 month ago
My 2 current choices are:

1. At the end of the mass bench, closest to the front door. In this location, even if i go straight up, puts the top of the chimney somewhere around 15-18 ft up. I could angle back towards the top of the dome.

2. Near the wall on the entry side. A straight shot up from here is very near the top height of the dome so the extra length outside would be close to the total height of the dome.

Which brings up a question I've had.  Can the chimney be too tall? It seems like a very long way for cooler (compared to standard stove) exhaust to go. Is there concern for wrong way flows from that extra height?
1 month ago