Ahmet Oguz Akyuz

+ Follow
since Mar 27, 2019
Merit badge: bb list bbv list
For More
Apples and Likes
Apples
Total received
In last 30 days
1
Forums and Threads

Recent posts by Ahmet Oguz Akyuz

Dear All,

As Turkish people we eat yoghurt on a daily basis. As a fermentation enthusiast myself, I have been making yoghurt for my family for more than 20 years now. Making yoghurt is basically in our family culture. I can say that most of the detailed information here is kind of too much -- no need to overcomplicate a simple subject. Having said that I've my own blog post about making yoghurt at home. You can visit it to see my take on the subject: https://itsybitsylittlefarm.blogspot.com/2020/09/making-yogurt-at-home.html

Basically, I simply boil raw milk on a large pan (we make yoghurt from 1-2 gallons of milk usually). You can also use pasteurized milk if you can't find raw. Let it cool to a temperature that is warm to the touch. It shouldn't be too hot or too cold. But no need for a thermometer. You should be able to dip your finger knuckle in it and keep there for 5-6 seconds without feeling too hot. Then simply pour 1-2 tablespoons of yoghurt from the previous batch. Do not mix too much. Cover the pan with a loose lid so the vapor can escape during fermentation. Put it in a place where it can stay undisturbed for about 5-6 hours (I usually put it inside the oven without turning on the oven!). You can cover it with a blanket for it to keep the warmth. After this resting period, put the yoghurt to the refrigerator and ideally don't touch it for 24 hours. This will make it harder. And that's it -- no need for sanitization or extra hygiene. Just use common sense.

By the way, if you can find Jersey cows' milk, your yoghurt will definitely be harder (and will have more fat content -- more delicious). Not to mention buffalo milk -- it is the gold standard. Regular cow milk also works well but will not be as thick as the jersey one. Goat milk also works but expect it to be looser.

Oguz
1 week ago
Apologies if this topic has been thoroughly discussed in this forum. And apologies again as I am somewhat abusing this forum as my system is not a rainwater catchment one (well, it was at some point but currently I'm pumping water to it from a well using solar panels). But I do have a water tank that is 1000 liters on a small hill at the back of my garden. I think the height difference between the tank and the garden where I have my crops is at most 10 meters (hard to measure precisely). I've drip irrigation system using standard inline emitters. And it seems to work reasonably well (sort of, really).

But two things concern me: occasionally a bird or a rodent pecks a hole in one of the drip lines -- sometimes the main line. In this case, the already not so high pressure drops noticeably. If this happens before I notice it, the crops can get poorly watered (I live elsewhere and visit the site about once a week). If I had more pressure, most emitters would still work despite the leak from bird damage.

Secondly, I'm concerned that if I add more beds and use longer drip lines, the pressure may drop too much. So I've to be cautious about how much I plant and ensure that the current gravity pressure supports any new bed that I add.

Is there a solution to this problem? I do have solar panels in the site that allows me to pump water to the tank when the sun is high. But I do not have a battery or an inverter and I sincerely don't want to buy them. Can you recommend me a reliable solar pump that can draw water from my tank and pump it with pressure to my drip lines?

Or perhaps is there a better way of irrigation than drip lines? I've read somewhere that using a normal hose punched with dry wall screws could be a good option (screw stays inside). This could be a labor intensive process but perhaps it may help with the bird damage as the hoses are thicker (not sure about the rodents though).

I would greatly appreciate any suggestions.
1 month ago
Thank you so much dear beefriends for your comments and encouragement. I wanted to make an update post on this to let you know what happened.

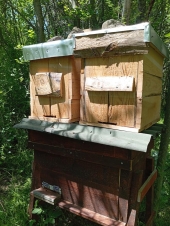
Well, I built two swarm traps and hung them up on two trees that are are about 100 feet apart. These were my first swarm traps and I really did not follow much of a plan. I was only careful to make the frame size equal to my hive size so that transferring the bees, if caught one, would be easy. You can see the traps temporarily placed on top of one of my hives in the first picture.  The second picture shows the trap placed on a tree.

I scraped off some of the old frames and placed them in the trap. I also dropped a few droplets of lemongrass oil.

To my surprise, one of the traps actually caught a very good swarm. In a few weeks time I transferred it to my hive. I wasn't exactly sure how to deal with this process but one evening with the help of my father-in-law, I took the hive from the tree and put the frames in the old hive. I turned the trap over and shook it to try to transfer every little bee. I was concerned that the bees could reswarm at the original trap location the next day, but it did not happen. They seem to have accepted the transfer without much hassle.

The second trap did not catch anything but something better happened. A nice sized swarm directly went into my second hive, saving the me labor of transfer.

So in the end, I managed to recover both of my hives and eat honey from them at the end of the season. A picture of delicious honey from my hives is attached.

Very recently, I collected the excess honey ensuring that I left the lion's share for them. This time, I simply placed a thin layer of bee cloth on top of the frames (actually the bee cloth was there the entire summer). After collecting the honey, I took out the empty frames and compacted the hive by placing two layers of rockwool as an insulator from the side (coated with aluminum sheeting). I left a small opening under the rockwool layer to allow bees to explore the empty portion of the hive (a trick that is suggested in the Keeping Bees with a Smile book).

So overall, I'm a happy camper at this point. If the bees can successfully overwinter this season it would be so much the better.
1 month ago
Dear All,

Thank you very much for these valuable responses. What I conclude from these is that, bees definitely do not need as much winter protection as I thought that they would need. Staying dry and well-ventilated are the most important things.  This has become a lesson for me. In the following seasons, I think I will simply place a soft bee-fabric on top of the frames. This failure prompted me to build some swarm traps and try to capture swarms this season. This was a part of beekeeping that I had not intended to jump right in, but the circumstances make it a necessity now (buying bees is really expensive and I think their health would be inferior to a colony that has swarmed on its own -- especially if caught early in the season).

Thanks,
Oguz
8 months ago
Hi there! I have two Layen's style beehives, which I built mostly by following the instructions at https://horizontalhive.com/. This was the second winter for one of the hives, and it was the first one for the other. At the end of October, I thought I was winterizing my hives by putting several layers of fabric on top of the frames including clean undershirts and towels. In one of the hives, I even put a small cushion. All of these materials were placed above the frames and underneath the lid. The lid has two side ventilations and the hive has a screened hole at the bottom to allow airflow. After collecting the honey and making sure to leave the bees a generous amount, I removed the empty frames and put an insulation board to tuck the bees in to one side of the hive (to the side where the entrance is). Finally, I reduced the size of the size of the entrance slit to prevent unnecessary heat loss.

When I arrived at the side today, I was faced with a catastrophe. All bees in both hives were dead. The fabrics in one of the hives were clearly wet. Perhaps rain found a way to get in it couldn't dry out. The top of the frames were all moldy. Even the left-over honey looked quite dark and unusable. The second hive appeared to be dry, but nonetheless the bees were all dead.

Now, a number of things could have gone wrong of course including some kind of infestation. But I was wondering if it was a mistake to use fabric as an insulation. I wonder if it got wet because of rain finding a way in or because of the condensation from within the hive. I would be very happy to hear your advice on this matter -- in particular whether I was doing something bad for the bees in an attempt to keep them warm.

As an extra information, I want to keep bees naturally by providing them good conditions and leaving generous amounts of honey for their consumption, which they make for themselves anyways. I don't want to feed sugar or spray any kind of chemicals. I am not in it for profit, but simply for the joy of keeping bees. My climate is a continental one, with relatively cold winters (can go below 0 degrees Celcius but daytime temperatures are usually around 0-10 degrees Celcius in winter).

As a related question, how can I clean the hive and the frames which got moldy? I hope I don't have to throw them away and start anew -- especially for the hive. My frames are also custom build as the hive dimensions are non-standard. Looking forward to your advice.

Oguz

8 months ago
Hi David,

I am using Lithium (LiFePO4 to be specific) at 48V. The battery box has a BMS in it and I can monitor the individual cells (there are 16 of them) using an app. But the inverter has no communication with the BMS -- it is an hybrid inverter rated at 6.2 kW. So I think my inverter is already relying on the global battery voltage readings from the poles of the battery. Is this a problem?

If I add a second charge controller, which in the mean-time I realized to be quite an expensive option, it would also connect to the battery poles directly and would sample the battery voltage from there. But I will make sure to enter the same battery settings for the existing inverter and the new MPPT.

I do have a question regarding the MPPT choice. Given that my panel specs are 320W-410W 32V-40V 7.7A-10A and I will connect 6 of these in series, can you recommend me a budget-friendly MPPT that will work with them. Victron models are unfortunately very expensive.

Also, I noticed that inverters can consume non-negligible battery capacity at night. The aforementioned 6.2 kW inverter easily eats up around 15% of my 100 Ah battery. Do you know if charge controllers also consume such capacity?

Thanks.
8 months ago
Hi Nathanael,

Yes, the inverter is an all-in-one type inverter which includes MPPT. I do not see this MPPT but it must be inside the inverter box.  The description of the inverter states "Mppt 90-500v Pv Input 100a" , which I understand to contain an MPPT with the given specs.

If I now buy a second MPPT with the same voltage and current settings (I guess it doesn't have to be the same, but it must match my panel specs) AND program the MPPT to use the same charging parameters as the built-in MPPT that comes with the inverter, I should be good to go, right?

The only thing that I do not understand is that, the inverter would be unaware of this second MPPT. But I guess it is not a problem.

Thanks,
Oguz
8 months ago
Hi There,

In my setup, I two two strings of panels on east and west side of my roof. Each string has 6 approximately 400W panels serially connected. I would like to ensure that each string gets its own MPPT for optimal performance. I have previously found out that when I directly connected these strings in parallel, I ran into a malfunction in one of the strings (most likely bypass diodes in the strings). So I now want to do things right to avoid a similar future problem.

The issue is that my solar hybrid inverter has a single MPPT module. How can I best add the second MPPT to my system? It seems to be suggested that the second MPPT output should be directly connected to the battery. Doesn't it create a weird configuration where one string goes to an inverter and then to a battery and the other string directly goes to the battery (I mean after the MPPT). I guess if I make this connection, the inverter would be fully unaware of my second string which goes to the battery directly. Wouldn't it cause a problem?

Or would you suggest that using blocking diodes in a combiner box a better option for my system?

Thanks for any insights.
8 months ago
Thanks for your responses. After going through them and doing a lot of research online, I believe I have reached a reasonable conclusion. Let me share it here -- but the confirmation will have to wait until I bring down and hopefully inspect the junction box of the panels in about a months time (this is a remote site that I do not have regular access).

To remind you my setup, I had two strings (meaning serially connected) of panes on each side of the roof; east and west. The groups of panels were bought at different times, so the east side must have had a slightly higher voltage ratings (the panels look a bit bigger too). I made the mistake of connecting each string in parallel to each other, assuming that this is the best type of connection under such an east-west configuration. The solar guys from whom I bought the panels and help me install them did not warn me of any potential problem.

After doing research, I now realize that such an east-west configuration typically requires an extra step: 1) Either blocking diodes that prevents voltage discharge between the strings (each string gets its blocking diode in series, before the strings are paralleled). 2) Separate MPPT for each string. These two solutions are clearly presented in this video: https://www.youtube.com/watch?v=-x_6OLdAods

I will ask a related question about these two options in a separate thread.

So I now hope that lack of either solution caused a heating and a malfunction, most likely a short circuit, of the bypass diodes in the failed string. Hopefully, my junction boxes are not buried in epoxy and have easy to replace bypass diodes. Will keep you updated once I fully get to the bottom of this problem.
8 months ago
Yes, I disconnected west panels one by one. Sorry for the typo.

The brand of the inverter is Lexron - it has a 6.2 kW rating and a MPPT voltage range of 90 - 500 Volt. I think my inverter was turned off when I arrived at the site from the on-off switch.
8 months ago