Jason Pritchard

+ Follow
since Nov 10, 2020
Merit badge: bb list bbv list
For More
Apples and Likes
Apples
Total received
In last 30 days
0
Forums and Threads

Recent posts by Jason Pritchard

Thank you for the thoughts William. I protected the concrete with a layer of super wool and it seems to have improved the situation. There are three slabs in total on top of the stove, but my only concern is with the one directly over the top of the firebox core. Since I have the materials necessary, I plan to pour a new slab for the area, let it cure much longer and create space for a solid and sealed layer of cfb to encase the countertop edges. She's fired up and roaring right now, so it looks like I have a bit of time to see if there are any more issues. I'll report back with any useful info.

P.S. This is a Continental Walker inspired cook stove. Thanks!
2 months ago

William Bronson wrote: I'm gonna throw this out there.
Use RapidSet CementAll as the cement portion and  an aluminum oxide or garnet blasting sand as your aggregate.
Add handfuls of rockwool into the mix to resist cracking.
Now use it wherever you like, heat be damned,  and you should be fine.
I've used this mix, plus perlite to form the feed,  burn tunnel and riser on a j tube rocket stove.
It's very durable, resistant to heat an physically strong.
The addition of perlite makes it physically weaker,not strong enough to support weight over a large span,  but  insulative and easily worked with saws and drills.
My under construction batch box is made of slabs of this mix.
I left out the aluminum oxide sand,  they seemed superfluous.

RapidSet CementAll isn't officially a refractory cement.
It is an Calcium aluminate cement, rated to 2300 degrees in at least one official msds document,and about $20.00 a bag Vs.  50 bucks for "real" refractory cement.
It sets up crazy fast which is either a bug or a feature...

With all that said,  I have also had great luck with cob and/or soil cement over steel mesh,  wires shelves, or sheet metal.
I recommend screwing some hardware cloth to the sheet metal to create a bond.
I plan on topping some of my own bells with aluminum sheet pans from the scrap yard, filled with a CementAll mix, topped with soil.
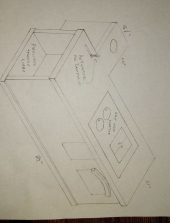
I want to be able to get back into the bell for inspection, and each of these will form a large access panel.


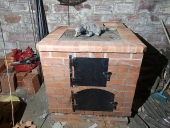
A couple questions for you if you happen to see this. I just fired up my newly built rocket mass heater. It has performed admirably, although, the concrete countertop that holds the cooktop just failed this morning. It was not unexpected but did happen sooner than I anticipated. It was the second small burn since completion. I used RapidSet Mortar mix for the countertops. It states on the bag "not intended for extended exposure over 212*F," just as the CementAll states. I couldn't find the document you mentioned with the higher temp info.

Do you know if this mix, RapidSet Mortar Mix, would work the same as the CementAll if amended in the way you recommend? What are the ratios of CementAll, blasting sand and Rockwool? Say one 55lb bag, to ?lbs sand, to ? handfuls of shredded Rockwool? Also, does the Rockwool appear in the finished surfaces; I'm guessing it does, but wonder how badly?

I didn't add any extra aggregate to the Mortar mix and they turned out nicer than I expected. I happen to have a bag of Mortar Mix left and a batt of Rockwool and would love to pour a new top so I can continue to cure/dry out the stove. Thank you for any thoughts you might share!
2 months ago
Thanks for the reply Tony. Very helpful indeed. Looks like you're getting close to firing the stove up. I'm thinking I will need to support the cfb if I choose to use the tiles I have as they don't span the top from brick to brick. I'll have to experiment a bit. I also plan to coat the cfb, as you did, with a water glass solution and hope that it slows the absorption of moisture. Best of luck on the fire up!

4 months ago
Very well executed build you have there Tony. I'd be thrilled if mine turns out half as good. Couple questions if you don't mind? You mentioned earlier that the cfb got quite soggy when in contact with your mortar. Did you do anything to remedy that or did it stiffen up upon drying?

I'm guessing you used low density cfb; is that all you have supporting your granite slabs or does the metal frame have a lip that the slabs rest on? I'm hoping the cfb will support some porcelain tiles I had planned to use as the topper, but wasn't sure if I would need some bracing; which would further complicate my already complicated build. I'm thinking high density cfb may do the trick if LD is not up to the task. I'm headed down the hill to look at some today and compare prices and such.

I very much wanted to keep things simple, as you suggested, but my space restraints forced deviating from the plans. Thank you for any thoughts!
4 months ago
Wonderful progress Tony! I'm working on frames and doors this week and hope to lay the first course next week. I'd like to hear more about your white oven design if you care to share. Will it be a steel box that sits in the oven area just above the lower tunnels? Do you plan to weld that to the door frame as a way to keep it sealed from the stove gasses? I'm learning much from your build, so thank you for continuing to document your progress and thoughts.
5 months ago
Thank you for the detailed explanation Tony; it's very helpful. I'm guessing the idea with the twisted wire, and your thin strapping, is that the lesser amount of expansion/contraction will be so minute that it shouldn't cause any issues because of its size? As opposed to pieces of the angle protruding into the mortar that will certainly experience more movement. I like the strapping/wire idea.

I saw that Austin had issues with drilling into the bricks and have been pondering alternatives ever since. I'm now thinking about running wire into the mortar and then running strapping into the firebox and oven areas. Predrilling holes in the bricks and then lining up the strap, drill a hole through that, at the appropriate predrilled location on the bricks, and sinking a few screws in that manner. Thus having both the wire anchored in the mortar and the attached strapping anchored into the bricks themselves as a robust way to keep the doors in place. Thanks for the inspiration and the photos!  
5 months ago
Is that little "fin" in the second pic how you'll be attaching your doors/frames to the stove itself? Do you have places you plan to use masonry screws that go through the door frames and into the bricks themselves? I'm still not sure how I plan to make the connections.

My bricks surrounding the oven and firebox door openings are quite short and I'm a bit concerned on how they'll hold up through years of use. Although, I did put some Tapcons in a rather small brick and whirled it around quite aggressively, trying to force a failure, and it held without any signs of stress.

I plan on pouring my insulated slab in the next couple of days and will begin work on my doors and frames while it cures. Those doors look beefy! Thanks for the inspiration and sharing your build.
5 months ago
Thanks Burra. I'm glad to know your thoughts on the matter and appreciate the quick reply. Looking forward to the rest of the build!
7 months ago
Thank you for sharing this build Austin and Burra. It is very helpful as there are so few builds showing the process of putting together one of Matt's stoves. I'm working on his Continental now and appreciate you sharing all the steps. I did wonder about your use of concrete in the mortar. I was under the impression that the use of a clay based mortar was so that the clay bricks and mortar would expand and contract at the same rate, reducing the risk of cracking. I see Thomas did the same as you on his riserless core build. Did you give that any thought, or did you feel it was a minor issue and move forward with what was readily available and what you were more familiar with? The stove is looking fantastic... keep on keepin" on!
7 months ago
Thanks for the heads up, Nancy! Sounds like a heck of an adventure. I'm leaning towards Rockwool insulation applied to a sealed top plate and bottom plate in the throat and possibly lining the old firebox too. Still reading what others have done over at hearth.com... I'm assuming what they've done will be sufficient for an RMH as well.

Are you able to clean the entirety of the flex line from the top of the chimney? I won't have access to the old fireplace once the stove is built, as it'll cover the entire FP opening. I will have a clean-out so I can vacuum and clean the stove's chimney, but nothing beyond that except from the top.
7 months ago