I'm building The Continental (big cook stove) designed by Matt Walker, with a few modifications, in front of an existing fireplace. I removed a "Better-N-Bens" inefficient and ineffective wood stove that was vented right into the firebox out of the rear of the stove. I removed the stove and hearth and cut out the old damper and will easily be able to remove a brick or two to fit a 6" stove pipe, with a couple 45's, through the throat.
I'm in the foothills of the high desert in Southern California. We have high winds that blow from every direction imaginable. Neighbor's ranch is incorrectly named Nine Winds Ranch (should be 99.) Hot and dry summers with cold and mostly dry winters that have extreme temp swings. The flue liner is 10'-6" tall, 18" x 13-3/4" oval diameter and in excellent shape (had a reputable sweep clean and inspect a few years ago.) Then two more ft to the edge of the smoke shelf where the damper was. The chimney is made of concrete block and exits the roof at the ridge with ext dimensions of 20-3/4" x 16-1/2" and is in the center of the house protruding 24" above the ridge. All exterior walls and the wall that connects the chimney to the rest of the walls are un-insulated concrete block. The attic has good insulation but is not well sealed. It's built in 1952 and has 1150 sq ft. The house gets hot in the summer and cold as crap in the winter. My sons and I got through the last three winters by wearing a lot of layers. I did install a mini-split, but after the first electric bill, it was retired except on special occasions or the really bitter nights.
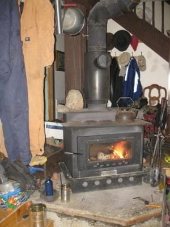
The plan is to run stove pipe from the flue collar all the way up and out the top of the chimney. I will be installing an insulated block off plate at the throat and lining the back of the stove with Rockwool to keep the heat in the living space. The stove chimney is going to jut out the rear, into the old fireplace, and give the straightest shot up the FP chimney (see pic). Matt has answered nearly a hundred questions from me and has been an invaluable coach as he walks me through the build process. I've learned a lot over at hearth.com as well, but wanted to get some input from those that are familiar with RMH and masonry stoves on the best and safest course of action for venting the stove through the existing chimney.
With all that said, is there a rocket stove scientist amongst the Permies that can guide me in choosing the proper components to get this stove off the ground and safely through my chimney? Such as: type of stove pipe: single wall, I doubt this but there will be plenty of cold starts, the chimney is short, the winds are strong and unpredictable and there may not be a substantial delta T on start ups. Double or triple wall? Stainless on some parts, or all? Add insulation in the field (a cheaper solution)? Is there a brand or company that is more trusted with quality control in selecting the stove pipe components? Is it better to use one of those flex lines to get through the throat or use 45's to clear it? Does it need to be secured to the chimney? I am next to the the San Andreas Fault. If so, where and how often? Can I use standard ducting strap or do I need a connector made for the purpose? I assume one would be needed where the stove pipe exists the chimney, especially with my high winds. Because of the conditions enumerated above, is there a specific cap that would provide more benefits? Should I extend the pipe further out the top of the chimney to improve draft? Should I build a block off plate for the top of the chimney as well? Should it be insulated? Etc, etc...
As I put all this together in my minds eye, these are some of the questions that pop up in regards to the routing of the stove pipe and I thought they might be better answered here than anywhere else. I've searched through the forum and stumbled across threads that mention this, but didn't find where one had been documented and shared. If this has been covered, please give me a clue as to its location or, if you have done this yourself, a brief description of how you accomplished it, maybe the components used, and if it is functioning as planned or if there were any changes you'd make. I'd like to get this right the first time through and have something that is durable, functional and safe, so any guidance or advice is greatly appreciated. If there is any more info needed to ascertain the best course of action, please ask. I did my best to provide as much relevant info as I could. If you read through all that, I thank you for taking the time!
Jason
Dimension-Stove.jpg
This shows the pop out that will get the chimney into the old firebox.
Dry-Cooktop.jpg
A dry run with the cast iron cooktop in place.
Dry.jpg
I was trying to avoid making many cuts and use less bricks, so it's far from perfect.
Hearth-FP.jpg
The hearth removed and firebox and smokeshelf were thoroughly cleaned; appears to have never been done. I'll be taking out some, or all, of the firebrick floor to make room for the stove's chimney.
Scaled-FP.jpg
Shows dimensions of the existing fireplace and its placement in relation to the living space.
I am probably not much help but where I live there would be a few options …..
Twin wall stainless chimney flue in stainless steel is by far the most popular method, the one meter sections are lowered down from the top and connected together as they are lowered down and eventually hung from a cover plate fixed onto of the chimney stack.
That method requires a scaffold on the roof and a special lowering pulley system.
For older or less secure chimneys, a flexible stainless steel pipe is pushed up the chimney, secured in place at the bottom with a plate and a insulating product is poured down from the top.
I would strongly advise to avoid the temptation ‘not’ to cut any bricks!
I would advise hiring or buying a wet saw tile cutter, they are very easy to use, make no dust and make straight or angled neat cuts.
I'm pricing things out now and the stainless is not easy on the pocket book. I was looking at this: DuraFlex 6 Inch 304 Stainless Steel Flexible Chimney Liner Kit - 20 Foot Length (nearly $800) but that's just single wall and I'm still not sure about the flexible line stuff. More homework to do. When I said "didn't want to make many cuts" in the pic... that was just for the first dry run stack so I could get some measurements and a visual. I'll be making plenty of cuts, just not with a wet saw. Even used ones are out of the budget. Thank you for the reply.
We lined our old (brick) chimney with stainless flexible flue when we installed our modern 'efficient' wood burning range cooker. I have to say it was an interesting DIY job up two stories plus on ladders! If you do use this route and insulate with perlite, be warned it flows really well! Make sure the botton is well sealed before you start pouring it in at the top (ask me how I know! )
Thanks for the heads up, Nancy! Sounds like a heck of an adventure. I'm leaning towards Rockwool insulation applied to a sealed top plate and bottom plate in the throat and possibly lining the old firebox too. Still reading what others have done over at hearth.com... I'm assuming what they've done will be sufficient for an RMH as well.
Are you able to clean the entirety of the flex line from the top of the chimney? I won't have access to the old fireplace once the stove is built, as it'll cover the entire FP opening. I will have a clean-out so I can vacuum and clean the stove's chimney, but nothing beyond that except from the top.
Nancy Reading
steward and tree herder
Posts: 13853
Location: Isle of Skye, Scotland. Nearly 70 inches rain a year
We clean our chimney from the bottom - we have an access plate in the flue which connects the stove to the chimney flue. The only time we get on top is if there has been an issue with the chimney capping - salt rain and wind have damaged or dislodged it on more than one occasion over the last 16 years. I would think with a proper 'rocket' you should get very little ash or creosote as long as you use properly dried fuel though, especially in an insulated flue. The main reason for the insulation for you would be to ensure a good draft even in warmer weather with low winds.
Hi Jason;
So you have an existing chimney that is in good usable condition.
It is centrally located inside the house.
Why do you want/ need a liner in it?
Did Matt say that entering a larger area would adversely affect the draft before leaving the house?
Or is it your high winds that require a 6" pipe up and out?
How did the chimney draw previously?
Your mock-up looks great!
For all your Montana Masonry Heater parts (also known as) Rocket Mass heater parts.
Visit me at
dragontechrmh.com Once you go brick you will never go back!
thomas rubino wrote:Hi Jason;
So you have an existing chimney that is in good usable condition.
It is centrally located inside the house.
Why do you want/ need a liner in it?
How did the chimney draw previously?
Your mock-up looks great!
I will really have to agree with Tom and Nancy, as your new proposed "rocket stove" should simply produce very little particles that would line your present flue. Now if your chimney is barely holding together that is a different story. But if it is decent shape, and you have bypass included, to always get the draft going the right direction (just helps) I would think there is very little to worry about.
This might be one of those things where, TRY FIRST, and then if it don't work and it is determined to be the flue beyond the stove is the problem, then attack that. Looks like your on the right track with the stove using a proven working design.
I have lined many chimneys over the years be was always for those creosote making stoves that actually created problems no matter what kind of liner was used. What I mean is, the new liner did not solve the problem of creosote building up.
I think that if you dont want to use an insulated chimney, perhaps ask the stoves designer first as most riser less cores seem to need a very good draw to operate at their best.
hello ,took me awhile to find your build ,--- my search method is like a drunk blindfolded man stumbling around a coal mine , hope you found a solution for the flue ---if not --you could weld up a solution ---perhaps make up your own sections---the pipe layouts are on the net , any progress on your doors , the layout pics looked good, did the cast iron top work out, still working around my stove ---making the 2nd cast concrete worktop at the moment


-B.png)
 9
9


 )
)