Aeron, you wrote this,
"Multiple people recommending bypass, which sounds good, only i've never done any of this, and am trying to keep it simple. Adding a bypass sounds like a lot more work than adding a tee piece at the base of the flue. Plus won't i need a clean out down there anyway? "
When all the folks that have built RMH's of nearly all designs, suggest this "bypass" thing, there is a good reason. All are wishing you to have good success with your build. By the way, a T-piece at the base of the flue, in no way, would be considered a easy work around bypass. I am not saying this to be rude, but rather stating it is simply not the same thing.
I think your letting the "idea of doing it" causing thoughts of a great obstical. It is not.
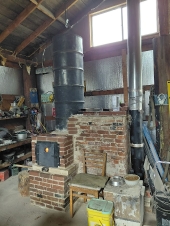
Let me simplify this, by saying, on the build And this includes all of the designs! you have a exit for the exhaust flue. No getting around that. And the flue will always go UP. if you feel you can do this, your only a few steps away from adding one more exit hole and slide gate and having this connect to your rising flue pipe. if you feel you can do the bottom one, you certainly can do the upper bypass one. I don't know about others in exact detail but this bypass does not have to be huge, mine is only 4" so about 1oo mm or so-- it is simply to get things going the right direction easily and for maybe 10 minutes. When you need it, you need it. This won't be often if your stove is warm, as things are primed to get things going in the right direction.
Don't let this little thing stop you from building.
While your at it, you mention that you "will need a clean out anyway" Not sure what your envisioning here, but a simple inspection hole across from the exit hole for the flue will be fine. If your in any kind of Grain harvest country, there are very simple auger tubing rings that work extremely well. Build in, plug and your good to go. Again a very minor thing in the sckeme of things. If you wnat pictures of the clean out, just post a note, and I or someone will post a few phots of this.
cheers
Scott