• Post Reply Bookmark Topic Watch Topic
  • New Topic
permaculture forums growies critters building homesteading energy monies kitchen purity ungarbage community wilderness fiber arts art permaculture artisans regional education skip experiences global resources cider press projects digital market permies.com pie forums private forums all forums
this forum made possible by our volunteer staff, including ...
master stewards:
  • Carla Burke
  • Nancy Reading
  • John F Dean
  • r ranson
  • Jay Angler
  • paul wheaton
stewards:
  • Pearl Sutton
  • Leigh Tate
  • Devaka Cooray
master gardeners:
  • Christopher Weeks
  • Timothy Norton
gardeners:
  • thomas rubino
  • Matt McSpadden
  • Jeremy VanGelder

How do you clean your inner bell's walls?

 
Posts: 59
8
  • Likes 7
  • Mark post as helpful
  • send pies
    Number of slices to send:
    Optional 'thank-you' note:
  • Quote
  • Report post to moderator
Hi all, and especially the rocket scientists with some years of experience behind their belt.
I know fouling of the inner bell's walls is inevitable over time, with some soot from the startup phase and (probably more) carried-over fly ash. How do you go about cleaning the inside of a brick bell? With a brush? How is your access? The 'regular' cleanout doors seem very small to effectively reach all corners of the bell.

At work (biomass energy plant manufacturer), the most used solution are (retractable) sootblowers working with steam or compressed air, litterally blowing off the soot from the heat exchange bundles. Similarly, is vacuuming or compressed air an option in a RMH bell?

Reason for this question: Hof / Oleg shared how his bell looks after 4 years of one 1 to 2 hour burn a day on the Proboards forum: https://youtu.be/7lbbziu-Tgs?si=TyewK7slBPvgzmNh
And this looks quite fouled to me. He mentions his flue gas temperature was at 160 °C, and 120-130 °C after some cleaning.
 
gardener
Posts: 1057
Location: +52° 1' 47.40", +4° 22' 57.80"
449
woodworking rocket stoves wood heat
  • Likes 16
  • Mark post as helpful
  • send pies
    Number of slices to send:
    Optional 'thank-you' note:
  • Quote
  • Report post to moderator
Good question, I try to answer it to the best of my abilities.
First and foremost: in the early stage of the burn there will be some soot that condensates on the walls (and ceiling) of a bell. This layer is very, very thin, nothing to be worried about. It will build up in months, up to the stage that it is quite flammable. So most of it will be turned into ash when the bell is getting hot enough, in a frost period for example.

Nothing to be worried about again, in no circumstance it will be something like a chimney fire, actually far from that. You won't notice it, the layer is glowing a bit and that's it. This process is repeated over and over again, the layer of ash will grow until it will get unstable on vertical surfaces, just falls down and accumulates on the floor of the bell.

So most ash falls down, some will stay and forms the base for a new layer of soot that'll turn into ash, and so on. This layer will be insulative but is quite thin. The higher the temperature difference between combustion gases and the bell walls, the less insulative it is. Insulation isn't blocking the heat, it slows it down.

Now my own situation: last winter I could tell my heater wasn't really happy, the burns were quite lazy. So during a warm spell, I took out the stove pipe and with the help of a flashlight I inspected the floor under and around the combustion core, which is raised above the floor by two feet. There happened to be a very generous layer of ash that wasn't smooth and level as I expected but rough and bumpy instead. It even did rise up to the level of the exhaust opening, blocking it partly.

Easy enough to scoop most of it out, the vacuum cleaner did most of the rest. Not all the ash was removed though, some was left but I couldn't care less. After that cleaning action the heater was its normal self again. Last fall I modified the top of the bell, a small extension and another way to close the top. The closing method was very similar to the Mallorca build, back in 2017.

While the bell was open at the top I noticed there was a thin layer of ash along the walls, nothing dramatic. The top of that layer was black and underneath it was just light grey ash. I left it there, I wasn't motivated to stir up lots of ash in the living room. Now, how quick would that layer grow?

This winter it's ten years ago that my red bell heater was built. Year after year, our fuel consumption was around 1.5 m3 of soft coniferous species, which equals 0.4 cords in imperial terms. In ten years, that would mean 4 cords or 6 m3, so I could expect to clean the floor of my bell when that amount is reached again. For other heaters: of course depending on the heater's size, it's construction, how high the exhaust opening is above the floor and whether or not the core is elevated. When you have lots of space down there, the interval could be anything between 2 and 10 years.

To answer the question directly: no need to clean the walls of a bell. That ash layer will fall down automatically, gravity will take care of that.
 
Rocket Scientist
Posts: 4530
Location: Upstate NY, zone 5
576
5
  • Likes 10
  • Mark post as helpful
  • send pies
    Number of slices to send:
    Optional 'thank-you' note:
  • Quote
  • Report post to moderator
I inspected and cleaned the interior of my 8" J-tube bell last fall, 8 years after I first started it. I had inspected it after the first year and found that there was not much buildup. This time, after 7 years, there was around 4 or 5 inches of fly ash on the bell floor, just beginning to obstruct the exit but not causing any problem yet. It amounted to 2 or 3 gallons. The walls and ceiling had a thin coat of soot. I took lots of pictures and will post a report when I find spare time.
 
Julian Adam
Posts: 59
8
  • Likes 3
  • Mark post as helpful
  • send pies
    Number of slices to send:
    Optional 'thank-you' note:
  • Quote
  • Report post to moderator
Thank you for the extended explanation Peter and for sharing your own experience with the red heater!

Peter van den Berg wrote: So most ash falls down, some will stay and forms the base for a new layer of soot that'll turn into ash, and so on. This layer will be insulative but is quite thin. The higher the temperature difference between combustion gases and the bell walls, the less insulative it is. Insulation isn't blocking the heat, it slows it down.


Out of interest, could you elaborate on this insulating effect Peter, e.g. what kind of rise in the flue gas temperature are we speaking of, clean compared to fouled (= e.g. after 2 years).

Peter van den Berg wrote: Last fall I modified the top of the bell, a small extension and another way to close the top. The closing method was very similar to the Mallorca build, back in 2017.


After considering building the top of my bell with an arch to avoid the superwool, for which Scott kindly offered to help (!), It looks like I will also be using this closing method. I got some second hand 9 x 9, 0.9 cm thick steel lintels which were used in a window opening. Also out of curiosity, did you build the extension to get your ISA up and flue gas temperature down slightly, I seem to recall you had around 120 °C exit T?

Peter van den Berg wrote:
This winter it's ten years ago that my red bell heater was built. Year after year, our fuel consumption was around 1.5 m3 of soft coniferous species, which equals 0.4 cords in imperial terms. In ten years, that would mean 4 cords or 6 m3, so I could expect to clean the floor of my bell when that amount is reached again. For other heaters: of course depending on the heater's size, it's construction, how high the exhaust opening is above the floor and whether or not the core is elevated. When you have lots of space down there, the interval could be anything between 2 and 10 years.

To answer the question directly: no need to clean the walls of a bell. That ash layer will fall down automatically, gravity will take care of that.


Great to know Peter! One more thing not to worry about :)
 
Julian Adam
Posts: 59
8
  • Mark post as helpful
  • send pies
    Number of slices to send:
    Optional 'thank-you' note:
  • Quote
  • Report post to moderator
Glenn, I would definitely be interested in these pictures! I suppose the walls looked similar to the video Hof shared? Thank you for your extra info, scooping out the ashes after a few years it is!
 
Peter van den Berg
gardener
Posts: 1057
Location: +52° 1' 47.40", +4° 22' 57.80"
449
woodworking rocket stoves wood heat
  • Likes 6
  • Mark post as helpful
  • send pies
    Number of slices to send:
    Optional 'thank-you' note:
  • Quote
  • Report post to moderator

Julian Adam wrote:Out of interest, could you elaborate on this insulating effect Peter, e.g. what kind of rise in the flue gas temperature are we speaking of, clean compared to fouled (= e.g. after 2 years).


Hard to say, it depends greatly on the gas temperature versus the temperature of the bell walls, expressed as deltaT. As a guess: maybe 2 to 5 degrees C, nothing much to speak of. With a little insulation, the exhaust temperature goes up rather quick, due to the walls aren't as absorbing with a low gas temperature. The higher the gas temperature and thus the deltaT, the more heat is reaching the walls. A complicating factor is the fact that I am used to tuning the heater down with the air inlet during the burn, in order to keep the exhaust temperature below 120 ºC (248 ºF). Between 100 and 110 ºC (212 and 230 ºF), while the roar is unaffected is very close to ideal. This is one of the things I tried very hard to have it built-in with the Shorty core, it is meant to regulate itself, independent of the air supply. That's why the Shorty is a casual burner, burning clean with a high overload resistance and good hot refueling characteristics.

Julian Adam wrote:Also out of curiosity, did you build the extension to get your ISA up and flue gas temperature down slightly, I seem to recall you had around 120 °C exit T?


The ISA has been 5 m2 (53.8 sq. ft) for the last nine years, at the time there wasn't a clear figure how large it could be. After the alteration it's now 5.25 m2 (56.5 sq, ft), pretty close to the current recommended value and the weight has been risen to 2.2 metric tons (2.43 US tons). It still reaches the critical exit temperature of 60 ºC (140 ºF) rather quick, after that the temp is going up more slowly than before. And the bell is now capable of holding more heat due to the higher mass.
 
Julian Adam
Posts: 59
8
  • Likes 2
  • Mark post as helpful
  • send pies
    Number of slices to send:
    Optional 'thank-you' note:
  • Quote
  • Report post to moderator

Peter van den Berg wrote: 2 to 5 degrees C, nothing much to speak of.


This is indeed very little, thank you for clarifying.

Peter van den Berg wrote: A complicating factor is the fact that I am used to tuning the heater down with the air inlet during the burn, in order to keep the exhaust temperature below 120 ºC (248 ºF). Between 100 and 110 ºC (212 and 230 ºF), while the roar is unaffected is very close to ideal. This is one of the things I tried very hard to have it built-in with the Shorty core, it is meant to regulate itself, independent of the air supply. That's why the Shorty is a casual burner, burning clean with a high overload resistance and good hot refueling characteristics.


I have two additional questions, sorry! :)
1. If you say you tune down the air inlet, how often do you have to play with it? Is it just closing to x percent after x time once?
2. I can see the advantages of the shorty core. My bell will be high but the shortness appeals to me because if the regular sidewinder core would ever need replacing I would be up for a (huge) rebuild, because of the tall riser. Only recently I discovered that you had mentioned the build of a sidewinder shorty version as well. I was wondering if you tested this version with your Testo? I would assume the lack of floor channel may make the sidewinder less ideal?
 
rocket scientist
Posts: 176
Location: Sangre de Cristo Mountains, CO - Lat 38°14' - Zone 5b
134
hunting earthworks solar wood heat rocket stoves homestead
  • Likes 3
  • Mark post as helpful
  • send pies
    Number of slices to send:
    Optional 'thank-you' note:
  • Quote
  • Report post to moderator
Hello Julian... a few comments to toss out.

My system was built to 6" specs due to having an existing chimney in my shop. The system is a bit undersized for my shop area (42' x 48' x 15') so with my mid winter outdoor temps going below zero F, I will typically run 2 or 3 batches back to back. I like to keep my outer brick skin in the 135 to 160F range in the hottest zone.

I'm running a traditional combustion core with tall riser. The riser is built from insulated fire brick rated at 2,600F and wrapped with superwool. My roof is 12" above the exit of the riser and triple layered; refractory brick, then superwool then clay brick. With the brick layed in dry but tight and the SW layer snugly sitting wall to wall. I have no gas leaks proven by the fact that I keep a CO monitor on the rooftop. This provides me with a clean and relatively easy means to remove the roof in the future for inspection. I used the high temp rated IFB for my riser with the expectation that it will last for many years unaffected by the heat generated.

When I light off the first batch in the morning or evening I will typically keep my door cracked just a touch to aid in getting the load lit but then close the door. There is no further fiddling with air intake, it just runs on its own with a nice low dragon roar. Even with a 3 batch back to back burn I have never seen my exit temperatures exceed 245F (118C). It will usually run in the 225F (107C) range.

If you have no height or weight restriction don't discount the traditional core design. I'm actually curious to know Peter's thoughts on this. Specifically, given no restrictions on size, weight and materials cost/access what would be his order of preference for the combustion core: traditional tall riser, DSR2, DSR3, Shorty core?
 
Peter van den Berg
gardener
Posts: 1057
Location: +52° 1' 47.40", +4° 22' 57.80"
449
woodworking rocket stoves wood heat
  • Likes 4
  • Mark post as helpful
  • send pies
    Number of slices to send:
    Optional 'thank-you' note:
  • Quote
  • Report post to moderator

Julian Adam wrote:1. If you say you tune down the air inlet, how often do you have to play with it? Is it just closing to x percent after x time once?


Most of the time there are three steps:  door open a crack to start with, door open half a crack (step1), door closed (step2), partially close the air inlet (step 3). With half a load step 3 is left out, the exhaust temperature will be stable by itself in that case. Time isn't the factor to go by, always the exhaust temperature. This a result of testing this heater endlessly, there seemed to be a direct correlation between chimney temp on the one hand and performance in terms of highest efficiency and lowest CO level on the other.

Julian Adam wrote:2. I can see the advantages of the shorty core. My bell will be high but the shortness appeals to me because if the regular sidewinder core would ever need replacing I would be up for a (huge) rebuild, because of the tall riser. Only recently I discovered that you had mentioned the build of a sidewinder shorty version as well. I was wondering if you tested this version with your Testo? I would assume the lack of floor channel may make the sidewinder less ideal?


No problems with the sidewinder Shorty core, it runs beautifully. I tested it last July during a workshop and it performed just the same as a straight one. A couple of guys tried to overload the thing for hours on end and they didn't succeed, not even with a reload right in front of the port. It was a strange sight while I walked to the workshop site, saw nothing leaving the bare chimney pipe only to be met with a heater that housed a huge, roaring fire. Such moments, I became unresistable giggly and felt very, very satisfied. No wonder, its development took the best part of a year, after all.
 
Peter van den Berg
gardener
Posts: 1057
Location: +52° 1' 47.40", +4° 22' 57.80"
449
woodworking rocket stoves wood heat
  • Likes 6
  • Mark post as helpful
  • send pies
    Number of slices to send:
    Optional 'thank-you' note:
  • Quote
  • Report post to moderator

Glenn Littman wrote:If you have no height or weight restriction don't discount the traditional core design. I'm actually curious to know Peter's thoughts on this. Specifically, given no restrictions on size, weight and materials cost/access what would be his order of preference for the combustion core: traditional tall riser, DSR2, DSR3, Shorty core?


The basic design is a very well-known one, there's lots of knowledge about it in the wider community. But there's a steel piece inside the firebox which could give up the ghost somewhere in time. And it's prone to overloads, I am very pleased that yours appears to be so stable, Glenn.

The DSR3 is a nice one, very spectacular to see it burn. Although complicated to build, some materials aren't available everywhere. But it is as self-regulating as a Shorty core which development followed logically after this one.

DSR2 is relatively easy to build, works real nice, low stature but features no self-regulating and has still the steel floor channel inside the firebox.

Shorty core is even lower, exhausting horizontally, clean burn, high overload resistence, good reloading characteristics. As a consequence, it is suitable for a cooking range and in a bell system the adagium "all above the riser should be refractory" doesn't count anymore. As easy to build as a DSR2, I might add.

All of the above core variants have their own merits. It depends greatly on one's need, budget and abilities what to choose. The whole of the above family is fully scalable as well, which can't be said about lots of other heaters and is unique in its own right. Furthermore, all of these family members works just as well as sidewinder variants, tested and all.

But, given no restrictions, the Shorty core would be my number one favourite. Secondly the DSR2 core, followed by the original BBR core and last but not least the DSR3.
 
Glenn Littman
rocket scientist
Posts: 176
Location: Sangre de Cristo Mountains, CO - Lat 38°14' - Zone 5b
134
hunting earthworks solar wood heat rocket stoves homestead
  • Likes 5
  • Mark post as helpful
  • send pies
    Number of slices to send:
    Optional 'thank-you' note:
  • Quote
  • Report post to moderator

Peter van den Berg wrote:...But there's a steel piece inside the firebox which could give up the ghost somewhere in time.


Thank you for your excellent response Peter and assessment of the different designs. As for the steel piece in the basic (original) design, I assume you are referring to the secondary air intake tube on the firebox floor. I built mine in a manner that will allow me to simply lift it out and replace it. I may have to remove the door but I believe I can just lift it up from the end by the port and gain enough angle to pull it toward the port and out of the hole in the door frame.

Peter van den Berg wrote:...But, given no restrictions, the Shorty core would be my number one favourite...


This is great to hear. One of my good friends is doing a major remodel/expansion on an Earthship house and is going to build an 8" system in the main room. He was planning a basic (original) design but with your comments above I'm sure he will be rethinking that and going shorty. In this case my question would be whether there is no reasonable limit in the height inside the bell from the exit port of the Shorty core to the underside of the roof?
 
Peter van den Berg
gardener
Posts: 1057
Location: +52° 1' 47.40", +4° 22' 57.80"
449
woodworking rocket stoves wood heat
  • Likes 2
  • Mark post as helpful
  • send pies
    Number of slices to send:
    Optional 'thank-you' note:
  • Quote
  • Report post to moderator

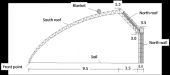
Glenn Littman wrote:One of my good friends is doing a major remodel/expansion on an Earthship house and is going to build an 8" system in the main room. He was planning a basic (original) design but with your comments above I'm sure he will be rethinking that and going shorty. In this case my question would be whether there is no reasonable limit in the height inside the bell from the exit port of the Shorty core to the underside of the roof?


In case you mean the upper limit: no, there's no practical one. The now-standard BBR has once been done with with a "top gap" of 3.3 feet in a 6" system without any adverse effects as I could see.
The bottom limit is the height of the riser itself. The cook stove built last July didn't have any height above the riser, the cook top was resting directly on the riser which incidentally wasn't done with a refractory top slab. With a hefty fire in the riser/afterburner, one could see the spinning vortexes through the dark brown glass.
For a bell type heat exchanger, I'd prefer one system diameter's size above the riser. But it could be less if you want to, I presume.
 
Julian Adam
Posts: 59
8
  • Likes 2
  • Mark post as helpful
  • send pies
    Number of slices to send:
    Optional 'thank-you' note:
  • Quote
  • Report post to moderator

Peter van den Berg wrote: Most of the time there are three steps:  door open a crack to start with, door open half a crack (step1), door closed (step2), partially close the air inlet (step 3). With half a load step 3 is left out, the exhaust temperature will be stable by itself in that case. Time isn't the factor to go by, always the exhaust temperature. This a result of testing this heater endlessly, there seemed to be a direct correlation between chimney temp on the one hand and performance in terms of highest efficiency and lowest CO level on the other.


Great explanation, if I understand correctly the temperature at which to perform step 3 will be dependent on the construction of the heater / bell.

Peter van den Berg wrote: No problems with the sidewinder Shorty core, it runs beautifully. I tested it last July during a workshop and it performed just the same as a straight one. A couple of guys tried to overload the thing for hours on end and they didn't succeed, not even with a reload right in front of the port. It was a strange sight while I walked to the workshop site, saw nothing leaving the bare chimney pipe only to be met with a heater that housed a huge, roaring fire. Such moments, I became unresistable giggly and felt very, very satisfied. No wonder, its development took the best part of a year, after all.


I can imagine, at these times, it probably almost feels like you are defying the laws of nature! I must come back to my original question to you, Peter. That is, do you think the shorty sidewinder could be incorporated in my bell? My concern being that the flue gas flow coming from the riser may obstruct the downwards stratifying layers in the bell?
thumb-PXL_20240729_201843722-2-(1).jpg
[Thumbnail for thumb-PXL_20240729_201843722-2-(1).jpg]
 
Peter van den Berg
gardener
Posts: 1057
Location: +52° 1' 47.40", +4° 22' 57.80"
449
woodworking rocket stoves wood heat
  • Likes 7
  • Mark post as helpful
  • send pies
    Number of slices to send:
    Optional 'thank-you' note:
  • Quote
  • Report post to moderator

Julian Adam wrote:I must come back to my original question to you, Peter. That is, do you think the shorty sidewinder could be incorporated in my bell? My concern being that the flue gas flow coming from the riser may obstruct the downwards stratifying layers in the bell?


Hmmm... I've been reading through this whole topic, this question isn't asked earlier so it's a new question.
The answer is easy, I don't think a sideways exhausting Shorty core will interfere with the stratification in the bell. Or just as much as a now-standard-BBR with long riser, that one will disrupt the gases just as much but in a slightly different way.

As I see it, you should build your bell somewhat deeper and less wide so that the whole of the core is incorporated in the bell.
It's time now to stop asking questions and start building instead, don't you think?
 
Posts: 290
Location: North East Iowa, USA
74
  • Likes 4
  • Mark post as helpful
  • send pies
    Number of slices to send:
    Optional 'thank-you' note:
  • Quote
  • Report post to moderator
I decided after reading this subject title with the questions and great replies of Peter on the matter.  

Being that I built into my  7" sized bell with related ISA  measurements, a very simple 8" dia inspection door that takes all of 10 seconds to slip off and inspect the insides, I found exactly as Peter mentioned.  It was eerie  inside though,  I related it to the photos of bottom of the sea, where nothing moves, and things settle in perfect peace.

I suppose you could say I had 1/4" of the lightest dust on the bottom of the bell.  But probably less, and directly across my inspection hole, was my exit flue, looking like the day it was installed.

This is a 7" system and a single bell that was experimented with on many levels for exterior facades,  from 1-1/8" granite, up to 4" thick granite on the entire back side, and as simple as 12 x 24" tile on the right side of the bell.  All of the secondary mass facades was installed by nothing more than 100% silicon.

I found conversing with Tom ( Dragon Masonry stoves)  and Glen, high in the Colorado Mountains, to be inspirational, if not informative. As all three of our stoves have worked out well.  This was/is my 4th stove, with the others being J tubes for almost instant heat.  Pre-planning for MASS heat has been most rewarding.  

The intention of this set up was never to be 100% fulfillment of the heat required in this house, as I could not build big enough for that. instead it has been a excellent efficient supplemental stove.  We light in the morning, and add to as much as required to reach bell temp of 150-160 degrees, then close it up. until as much heat has radiated off to get to 100 degrees.  Exhaust temps are held to the same level, rarely going higher,   Thus we feel the system is as efficient as I could expect.   Over fueling simply doesn't happen.  The ability to turn a 1/2 round bar of steel, a dull red in about 10 minutes can always be counted on.

In short, I feel with the amount being burned in this, my typical season of burning would be relate-able to many burning 3 seasons.

Just thought a "seasoned" report might inspire some to move forward yet this winter with a build.

Best of success!
 
Julian Adam
Posts: 59
8
  • Likes 1
  • Mark post as helpful
  • send pies
    Number of slices to send:
    Optional 'thank-you' note:
  • Quote
  • Report post to moderator
Peter, I've started my build a few months back: https://permies.com/t/261401/BBR-inch-mm-sidewinder-build
Unfortunately I don't have enough free time to continue building as quickly as I'd like, giving too much time for thinking...
With 'my original question to you' I meant in my build thread, I asked about the 5 times CSA clearance around the core, and after your input I increased the clearance to around 7.5. The external skin is built now. Using the shorty core instead of the original batch box, I would be sacrificing some of that clearance again due to the deeper port, to around 6.1 times riser CSA. My sketch was not sufficiently clear.

Forgive me for sharing my thoughts:
If I'm using the shorty core, I could keep the door in the middle, but there will be a 'slit' to the right of the core which I probably shouldn't count as clearance around the core. Plus the hot gas would directly be aimed at my chimney.

Other option is to put the door at the right side of the bell, then I would be able to use the ful 6.11 x CSA clearance. Only concern would be 'side gap' (eq. to top gap for shorty) of around 20 (assuming some extra mass / insulation where the gas hits the bell's wall) - 24 cm, which is less than the recommended 2 x system size.
PXL_20250112_155617012-4.jpg
[Thumbnail for PXL_20250112_155617012-4.jpg]
Shorty: first option
PXL_20250112_155546817-2.jpg
Shorty: second option
 
Julian Adam
Posts: 59
8
  • Mark post as helpful
  • send pies
    Number of slices to send:
    Optional 'thank-you' note:
  • Quote
  • Report post to moderator

Scott Weinberg wrote:
Being that I built into my  7" sized bell with related ISA  measurements, a very simple 8" dia inspection door that takes all of 10 seconds to slip off and inspect the insides, I found exactly as Peter mentioned.


Thanks for adding your experiences to this thread Scott!
 
Posts: 3
  • Likes 2
  • Mark post as helpful
  • send pies
    Number of slices to send:
    Optional 'thank-you' note:
  • Quote
  • Report post to moderator

Peter van den Berg wrote:
Most of the time there are three steps:  door open a crack to start with, door open half a crack (step1), door closed (step2), partially close the air inlet (step 3). With half a load step 3 is left out, the exhaust temperature will be stable by itself in that case. Time isn't the factor to go by, always the exhaust temperature. This a result of testing this heater endlessly, there seemed to be a direct correlation between chimney temp on the one hand and performance in terms of highest efficiency and lowest CO level on the other.


Hello everyone,
my first post here…

Peter, may I ask about the air regulation you described above. I‘m a bit confused, because I thought your batch box designs are supposed to run ether full throttle when burning or with the air supply completely closed at the end of the burn. I remember you did design an air flap on your commercial Dsr3 like this, ether fully closed or fully opened.

Since I’m looking for starting a Dsr3 build soon, I wonder if I should go for a tuneable air flap design. With my traditional wood stove the several air intakes ask for a lot of tuning depending on outside temperatures, wind, chimney temps and so on. So I asked myself if this all is taken care of only by the internal self regulation of the special core design.

Thanks a lot!
 
Julian Adam
Posts: 59
8
  • Likes 1
  • Mark post as helpful
  • send pies
    Number of slices to send:
    Optional 'thank-you' note:
  • Quote
  • Report post to moderator
Matthias, if I may quote Peter, a bit higher up in this thread:

Peter van den Berg wrote: The DSR3 is a nice one, very spectacular to see it burn. Although complicated to build, some materials aren't available everywhere. But it is as self-regulating as a Shorty core which development followed logically after this one.


I read self-regulating as you don't have to do any fiddling with the air intake - it 'decides' itself to dampen the air intake. As I understand, most people don't touch the air intake on batchrockets, probably just loosing a few percents in efficiency. But you can hear what Peter has to say on the matter.
 
Peter van den Berg
gardener
Posts: 1057
Location: +52° 1' 47.40", +4° 22' 57.80"
449
woodworking rocket stoves wood heat
  • Likes 5
  • Mark post as helpful
  • send pies
    Number of slices to send:
    Optional 'thank-you' note:
  • Quote
  • Report post to moderator

Matthias Hacker wrote: I‘m a bit confused, because I thought your batch box designs are supposed to run ether full throttle when burning or with the air supply completely closed at the end of the burn. I remember you did design an air flap on your commercial Dsr3 like this, ether fully closed or fully opened.


There are some differences between a standard batchrocket with long vertical riser and the other variants. The standard one has the habit of burning faster and faster until the point that the afterburner function isn't able to cope anymore with the woodgas production in the firebox. Resulting in a fuel overload and thick black smoke from the chimney.  In order to remedy that, the air inlet size is slightly restricted. Furthermore, air supply is a value that is a combination of opening and air velocity. In order to keep the supply on the same level, the opening should be smaller when the air velocity goes up. That's what I do with my heater, starting with a larger opening and successively making it smaller while the burn is under way. This could also be done electronically with the help of a stepper motor and a temperature sensor in the chimney pipe. OR with the maximum combustion rate function which is built-in the DSR3 and Shorty core designs.

Matthias Hacker wrote: Since I’m looking for starting a Dsr3 build soon, I wonder if I should go for a tuneable air flap design. With my traditional wood stove the several air intakes ask for a lot of tuning depending on outside temperatures, wind, chimney temps and so on. So I asked myself if this all is taken care of only by the internal self regulation of the special core design.


You don't need a tuneable flap design for the DSR3 core you are planning to build. The EU confirmation test on the DSR3 commercial heater was done in October, completely with the open-closed flap, nothing in between. Just build the heater to the specifications, preferably with a bypass, and you're good.
Hope this is clear, though.
 
Matthias Hacker
Posts: 3
  • Likes 3
  • Mark post as helpful
  • send pies
    Number of slices to send:
    Optional 'thank-you' note:
  • Quote
  • Report post to moderator
It‘s perfectly clear, thanks a lot!
So what you wrote about the tuning of the air inlet did apply to the older J tube riser design, not to the last developments like Shorty and Dsr3.

I see what a challenge it is for my wife to tune the air inlets of our regular wood stove so that it‘s running smooth and fine, I don‘t blame her for that, but it will be so much easier with a self regulating design. Also for me of course, not to take care of that every now and then. Now I „only“ have to get the build done 🙏
 
Peter van den Berg
gardener
Posts: 1057
Location: +52° 1' 47.40", +4° 22' 57.80"
449
woodworking rocket stoves wood heat
  • Likes 3
  • Mark post as helpful
  • send pies
    Number of slices to send:
    Optional 'thank-you' note:
  • Quote
  • Report post to moderator
[quote=Julian Adam]If I'm using the shorty core, I could keep the door in the middle, but there will be a 'slit' to the right of the core which I probably shouldn't count as clearance around the core. Plus the hot gas would directly be aimed at my chimney.[/quote]

If you shift the core a bit to the right to close that slit, you'll end up with a maximum space at the left.
A possible solution for the horizontal directed gas stream: just a little ski-ramp on top of the firebox so more heat is directed upwards. This ski-ramp as far away from the core exhaust as possible, not reaching higher than half the height of the exhaust opening.

I didn't try this construction myself, but it seems to be logical.
 
Live large! And I'm talking to you tiny ad!
Rocket Mass Heater Jamboree And Updates
https://permies.com/t/170234/Rocket-Mass-Heater-Jamboree-Updates
reply
    Bookmark Topic Watch Topic
  • New Topic