Peter van den Berg

gardener
+ Follow
since May 27, 2012
Merit badge: bb list bbv list
Forum Moderator
Peter van den Berg currently moderates these forums:
Biography
He's been a furniture maker, mold maker, composites specialist, quality inspector, master of boats. Roughly during the last 30 years he's been meddling with castable refractories and mass heaters. Built a dozen in different guises but never got it as far as to do it professionaly. He loves to try out new ideas, tested those by using a gas analizer.
Lived in The Hague, Netherlands all his life.
For More
+52° 1' 47.40", +4° 22' 57.80"
Apples and Likes
Apples
Total received
In last 30 days
12
Forums and Threads

Recent posts by Peter van den Berg

Matthew Galloway wrote:Ah 30cm thick ceramic fiber was a mistake - I meant 30mm!
There is 10, 20, 25, 30, 40mm high temp ceramic fiber blanket available here. I could do 20mm or 25mm if you think that is sufficient instead of 30mm.


The 20 or 25 mm thickness are both sufficient.

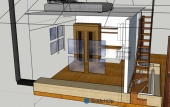
Matthew Galloway wrote:Ah I didn't understand the the depth/length of the firebox could be extended. In the Sketchup design it made it to exactly 376mm from the backside of the door to the front wall of the port wall, but if it's recommended to be larger to provide more space for wood positioning, I can adjust my design.
The common length of firewood around here is only 30m, so maybe I'll bump up the depth of the firebox to 430mm. How does that sound?


Normally, an extension of 25% more in the depth of the firebox is within allowable tolerances. So, 430 mm is a nice figure to go for.
1 week ago
I checked the drawings just a minute ago. It looks like the firebox of the Shorty core is lacking in depth. According to the formulas, this should be 376 mm or up to 25% more of that figure. People tend to think they can tailor the depth to the firewood that is available to them. That's OK, but you'll need some space extra in the front and rear end of the box as well. Say, something between 25 to 50 mm at both ends.
Just to let you know.
1 week ago

Matthew Galloway wrote:You make a good point about stability especially since effectively this batch box will be raised 80cm above the ground to match the floor level, making it more vulnerable than a masonry heater closer to the ground level. The support bricks below the subfloor will all be mortared on the 15cm face for stability, but perhaps I will reconsider the bell design to utilize the stability of the 15cm clay brick face for the bell walls.


Would be a sensible thing to do. Maybe even a vertical angle iron on the four corners, held together by steel strips.

Matthew Galloway wrote:I do still intend on building the core on the 6cm face of the refractory brick, but I can reinforce that with a steel frame.
Since we're on the subject, do you think it's necessary to place a layer of clay brick alongside the sidewalls of the core or is it sufficient to just have the steel frame and wrap the core and riser in ceramic blanket? I'm thinking 30cm thick ceramic superwool.


I think it would be sufficient to have a steel frame around the core. Insulation of the core could be done, but 30 cm looks like grossly overkill to me. I'd suggest to use Morgan Thermal Ceramics Superwool 25 mm, this is sufficient in most cases.
2 weeks ago

Matthew Galloway wrote:
Now I'm working on the bell and realizing with the 30x15x6cm clay bricks available here that would suggest stacking the bell bricks on the 6cm edge to keep the profile of the bell as small as possible.  So I'm going for a cube shape of about 90x90x90cm on the exterior.  Is stacking on a 6cm edge with clay bricks reasonable or should I change my design to stack on the 15cm face instead?


Bricks on edge for the bell could be done, especially when the bell will be plastered. But... you mentioned that you are building in Chile, in an area with refquent earthquakes. Un der circumstances, is it wise to have the bricks on edge and what is the plan to keep the heater together in the event of an earthquake?

Matthew Galloway wrote:I'm just under the Shorty ISA for 130mm at 3.38m2 (adjusted for shorty) if I stack clay bricks on edge, with the bottom of the core 26cm from the bottom of the floor, and with 30cm of air gap on both sides between the inner walls of the bell and outer walls of the core. I'm also assuming with a shorty it's ok to have the ceiling of the riser in contact with the ceiling of the bell, but if this isn't advised I'll adjust the design to be a bit taller and narrower.


Best to keep some distance between the top of the core and the bell's ceiling, say 10 cm at least.
2 weeks ago
Hi Aeron, a question: is the workshop in use each and every day of the week? In case it's 4 days or less, you have to start all over again in the morning as soon as you come in. A quick response heater is usually the way forward in such a situation. All barrels or a single skin brick bell.

I'll try to go through all the questions and try to provide answers, starting down here.

Aeron Ironbark wrote:- Core material: insulated fire brick vs ceramic fibre board (vs something else)? What's the cheapest and easiest? And is longevity/durability the exchange for that?


Hard firebrick, no question about that. You can insulate the core or not, although I've seen larger mass heaters without core insulation.

Aeron Ironbark wrote:- Location of the flue: I've seen brick RMH's with flues inside the bell, and I've seen them outside. It seems to me that if it was inside, as soon as the burn starts it would begin heating the flue and starting draw, thus minimising (or eliminating) smoke coming into the room. However, it seems to me that this setup would also create quite a strong draw during the main burns, and would thus be drawing out hot gasses before they had given their heat to the bricks, thus making the system much less efficient. Conversely, the flue on the outside means that only gasses cool enough to reach the bottom would ever make it to the outlet, which would mean much more efficiency in terms of heat given to the thermal battery, but how does the draw start in that set up? I've been thinking about a Tee piece at the outlet, and putting in some wood shavings at the start of a burn to heat up the chimney directly? And how does the draw continue? As I understand, any flue situation relies on the temperature differential between the pipe and the surroundings, and in the scenario where the pipe is outside of the heater, and the outlet of the heater is at the bottom because that's where the coolest gasses end up after giving their heat to the brick and thus making the thermal battery a thermal battery, how does the draw maintain?


The batchrocket system has been built for decades now, on every continent, Antarctica being the exception. There are calculations for every system size you might choose, designed in such a way there 's always enough heat transported to the chimney to keep it going. In short: not all the heat is extracted from the gases. Have the chimney external to the bell, with a bypass to help it going in case the heater is stone cold.
The first generation batchrocket, with its long vertical riser blows the hot gases to top, thereby pushing the colder gases at the bottom out. Built exactly to specs and with a good chimney, this one doesn't need a bypass. That said, as a rule of thumb, within 20 minutes of lighting a cold heater the exit temperature of the bell need to be at least 60 ºC.  If this isn't the case, water vapor is big time condensing inside the chimney and all smoke comes back into the house.

Aeron Ironbark wrote:- Secondary air inlet: Does this piece of square tubing have to just be a replacement part, since it will sit directly underneath the primary burn chamber and be much hotter than steel is designed to get? I've heard of fancy expensive metals that can be used to make tubes out of, but I think in Australia it's hard to get. Love to know what folks use for this.


Thomas answered this very comprehensively. Suffice to say: use the latest Shorty core, that one doesn't need a secondary air provision.

Aeron Ironbark wrote:- Sizing the Bell: If i've read the tables correctly, if i go with a 200mm riser, I need a Bell with a 9.4m2 internal total surface area. I've read about people adding columns inside the bell to add surface area, which sounds like a good idea to me to keep overall size down. I've also been hoping to do it as a single skin for the same reason, but is that a bad idea?


A 200 mm system seems overkill to me, it's a 50 m² workshop, moderately insulated. You might get away with a 150 mm one, but scaling up can be done witout steps so a 175 mm system and ditto chimney might be plenty large enough. This system scales up very fast!

Aeron Ironbark wrote:- Bell lid material: What do I make the lid of the bell out of?? I've got the business end of a rocket stove pointed directly at this thing, and I can't find info about what it should be made of... I don't know much about concrete, but it seems like it would just crack? And what does it sit on for support across the span? Another reason I like the flue on the outside is a simpler construction of the lid, so there's that too...


Given enough distance between ceiling and riser, steel t-bars and firebricks would do the trick. Also used multiple times worldwide, including my own red bell heater since two years. OR you could use a Shorty core, much less firebricks in the walls and ceiling possible, because it's tuned down a bit and blows horizontally back to the front instead of vertically up. Bell would also a bit smaller, not to mention cheaper.

Aeron Ironbark wrote:- Bricks and mortar: What bricks for the actual Bell? Plain old building bricks? Solid/vs hollow? And what about the mortar, both for the core and for the bell?


This isn't one question, but a handful instead.
Normal, solid building bricks are perfectly adequate, the denser the better. But anything could be used, including concrete paving bricks, commonly called clinkers. Have a look at a large heater like that:  The Sculpter's Shop heater!
Refractory mortar for the core, clay/sand OR sand/lime/portland for the bell.
2 weeks ago

Matthew Galloway wrote:Here's the part that I'm not clearly understanding from the instructions:
"Equally, if the firebox is built into the bell then the surface area of the firebox within the bell won't play a role in calculating this area as no heat is absorbed there."
Is he referring the SA of the firebox itself or the walls of the bell that surround it?


Just because people tend to be confused about what should be included into the ISA, I tried to simplify the method. Pretend there isn't a core at all in the bell, just calculate the wall and top and that's it. Reason behind this: when painstakingly calculated, the door opening should be left out, and the core should be included for about 20 to 25 %. When started from cold, the core will take up some of the produced heat, but shortly after that it will emit heat instead.

Calculated the simple way, the piece of wall where the door opening is, will be on a par with what the core will extract. So please, don't overthink this, just take the four walls and the deck, all internal. The result will be exactly fitting for the intended core.
1 month ago

sara ventura wrote:I still struggle to imagine the behavior of the hot air coming from the riser to "open air" inside the bell.
Has it the speed enough to project like a beam to the front wall, and from this first contact with mass ( and heat transfer) bounce and spread upwards?


It might help to view the core exit as a venturi (which it is), gases leaving at a remarkably high velocity. A bare core is different, exit is slow. But coupled to a fitting chimney the whole of the core will step up to a higher combustion rate and higher gas speed. What you describe is correct, the heat wave is travelling almost straight forward and more or less bounce against the opposite wall. In general, with a higher velocity of the gas stream, the less it will be spreading by itself. Until something solid is in its trajectory, as it were.

sara ventura wrote:Is it l like the air coming from an A/C unit, that you can freeze yourself if you're straight in front of the beam, but move away from there and the air becomes slightly fresh but quiet? I hope I pictured the example correctly : )


Yes, that's about the correct picture.

sara ventura wrote:Another question, when drawing the airframe and door adapted to my firebox (scaled to fit the size of my bricks), I just have to scale the air inlets accordingly, right?


The air inlets are large enough as is, although it won't hurt to make those a bit larger, just for sure. Remember, the exact dimensions of the air frame aren't really important as long it isn't cramped. The core will behave itself without a human being fiddling on the air controls. Even better, there aren't any air controls!
1 month ago

Scott Weinberg wrote:Would this oversizing of the flue, effect the performance or workings of a stove
I am thinking about those that may have aquired  a place that hard a large flue, but don't need that much stove size for the needed heat value that the flue could provide for.


Common knowledge seems to go in the direction of one step larger won't hurt, for example from 6" to 7". Two steps up might be too large, all depending on length of the chimney, also circular or not, smooth inside and straight up.

One step smaller will almost certainly culminate into a recalcitrant heater, difficult to start and slow to come up to speed.
1 month ago

sara ventura wrote:My fault, I've drawn a 20cm exit flue because I'll use a double walled pipe, 15cm exit inside. Also, will have a reducer from 20 to 15 at the base so I simplified the drawing, a lot😅


OK then, I am back on track again.

sara ventura wrote:Noted on the bypass, even better for me, construction wise.
That means the bypass flap will endure maximum temps coming from the core, anyone has experience on how does the flap behave after a long time period?


Your concern would be justified in the case of a 1st generation batchrocket build. The Shorty core however, is radically different in this respect. Maximum temperatures won't be at the top of the bell anymore, but opposite the core exit instead. This is better in more than one way, the most obvious one: people tend to live at a lower level than the top of a high bell.

sara ventura wrote:I'll add a bit more ISA, would you say the best place to add space is between the exit core and facing wall?
To have more space for the gases to move easily to the bench?
Or increase the clear space around exit pipe, wall and core? as it is now I have 4 cm on each side.


The exhaust is situated under the core's level, space enough there. I would vote for more space between core exit and facing wall.
1 month ago
Sara, in the drawing the flue is drawn as a 200 mm diameter one, while the core and ISA is for a 150 mm system. You won't need a 200 mm chimney, any particular reason to have one?

Also, the bypass have to be higher in the bell, preferably higher than the core's exhaust.

For to calculating the ISA of the bell, just imagine the bell whithout a core at all. Just four walls and a ceiling, this will be accurate for the chosen size.
Reasoning: the walls of the core will extract some heat from the smoke gases during a cold start, that's true. But after about 15 minutes the core will emit heat to the bell.
1 month ago