• Post Reply Bookmark Topic Watch Topic
  • New Topic
permaculture forums growies critters building homesteading energy monies kitchen purity ungarbage community wilderness fiber arts art permaculture artisans regional education skip experiences global resources cider press projects digital market permies.com pie forums private forums all forums
this forum made possible by our volunteer staff, including ...
master stewards:
  • Carla Burke
  • Nancy Reading
  • John F Dean
  • r ranson
  • Jay Angler
  • paul wheaton
stewards:
  • Pearl Sutton
  • Leigh Tate
  • Devaka Cooray
master gardeners:
  • Christopher Weeks
  • Timothy Norton
gardeners:
  • thomas rubino
  • Matt McSpadden
  • Jeremy VanGelder

BBR 6 inch (150mm) sidewinder build questions and progress (BE)

 
Posts: 59
8
  • Likes 5
  • Mark post as helpful
  • send pies
    Number of slices to send:
    Optional 'thank-you' note:
  • Quote
  • Report post to moderator
Hi all, I've been lurking for a long time. Now I want to start building my own BBR. I'd like to use this forum to ask questions and track my progress, and hopefully be of use to someone else.

So here it goes: I have an existing fireplace in my house (I'm located in Belgium) which I would like to convert to a BBR mass heater with bell. I will remove the front of the fireplace and use the remains of it as part of the exterior skin.

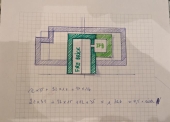
I want to include the stove pipe in of the bell (between the inner and outer skin). However, I know this limits the free space around the core somewhat. I've 'crunched the numbers' And there would be 1140 cm2 or around 6.5 times the riser CSA of 177 cm2. I've seen Peter mention 4 and 5 times as minimum for a good functioning heaters. So I wanted to double check if my layout will work OK friction-wise. I'd really like to avoid coming more into the room as this would narrow my living space too much. I'll install a bypass around halfway up the riser for starting up the stove.
PXL_20240726_143511389-2.jpg
batch burn rocket in existing fireplace
Cross section of bell and core + calculation of free CSA
PXL_20240725_182411197.jpg
convert existing fireplace to rocket mass bell
Mockup of the final result
 
rocket scientist
Posts: 6355
Location: latitude 47 N.W. montana zone 6A
3209
cat pig rocket stoves
  • Likes 2
  • Mark post as helpful
  • send pies
    Number of slices to send:
    Optional 'thank-you' note:
  • Quote
  • Report post to moderator
Hi Julian;
Welcome to Permies!
As math is not my strong suit, I hope Peter notices this and gives his opinion.
This seems small but should work, although I'm not quite understanding your mockup.
Do you know what the ISA of your bell will be?
 
Julian Adam
Posts: 59
8
  • Likes 2
  • Mark post as helpful
  • send pies
    Number of slices to send:
    Optional 'thank-you' note:
  • Quote
  • Report post to moderator

thomas rubino wrote:Hi Julian;
Welcome to Permies!
As math is not my strong suit, I hope Peter notices this and gives his opinion.


I hope so as well! I'd like to move the build forward.

thomas rubino wrote:
This seems small but should work, although I'm not quite understanding your mockup.


Oh, the vertical planks are the 'contours' of the outer surface of the bell (it will be clay-plastered). So I will first remove the front of the current mantlepiece (the back and sides will remain) and will then complete it again with new bricks, while also building the inner skin of the bell and placing the core.

thomas rubino wrote:
Do you know what the ISA of your bell will be?


Yes, the 5.3 m2 specified on batchrocket.eu. Or maybe slightly less. The circumference of the inner skin is 2.5 m. So at a height of 2 - 2.15 m, this will give me 5 m2 - 5.30 m2 ( the room is 2 m 55 high - leaving me with some clearance for insulation and firebricks to form the top of the bell. Also note that the exhaust will be lower than the core as is suggested by Peter.
 
thomas rubino
rocket scientist
Posts: 6355
Location: latitude 47 N.W. montana zone 6A
3209
cat pig rocket stoves
  • Likes 3
  • Mark post as helpful
  • send pies
    Number of slices to send:
    Optional 'thank-you' note:
  • Quote
  • Report post to moderator
Ok, that makes sense.
As you are near but under the ISA for a 6" I believe you will have no problems.
Let us give Peter a few days to reply, hopefully, he will agree.
 
gardener
Posts: 1057
Location: +52° 1' 47.40", +4° 22' 57.80"
449
woodworking rocket stoves wood heat
  • Likes 7
  • Mark post as helpful
  • send pies
    Number of slices to send:
    Optional 'thank-you' note:
  • Quote
  • Report post to moderator
I suppose it can be done this way, especially because the core is lifted from the floor.
You can't count all small slits in with that "at least five times", very little of the gas stream directed down will go there, too much friction.
The floor of the bell isn't included in the ISA calculation since the exhaust opening is above it.

It feels a bit cramped, as if you try to built the thing as small as possible. Please don't do that, you'll end up with a heater that's far from optimal.
In all: I would pull the front of the bell somewhat more forward. The top of the bell, being the hottest, is lifted above your head as it is now, where it won't heat you. Better to have the inner top of the bell at a person's height where the radiation is most effective.
 
Rocket Scientist
Posts: 4530
Location: Upstate NY, zone 5
576
5
  • Likes 7
  • Mark post as helpful
  • send pies
    Number of slices to send:
    Optional 'thank-you' note:
  • Quote
  • Report post to moderator
I realize the projecting "frame" around the firebox gives pleasing proportions, but without even taking more actual space in the room you could give adequate clearance for airflow behind the core by pulling the face of the firebox out even with that frame.

I second the idea of making the bell a bit deeper and shorter than your plan, to get the heat concentration closer to human height. With the wall above the bell keeping the existing position, you would get a more open feel to the space even if the masonry extends farther at lower heights.

I notice a stack of blocks to the left of the core; are you thinking of making a heated seat there? I think you could make that a bit deeper for much of its width without blocking the doorway, perhaps angling or curving the end of the seat nearest the doorway. A cavity at least about 8" wide should allow good airflow provided the ceiling of the space is well above the top of the flue exit.
 
Julian Adam
Posts: 59
8
  • Likes 4
  • Mark post as helpful
  • send pies
    Number of slices to send:
    Optional 'thank-you' note:
  • Quote
  • Report post to moderator
Thank you Peter and Glenn for your remarks, I will look into it this evening, and report back with a new design / some new designs. Not really the responses I was hoping for as I really want the BBR, but I also need to keep the girlfried happy... I see you both advocate pulling the face forward, I suppose it would also be an option to make it wider and rebuild one of the sides somewhat more to the left or right?
 
Julian Adam
Posts: 59
8
  • Likes 6
  • Mark post as helpful
  • send pies
    Number of slices to send:
    Optional 'thank-you' note:
  • Quote
  • Report post to moderator
Gentlemen, I've made some changes after consulting with my girlfriend. We both would prefer not to extend the bottom more into the room to allow free passage to the dining room.

We also tried pulling the front of the heater out into the room, but my family and girlfriend are opposed.

So my idea would be to remove the left hand wall of the existing fireplace and rebuild it approx. 10 cm to the left. I have a better feeling about the cross-section now. What do you think? without the csa of the slits front and back of the core, I've calculated the free section to be 7.5 x riser CSA.

The image should be reversed, so I will move the flue gas exit from the left to the right. The blocks in the picture were not meant to be a bell but a piece of furniture for the TV. I've looked into your suggestion about the bench Glenn, but it doesn't make sense really due to the television being there. That just got me thinking: I should probably put the TV low enough to prevent the highest outer skin temperatures?

With the new circumference of 2.7 m, the bell height will be 5.3/2.7 = 1.96 m, which is still 10 cm above my head but it seems like a compromise I will have to make. I was wondering if I could make the floor of the bell 10 cm lower than the floor in house - because the bottom 10 cm will not really be heated?

Thanks for your advice!
PXL_20240729_201843722-2.jpg
[Thumbnail for PXL_20240729_201843722-2.jpg]
 
Peter van den Berg
gardener
Posts: 1057
Location: +52° 1' 47.40", +4° 22' 57.80"
449
woodworking rocket stoves wood heat
  • Likes 6
  • Mark post as helpful
  • send pies
    Number of slices to send:
    Optional 'thank-you' note:
  • Quote
  • Report post to moderator
This is getting better already. Another 10 cm into the floor would also help to get the top of the bell down. The inner skin need to reach all the way down and the floor of the bell should be flat and level. The exhaust hole lowering down as the only aspect won't do the trick, i.e. no hole in the floor where the exhaust is, this tend to pose a lot of friction to the gas stream.
 
Julian Adam
Posts: 59
8
  • Likes 4
  • Mark post as helpful
  • send pies
    Number of slices to send:
    Optional 'thank-you' note:
  • Quote
  • Report post to moderator
In a good week I'll be in France and I happen to pass by a refractory materials store. So now the question of how to build the core and integrate it in the bell. Let me first state that I'm looking for a sweet spot between performance / personal health (avoiding superwool as much as possible) and durability.
That last one I would already like to adress by making an opening in the skins, quite a lot larger than the core, two steel lintels (one for inner, one for outer - or could I use reinforced concrete as well?) would create the opening, which I would then fill up again, but using fireclay/sand for both inner skin and outer skin (rest of outer skin: "bastard" ( = lime + portland cement ) mortar). This way I could relatively easily open up the bell to access the core.

Then for the core itself, I see two options:
Option 1: cast the combustion chamber out of castable refractory - which seems maybe the way to go since the sidewinder is said to be a bit harder to build with fire bricks & a 150 mm system - thickness 4 cm.
I would put this cast core into a steel 'box' ( I already have 4 mm steel plate), with 2 cm gap between bottom and sides. More on the top and calcium silicate board added because the top of the firebox is the hottest. Then superwool between the steel box and the bell. This box would make it really easy to add the cover plate and door + make it possible to replace the firebox. Any Idea on how many bags of refractory castable I would need just for the core?

The second option is similar to what Glenn Rittman (I believe) built a few months ago.

The riser in both cases I would build out of insulating fire brick (better to take the higher temp ones or are those of 1200 °c more durable?). Should I start using IFB only above the top of the firebox? Or immediately after the port?

Any mixing of options or other suggestions?
Ps: I hope my sketches are somewhat clear. I'm lacking a bit the time to do a proper job.
PXL_20240731_214204967-2.jpg
Lintels in bell + core option 1
PXL_20240731_214210714-2.jpg
Core option 2
Core option 2
 
Julian Adam
Posts: 59
8
  • Likes 4
  • Mark post as helpful
  • send pies
    Number of slices to send:
    Optional 'thank-you' note:
  • Quote
  • Report post to moderator
Small update: I bit the bullet and ordered regular fire bricks for the combustion room's sides and bottom and refractory concrete for its top. For the riser it's going to be insulated fire brick, I've ordered 3 grades: morgan ceramics JM28 up to the combustion room's top, then half of the remaining layers JM26 and final layers asian 26'es. (critical to less critical, expensive to cheap, high alumina to low(er) alumina)

Also got a good deal on a wet saw. Will allow me to make better progress. Will report back in a few weeks time when I get some work done on the new sides for the outer bell (which is load-bearing)

PXL_20240806_134641063.jpg
[Thumbnail for PXL_20240806_134641063.jpg]
 
Rocket Scientist
Posts: 797
Location: Guernsey a small island near France.
299
  • Likes 4
  • Mark post as helpful
  • send pies
    Number of slices to send:
    Optional 'thank-you' note:
  • Quote
  • Report post to moderator
Nice wet saw, that will make cutting so much easier and healthier, no soaking bricks that take weeks to dry out, no dust and accurate cutting….. thats the way to go….
 
Julian Adam
Posts: 59
8
  • Likes 2
  • Mark post as helpful
  • send pies
    Number of slices to send:
    Optional 'thank-you' note:
  • Quote
  • Report post to moderator
Have been busy on some other parts of my house, but I'd like to continue some on the BBR. First, I need to cast a small concrete slab, and then rebuild the left (outer skin) Wall of my fireplace. I was going to use hydrated lime/cement mortar. Will the 'typical' 1/1/6 ratio (cement, lime, sand = known as type N mortar) be okay to use at these relatively high temperatures (outer bel)? I understand the portland cement performs worse than the lime at higher T. But I do want enough compressive strength since the outer skin will be load-bearing. I found a local (Belgium - MOT Bakovens) reference about historic wood-fired bread ovens using 1/1.5/7 ratio cement / lime / sand, but I'm afraid it will not be as strong. Any suggestions? Thanks!
 
Julian Adam
Posts: 59
8
  • Likes 7
  • Mark post as helpful
  • send pies
    Number of slices to send:
    Optional 'thank-you' note:
  • Quote
  • Report post to moderator
Hi all. An update. I like pictures myself, so added some images. Am now using "mortar with lime" bought from the store. Assume it will be fine for the outer skin?
PXL_20241012_083626199.MP.jpg
Rebar and mold for extra concre slab
Rebar and mold for extra concrete slab
PXL_20241012_103047287.jpg
Concrete!
Concrete!
PXL_20241013_161333083.jpg
Adding braces and tearing down left and front of existing fireplace
PXL_20241018_185421977.jpg
Water barrier...
Water barrier...
PXL_20241018_170255115.jpg
External air supply (will exit in the room)
PXL_20241018_193957416.jpg
Finished aerated concrete (Ytong) insulation layer
PXL_20241019_173306272.jpg
Cutting some reclaimed bricks...
PXL_20241020_102227775.jpg
Decided to buy some new bricks instead (€40 for 300)
Decided to buy some new second-hand bricks instead (€40 for 300)
PXL_20241020_163659673.jpg
right remaining wall of the fireplace removed as well. Ready to lay some bricks!
PXL_20241021_194333164.NIGHT.jpg
Situation as-is: first rows of the external skin laid
 
Julian Adam
Posts: 59
8
  • Likes 4
  • Mark post as helpful
  • send pies
    Number of slices to send:
    Optional 'thank-you' note:
  • Quote
  • Report post to moderator
Asked a separate question about the suitable mortar for the exterior skin here:
https://permies.com/t/268113/bastard-mortar-portland-cement-lime
In the end, I tried the lime mortar. It was probably a bad idea not to look for a premixed lime mortar. But it was simply nowhere to be found near me.
In the end I could not find a composition that worked reasonably. probably because the mortar height I used is only 10 mm, and the sand I used was made with 0/4 sand as per the manufacturer's instructions.
As Peter had given his approval on using the portland/lime/sand mortar for the exterior skin, I just continued using it up to the ceiling.

Quite pleased with the result so far. Probably will take a few months now before I can continue on the core and interior skin. As you can see, I left the middle of the front face open to be able to build the inner skin, internal chimney and core. I would also use sand/fireclay mortar for filling in the 'hole' that is now still left in the outer skin. That way I could probably rebuild the core again in maybe 20 years time (hopefully everything will last this long). What part of a batchbox would have to be replaced first? I assume the firebrick combustion room?
PXL_20241104_193355737.jpg
[Thumbnail for PXL_20241104_193355737.jpg]
 
Julian Adam
Posts: 59
8
  • Likes 4
  • Mark post as helpful
  • send pies
    Number of slices to send:
    Optional 'thank-you' note:
  • Quote
  • Report post to moderator
Some other details showing a chicken wire 'layer reinforcement' I put in every 6 rows, with the idea of stopping possible crack propagation, and some granite infill max 4 mm I added to the brick's holes for extra mass (granite has very similar expansion coefficient as red brick).
PXL_20241023_154225608.jpg
[Thumbnail for PXL_20241023_154225608.jpg]
 
Julian Adam
Posts: 59
8
  • Likes 4
  • Mark post as helpful
  • send pies
    Number of slices to send:
    Optional 'thank-you' note:
  • Quote
  • Report post to moderator
Reinforcement
PXL_20241030_081233705.jpg
[Thumbnail for PXL_20241030_081233705.jpg]
 
Julian Adam
Posts: 59
8
  • Likes 6
  • Mark post as helpful
  • send pies
    Number of slices to send:
    Optional 'thank-you' note:
  • Quote
  • Report post to moderator
Wanted to do an experiment to see how much pallet wood I could collect in one evening and how quickly. I pried them apart with a crow bar, on site, loaded them in my (old) car, and at my place removed the big nails and hammered the small nails down. Then cut it with my old mitre saw and a home made jig to get the right length every time.

Stranded on 63 kg (138 lbs), and humidity overall was surprisingly low, around 15%. I took one pallet which had clearly been outside for longer and that one was around 30%. I must say I believe I was lucky, usually don't see that many for free. Here in Western Europe almost all pallets are pine.

So once dried a little further, I think I will be looking at around 60 kg (132 lbs) net. Note that I cut at around 40 cm (around 16 inch) for a regular batch box. It's an ideal length with standard pallets it seems.

Time: the whole process took me more than 3 hours.
Knowing this amount of wood will probably be burnt in two weeks beginning of the season and about a week to a week and a half later in winter, I think I spent too much time on it.

Some logical lessons learned but I will state them anyway:
- Stay away from older pallets with extra nails. They are a PITA to process. In the future I'll likely buy a battery powered circular saw, with which I could just cut out the 'good bits' from these pallets.
- Pallets with blocks made from solid wood are easier to dismantle and you don't have the compressed wood fiber blocks to get rid of.
- Longer and thicker pallets are better, you can more efficiently dismantle and cut them.

Any other tips of course welcome.

PXL_20241129_111321562.jpg
Homemade jig + old miter saw
PXL_20241129_110244153.jpg
The pile of wood with some small kindling in a bag on top
 
Fox James
Rocket Scientist
Posts: 797
Location: Guernsey a small island near France.
299
  • Likes 4
  • Mark post as helpful
  • send pies
    Number of slices to send:
    Optional 'thank-you' note:
  • Quote
  • Report post to moderator
Good job, you can buy a purpose pallet breaker bar (much better than a standard bar) and use a battery jig saw rather than a circular saw.
 
Julian Adam
Posts: 59
8
  • Likes 3
  • Mark post as helpful
  • send pies
    Number of slices to send:
    Optional 'thank-you' note:
  • Quote
  • Report post to moderator

Fox James wrote:Good job, you can buy a purpose pallet breaker bar (much better than a standard bar) and use a battery jig saw rather than a circular saw.


I've seen them, will have to weld one. Already bought a welder to make the door of the BBR, but have not gotten around to it.
You have good experiences with a jig saw? I don't own one but I see they are in black friday discount at Lidl.
 
Fox James
Rocket Scientist
Posts: 797
Location: Guernsey a small island near France.
299
  • Likes 5
  • Mark post as helpful
  • send pies
    Number of slices to send:
    Optional 'thank-you' note:
  • Quote
  • Report post to moderator
Yes I am experienced with all hand tools, jig saws are very versatile machines but like everything ..you get what you pay for!
You want one that has an adjustable rake action on the blade as this allows you to cut more easily.
I have a 18v DeWalt cordless jig saw that was not that expensive, they have 3-4 models to choose from, get some good blades and you will rip through those pallets.
 
Posts: 579
Location: Sierra Nevada foothills, 350 m, USDA 8b, sunset zone 7
102
  • Likes 6
  • Mark post as helpful
  • send pies
    Number of slices to send:
    Optional 'thank-you' note:
  • Quote
  • Report post to moderator
When I tried myself to dismantle pallets (to burn them) I realized quickly that it takes massive amount of time.
So instead of prying, removing the nails and cutting the planks I just take my 5 kg hammer and smash it to pieces. It takes a minute or two. Then I burn it with nails and remove nails with magnet from the ashes.
 
Julian Adam
Posts: 59
8
  • Likes 2
  • Mark post as helpful
  • send pies
    Number of slices to send:
    Optional 'thank-you' note:
  • Quote
  • Report post to moderator
You make a good point Fox, I also prefer proven brands but also try to be budget-conscious, so I focus on those brands for the tools I use the most & which require precision.
I have bought jackhammers, a miter saw and laser from Parkside and in general I'm satisfied with the quality (considering the price) - but they're all with a power cord... I'm already in the Makita battery ecosystem, but as I said, I'm hesitant to spend €150 on something I have no experience with.
 
Julian Adam
Posts: 59
8
  • Likes 2
  • Mark post as helpful
  • send pies
    Number of slices to send:
    Optional 'thank-you' note:
  • Quote
  • Report post to moderator

Cristobal Cristo wrote:
I just take my 5 kg hammer and smash it to pieces.


Well that's another option... How do you stack the wood then? Is the volume not greatly increased?
 
Cristobal Cristo
Posts: 579
Location: Sierra Nevada foothills, 350 m, USDA 8b, sunset zone 7
102
  • Likes 2
  • Mark post as helpful
  • send pies
    Number of slices to send:
    Optional 'thank-you' note:
  • Quote
  • Report post to moderator

Julian Adam wrote:How do you stack the wood then? Is the volume not greatly increased?


I don't stack the wood, I don't have space and time for it. I have a pile of around 90 m3 of cut eucalyptus 40 cm long  pieces and another 30 m3 of roots. Before the rains, I cover part of the pile with a tarp to have dry wood for my baking oven in winter. When I chop the pallet I just burn it right away.
 
Julian Adam
Posts: 59
8
  • Likes 3
  • Mark post as helpful
  • send pies
    Number of slices to send:
    Optional 'thank-you' note:
  • Quote
  • Report post to moderator
Took 2 late nights, but got around to throwing a 150 mm core together with reclaimed firebricks and cob (the quite clay-ish soil here was surprisingly pleasant to work with) Lit a few small fires. She was trying hard, but the rocket did not fully take off. Is it normal to have a lot of actual - smelly smoke when the cob is not dry yet / with small fires? I will see if I can make a slightly bigger fire this evening.

Good to see/feel the effect off the large uninsulated mass of the riser on the combustion, the bottom of the riser did not even get fully warm. I suspect the cold + wet cob + larg mass in the uninsulated riser was too much?
PXL_20241217_204408435.jpg
[Thumbnail for PXL_20241217_204408435.jpg]
PXL_20241217_210900227.NIGHT.jpg
[Thumbnail for PXL_20241217_210900227.NIGHT.jpg]
 
Julian Adam
Posts: 59
8
  • Likes 1
  • Mark post as helpful
  • send pies
    Number of slices to send:
    Optional 'thank-you' note:
  • Quote
  • Report post to moderator
Tested it out again last night with a somewhat bigger fire towards the port (maybe 1/3) of total volume. Lighted it on top, but there was a lot of wind. It did not kick of until maybe 10 mins later and there was a lot of black smoke coming out the front and riser. At last I managed to ignite the black smoke and the fire started going. After about 10 minutes it started to rocket.
When it started going well, there was no smoke, but only for a limited amount of time. The riser got warm to the touch more towards the bottom.
When it started to coal, quite a lot of smoke again. Some shorts:
https://youtube.com/playlist?list=PLEggqZY9BkQa6karu0qeJozTl4EBGipwb&si=u8AyGKs7vpq6cGXk
Is this normal during operation of a noninsulated BBR with thick fire bricks? During full burn it was nice, but the smoke at the front and back of the burn were not encouraging...
 
thomas rubino
rocket scientist
Posts: 6355
Location: latitude 47 N.W. montana zone 6A
3209
cat pig rocket stoves
  • Likes 6
  • Mark post as helpful
  • send pies
    Number of slices to send:
    Optional 'thank-you' note:
  • Quote
  • Report post to moderator
Hi Julian;
Yes, with a heavy brick core, a heavy brick riser, and no secondary air or a door, it will smoke during startup and while burning out.
That is normal.  
Remove the brick riser, and use a plain stovepipe in its place. It will turn cherry red while burning. This is where a five minute riser really shines!
I think you will find your rocket core roars when it is not trying to bring all those heavy firebricks up to dragon temperatures.

As it is once your bricks truly heat up it will burn better.
Oh, for test fires in a wet batch, you might try lighting your fire from the bottom up rather than the top down method.
 
thomas rubino
rocket scientist
Posts: 6355
Location: latitude 47 N.W. montana zone 6A
3209
cat pig rocket stoves
  • Likes 2
  • Mark post as helpful
  • send pies
    Number of slices to send:
    Optional 'thank-you' note:
  • Quote
  • Report post to moderator
I thought you were building a sidewinder, not a traditional rear exit batch.
 
Julian Adam
Posts: 59
8
  • Likes 5
  • Mark post as helpful
  • send pies
    Number of slices to send:
    Optional 'thank-you' note:
  • Quote
  • Report post to moderator
Thomas, thanks for your comments. Indeed I'm building a sidewinder. Regular BBR is just easier to build so I went with that one.

thomas rubino wrote:
Yes, with a heavy brick core, a heavy brick riser, and no secondary air or a door, it will smoke during startup and while burning out.
That is normal.  


Good to know! So I should not worry with a riser made from IFB from the top of the firebox and up?

thomas rubino wrote:
Remove the brick riser, and use a plain stovepipe in its place. It will turn cherry red while burning.This is where a five minute riser really shines!


I love the 5 minute riser from a technical point of view, but I'm far from convinced health-wise. I'm trying to avoid ceramic fiber wherever possible. I may try again using air entrained concrete for the riser. I have some left which I may use for the riser. However, some other renovation work is calling...
 
Julian Adam
Posts: 59
8
  • Likes 3
  • Mark post as helpful
  • send pies
    Number of slices to send:
    Optional 'thank-you' note:
  • Quote
  • Report post to moderator
About the ceramic fiber... I'm contemplating making the bell's roof arched in fire brick, completely avoiding ceramic fiber + steel. It's definitely self-supporting, only spanning 47 cm, but I assume the cob joints are too thick? Any other considerations?
PXL_20241215_153350423.jpg
[Thumbnail for PXL_20241215_153350423.jpg]
 
thomas rubino
rocket scientist
Posts: 6355
Location: latitude 47 N.W. montana zone 6A
3209
cat pig rocket stoves
  • Likes 8
  • Mark post as helpful
  • send pies
    Number of slices to send:
    Optional 'thank-you' note:
  • Quote
  • Report post to moderator
I think I would cut those firebricks on an angle to bring them closer.
Mortar joints that thick would make me very nervous
 
Posts: 290
Location: North East Iowa, USA
74
  • Likes 8
  • Mark post as helpful
  • send pies
    Number of slices to send:
    Optional 'thank-you' note:
  • Quote
  • Report post to moderator

Julian Adam wrote:About the ceramic fiber... I'm contemplating making the bell's roof arched in fire brick, completely avoiding ceramic fiber + steel. It's definitely self-supporting, only spanning 47 cm, but I assume the cob joints are too thick? Any other considerations?


Julian, your center of the arch "brick"  (n the photo) appears to be the smallest, it really should be the largest or at least have the same taper as the others.   Having it the largest it is like a keystone- some call  it the camels back bone, of the arch.  This is done for a reason.

They way you have it, your not taking advantage of the compressive strength of the brick.  And really it would appear your center brick and both sides are not in a compressive setup.  This might just be how the photo looks, but it would appear to be that way.

Another way, if you would like,   Send me or post here, the exact size of your bricks, this can be imperial or metric, and then what you would like for width of the inside of your bell and the height of your arch ( inside) And I will be able to show you how to get the most our of your arch for the least cutting and have it uniform to boot.   This only takes me a few minutes,  And I could also provide a template for the arch support for you to print.  

I have no problem doing this for fellow rocket scientist,   A bit later today, I will try to post an example.    So again width and height of arch, as well as end view width and height of your brick.  How long a bell does not matter.  Oh and I guess you have to determine, if you want to cut tapers to the brick, sometimes it works nicely to just have the tapers in your mortar.  but one or the other has to be tapered, The Romans proved that thousands of years ago.
 
Julian Adam
Posts: 59
8
  • Likes 2
  • Mark post as helpful
  • send pies
    Number of slices to send:
    Optional 'thank-you' note:
  • Quote
  • Report post to moderator

Scott Weinberg wrote:

Julian, your center of the arch "brick"  (n the photo) appears to be the smallest, it really should be the largest or at least have the same taper as the others.   Having it the largest it is like a keystone- some call  it the camels back bone, of the arch.  This is done for a reason.


Didn't know it was so crucial to have the keystone be the largest. I agree that my current 'prototype' is not optimal, I just threw it together with bricks I had on hand (no cutting). I must say the strength surprises me. I already pushed down on it with some force but nothing budged. For the final arch, I would cut the bricks with a taper. I have a wet saw so it's not a problem. However, I understood that each taper would be different from the next as I want to build a self-supporting 'catenary' arch, with no resulting horizontal forces at the bottom stones, and each cut should be perpendicular to the tangent of the parabolic curve running through the center of the stones...

I will try to get you the info tomorrow Scott! I understood you do a lot of CAD modelling for your job. It pains me to not be able to do it myself anymore. When I was still a student & working at university I used Siemens NX a lot, which you probably know. Not having a licence anymore is like a part of my creativity has been amputated. Tried Fusion but it has nowhere near the same functionalities and haven't found the time/courage to get really familiar with it.

In any case thank you already for the offer!
 
Julian Adam
Posts: 59
8
  • Likes 6
  • Mark post as helpful
  • send pies
    Number of slices to send:
    Optional 'thank-you' note:
  • Quote
  • Report post to moderator

thomas rubino wrote:I think I would cut those firebricks on an angle to bring them closer.
Mortar joints that thick would make me very nervous


What is the ideal clay/sand mortar thickness? I believe I recall Peter saying about 6 mm (1/4th of an inch?) I've also seen clay slip being used. Do you happen to know when / why to use slip / mortar, Thomas?
 
Cristobal Cristo
Posts: 579
Location: Sierra Nevada foothills, 350 m, USDA 8b, sunset zone 7
102
  • Likes 6
  • Mark post as helpful
  • send pies
    Number of slices to send:
    Optional 'thank-you' note:
  • Quote
  • Report post to moderator
Julian,

The smaller the joint the better. The good standard for fireboxes is to lay the firebricks on 1-2 mm joint, which can be more difficult with used bricks.
If the skin is built also with firebricks then the same joint can be used. For bricks with less strict dimensional tolerance 6 mm is a good. For hand made bricks it's difficult even to keep 10 mm joint across the build in some cases.

Regarding the slip - the more water you have in the mortar, the greater shrinking it will experience. Of course it depends on the type o clay, particle size distribution, etc,

 
thomas rubino
rocket scientist
Posts: 6355
Location: latitude 47 N.W. montana zone 6A
3209
cat pig rocket stoves
  • Likes 5
  • Mark post as helpful
  • send pies
    Number of slices to send:
    Optional 'thank-you' note:
  • Quote
  • Report post to moderator
Hi Julian;
Clay slip is generally only used with new firebricks for core construction.
All other clay mortar joints such as a bell or arch would ideally be 5-6mm.  
Here is the brick arch on my bell, it is 35" (88.5cm)  outside measurement
20241013_092721.jpg
[Thumbnail for 20241013_092721.jpg]
20241013_131724.jpg
[Thumbnail for 20241013_131724.jpg]
20241013_154535-(1).jpg
[Thumbnail for 20241013_154535-(1).jpg]
 
Scott Weinberg
Posts: 290
Location: North East Iowa, USA
74
  • Likes 4
  • Mark post as helpful
  • send pies
    Number of slices to send:
    Optional 'thank-you' note:
  • Quote
  • Report post to moderator
So may ways to calculate what will work best, but if your bricks are consistent in size, you can do a pretty educated guess.

A lot of wet saws have preset angle stops of  10 - 22.5 and 45 degrees, If the blade is of the smaller size, you can only get the 2.5 width cut at these angles in one stroke.  Cutting across the 4.5" width for angle takes a bit more planning, but can be done, as Tom has shown.

Many can just wing it, but it is nice to know how things SHOULD work out.  One of the simple tricks is knowing how high the arch needs to be to make the least cutting. Sometimes 1/2" difference can really help or hurt.

Best of success.

Oh yes, these are just examples, the 4.5 inch bricks can be on edge too.
complete-arch-top-with-10-degree-tapered-brick.JPG
Just an example for normal sized fire bricks with slight angle cuts
complete-arch-top-with-square-bricks.JPG
similar arch but with completely different brick
 
Oh the stink of it! Smell my tiny ad!
2024 Permaculture Adventure Bundle
https://permies.com/w/bundle
reply
    Bookmark Topic Watch Topic
  • New Topic