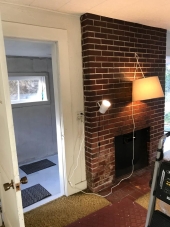
• Post Reply Bookmark Topic Watch Topic
  • New Topic
permaculture forums growies critters building homesteading energy monies kitchen purity ungarbage community wilderness fiber arts art permaculture artisans regional education skip experiences global resources cider press projects digital market permies.com pie forums private forums all forums
this forum made possible by our volunteer staff, including ...
master stewards:
  • Nancy Reading
  • Carla Burke
  • r ranson
  • John F Dean
  • paul wheaton
  • Pearl Sutton
stewards:
  • Jay Angler
  • Liv Smith
  • Leigh Tate
master gardeners:
  • Christopher Weeks
  • Timothy Norton
gardeners:
  • thomas rubino
  • Jeremy VanGelder
  • Maieshe Ljin

Best rocket heater for this situation?

 
author & steward
Posts: 5289
Location: Southeastern U.S. - Zone 7b
3072
5
goat cat forest garden foraging food preservation fiber arts medical herbs writing solar wood heat homestead
  • Likes 1
  • Mark post as helpful
  • send pies
    Number of slices to send:
    Optional 'thank-you' note:
  • Quote
  • Report post to moderator
Our house is almost 100 years old. One of our first projects was to tear out a double-sided coal burning fireplace and chimney, and build a woodstove alcove. Now, we'd like to replace the woodstove with a rocket heater. However, we have no experience with rocket heaters. So, I've been researching. Besides the forums here, I've found https://batchrocket.eu/en/ and https://donkey32.proboards.com, but the information is overwhelming. And it's difficult to sift through people's experiments and trial-and-error projects to know what's best for our situtation. We need to get it fairly right the first time.

One problem is that there really isn't anywhere to put a mass. Also, my husband's not real keen on a j-tube in the house. He wants a door or cover over any open flame, so we're leaning more toward a batch stove.

Let me show you what we're working with. Because this was originally a double-sided fireplace, I'm thinking we should be able to heat both rooms with the one stove.

1. Original living room fireplace.

2. It was back-to-back with the fireplace in the front bedroom and shared a chimney.

3. Tearing out the living room fireplace.

4. That's the back of the bedroom fireplace.

5. Dan built a new hearth for the woodstove.

6. Concrete poured and cat approved.

7. The bricks were from the original chimney, which had to be torn down.

8. Building the shield wall with air gap between the bricks and wood tongue-and-groove wall.

9. Cement board for the wall above the hearth shield.

10. This is how it looks now.

11. Bedroom fireplace filled in with the hearth wall.

Measurements:
 hearth width (front) - 57"
 hearth width (between brick hearth walls) - 49"
 hearth front to back brick hearth wall - 43"
 hearth wall height - 42.5"
 from front of hearth to front of bedroom fireplace 53"
 backside of exposed bedroom fireplace bricks (see pic 7) measure app. 36" x 40"

Have I forgotten anything? The chimney's position is fixed and won't be moved.

Is a rocket heater a possibility for us? I'm interested in suggestions and ideas for the best rocket heater for this situation!
 
gardener
Posts: 500
Location: Victor, Montana; Zone 5b
228
hugelkultur forest garden composting toilet building rocket stoves
  • Likes 1
  • Mark post as helpful
  • send pies
    Number of slices to send:
    Optional 'thank-you' note:
  • Quote
  • Report post to moderator
Well the good thing is it looks like plenty of room for a RMH.

I think the best fit would be an 8" batch rocket similar to the entire bell heater on https://batchrocket.eu/en/applications.

I recommend looking at https://www.firespeaking.com/portfolio/ for some ideas of the design, then doing some research on Peter's site, batchrocket.eu and finding a good schematic to work off.
 
rocket scientist
Posts: 6318
Location: latitude 47 N.W. montana zone 6A
3188
cat pig rocket stoves
  • Likes 2
  • Mark post as helpful
  • send pies
    Number of slices to send:
    Optional 'thank-you' note:
  • Quote
  • Report post to moderator
Hi Leigh;
Beautiful old home you have!  And Dan did a great job in the fire place nook!
Short answer is yes you can have an RMH.

Couple of questions to start.
#1) Is that a 6" chimney you currently are using ?
#2) What is under the original fireplace?  Is it solid down to the ground?
#3)what is under the bedrooms?  A basement? A crawl space ?
#4) What is your chimney made up of?
#5) How much area are you hoping to heat with this?
#6) Do you understand that an all brick RMH is going to take time to share its heat? No instant gratification like with a metal (or soapstone) box stove.
Good things ARE worth waiting for though...

Here is what  I see as one possibility.
A 6" Batch will be plenty.   Seeing as your in the South east and it won't get as cold as up here in Montana. An 8" is too big.
An all brick rmh ,with firebrick in the hot spots at the top of the riser.  Extending into both rooms.
One side would have your door and the other room would just have a brick bell.
You might need to build your batch door lower than you might like, to have safe headroom above your bell.
I anticipate that you will need all sorts of parts from   https://dragontechrmh.com/    and you will request the staff member discount!


Leigh Tate
author & steward
Posts: 5289
Location: Southeastern U.S. - Zone 7b
3072
5
goat cat forest garden foraging food preservation fiber arts medical herbs writing solar wood heat homestead
  • Likes 1
  • Mark post as helpful
  • send pies
    Number of slices to send:
    Optional 'thank-you' note:
  • Quote
  • Report post to moderator

thomas rubino wrote:Couple of questions to start.
#1) Is that a 6" chimney you currently are using ?


Yes

#2) What is under the original fireplace?  Is it solid down to the ground?


Yes, the original fireplace was built on the ground, so Dan's hearth is built on the ground.

#3) what is under the bedrooms?  A basement? A crawl space?


Crawl space. The house is built on a gentle slope; under the front bedroom and living room it's belly crawling height.

#4) What is your chimney made up of?


The entire chimney is now double-walled insulated stove pipe. Dan took the old brick chimney down.

#5) How much area are you hoping to heat with this?


As much as possible! lol Total square footage is just a tad under 1500 sq. feet. But it isn't "open concept" so it's difficult to heat the entire house with the one stove. The house was constructed with a fireplace or coal stove in every room. Lots of doors accommodate zone heating.

Roughly accurate sketch of our floor plan.

Currently, we use the soapstone stove to heat the living room, master bedroom, and dining room; a wood burning cookstove heats the kitchen and 2nd bathroom. In the coldest weather, I close off the front bedroom (labeled "spare bedroom") and the room labeled "Leigh's studio." If we could also heat that front bedroom, I'd be thrilled! Then I could use it as my weaving and sewing room!

So, the answer to your question is we'd like to heat about 780 sq feet. Eventually, we'd like to replace the wood cookstove with one of the Walker cookstoves, but that's much further down the road. In fact, one of the possibilities we wonder about is the Walker full masonry cookstove to replace the soapstone stove. Not that I want a cookstove in the living room, but its size and the placement of the chimney in that stove looks like it might work in our alcove.

#6) Do you understand that an all brick RMH is going to take time to share its heat? No instant gratification like with a metal (or soapstone) box stove.


That makes sense. Actually, our soapstone stove takes awhile to put out heat, at least it's slower than the cast iron cookstove. The only thing we'll miss is the fire view window, but the trade-off for more efficient heat will be worth it.

Here is what  I see as one possibility...
A 6" Batch will be plenty. Seeing as your in the South east and it won't get as cold as up here in Montana. An 8" is too big.
An all brick rmh, with firebrick in the hot spots at the top of the riser.  Extending into both rooms.
One side would have your door and the other room would just have a brick bell.
You might need to build your batch door lower than you might like, to have safe headroom above your bell.


Sounds very hopeful, then!

I anticipate that you will need all sorts of parts from   https://dragontechrmh.com/    and you will request the staff member discount!


That would be fantastic! I've got you bookmarked!
 
thomas rubino
rocket scientist
Posts: 6318
Location: latitude 47 N.W. montana zone 6A
3188
cat pig rocket stoves
  • Likes 2
  • Mark post as helpful
  • send pies
    Number of slices to send:
    Optional 'thank-you' note:
  • Quote
  • Report post to moderator
Hi Leigh;  
Well that settles the stove size question!   6" it will be.
Super you already have a new safe chimney to work with.
The fact that your hearth and stove are grounded is excellent news!
Several stoves are a much better way to heat than asking one stove to do it all.
Ceiling fans and heat registers up high help bunches.

You won't have to go without a window in your batchbox or your Walker full size stove.
My doors have a small window but they do give a good view.
Matt recommends Pisla doors(much larger window) as an option on his larger stoves.
At least he did before he got his new dragon tech door... just saying :-)
mattstove2.JPG
Matt Walker's Tiny cook stove with Dragon Tech door
 
gardener
Posts: 3471
Location: Southern alps, on the French side of the french /italian border 5000ft elevation
194
  • Likes 1
  • Mark post as helpful
  • send pies
    Number of slices to send:
    Optional 'thank-you' note:
  • Quote
  • Report post to moderator
As it is, best way would be to make a double sided bell, between living room and spare bedroom.

As Daniel was certainly trying to picture.

https://batchrocket.eu/en/applications#redbell
 
Leigh Tate
author & steward
Posts: 5289
Location: Southeastern U.S. - Zone 7b
3072
5
goat cat forest garden foraging food preservation fiber arts medical herbs writing solar wood heat homestead
  • Mark post as helpful
  • send pies
    Number of slices to send:
    Optional 'thank-you' note:
  • Quote
  • Report post to moderator
Daniel and Satamax, thank you for the links!

Thomas, thank you! That's a relief and very encouraging. How do you suggest we go about choosing a design?
 
thomas rubino
rocket scientist
Posts: 6318
Location: latitude 47 N.W. montana zone 6A
3188
cat pig rocket stoves
  • Likes 1
  • Mark post as helpful
  • send pies
    Number of slices to send:
    Optional 'thank-you' note:
  • Quote
  • Report post to moderator
Hi Leigh;
Well in my mind you are choosing between Matt's large cook stove or a batchbox you design your self to fit your specific area..

Matts stove has a build sheet and schematic's.   This can relieve a large portion of self doubt and worry. Make's getting materials on hand a breeze.

Building your own basic batchbox is really not as hard as it seems.  After all its just a box of a specific size with a specific size hole "port" at the rear.
Nothing is secret, Peter and Matt freely share all their information.
From that point on its a large empty brick box with a super hot riser "chimney" inside...  
By building your own, you can utilize  pretty much any shape brick boxes that fits in both rooms.
It is more work and you will need to stay within size parameters.  ie)  Your space  and the final "isa" internal surface area of your brick bells.
But I think with the bells in both rooms you would be warmer.

You will need dry bagged fire clay and building sand.
You will need ceramic boards and ceramic blanket,
You will need bricks, plain clay and heavy firebrick.
You will need a secondary air tube
you will need a door
You may need angle iron to build a core support or to bridge brick walls  when placing a roof.

 
Satamax Antone
gardener
Posts: 3471
Location: Southern alps, on the French side of the french /italian border 5000ft elevation
194
  • Mark post as helpful
  • send pies
    Number of slices to send:
    Optional 'thank-you' note:
  • Quote
  • Report post to moderator
I post the thread about my build. As it might give you ideas.

https://permies.com/t/44806/Cobbling-workshop-heater-cooktop-oven

Since the slab is already poured and the bricks laid, That's already the start of a bell. i would clear the wood around the bell, and build a little bit, adding rows to the  already existing bricks. Up to the ceiling or nearly. Leave an air gap according to code. Tear the bedroom chimney, and add a second layer of bricks there. Which would make you flush  with the bedroom's wall, more or less. On the living room side; you double the brick wall on the inside of the sides, and link that to the front, alternating the bricks. As usual. At the same time, you build a batch box. While going up. I would put a metal door somewhere on the front, or back. To clean the stove. You would have fitted a plunger tube down the bell you're building, either metal or bricks. The hardest bit will be to cap off the bell.

HTH
 
Leigh Tate
author & steward
Posts: 5289
Location: Southeastern U.S. - Zone 7b
3072
5
goat cat forest garden foraging food preservation fiber arts medical herbs writing solar wood heat homestead
  • Likes 1
  • Mark post as helpful
  • send pies
    Number of slices to send:
    Optional 'thank-you' note:
  • Quote
  • Report post to moderator

thomas rubino wrote:Hi Leigh;
Well in my mind you are choosing between Matt's large cook stove or a batchbox you design your self to fit your specific area.


It's the "design your self" that sounds so scary! LOL I already mentioned that the amount of information out there is overwhelming, but your explanation beautifully lays out the basic ideas in a way that I can wrap my head around. (Dan is quicker to catch on to things like this, but that's the difference between his gifts and mine and why we make a good team).

Building your own basic batchbox is really not as hard as it seems.  After all its just a box of a specific size with a specific size hole "port" at the rear. . . From that point on its a large empty brick box with a super hot riser "chimney" inside...  


Kind of like the stove pictured on your Batchbox Doors webpage- the one with the octagonal chimney? I can see something similar to that working well for our situation.

It sounds like our next step is to take our measurements and start exploring design possibilities.

Satamax Antone wrote:I post the thread about my build. As it might give you ideas. https://permies.com/t/44806/Cobbling-workshop-heater-cooktop-oven


Satamax, thank you! I like that you included lots of pictures. They help it make more sense.
 
Satamax Antone
gardener
Posts: 3471
Location: Southern alps, on the French side of the french /italian border 5000ft elevation
194
  • Likes 3
  • Mark post as helpful
  • send pies
    Number of slices to send:
    Optional 'thank-you' note:
  • Quote
  • Report post to moderator
I think something like this could work, but with a batch.

https://permies.com/t/38889/a/22541/Jrocketbell.skp?download_attachment=true

You'll have to learn to use sketchup. Rotate, select deselect, hide unhide etc.

https://permies.com/t/38889/a/46616/batchetage.skp?download_attachment=true

https://permies.com/t/38889/a/46625/batchetage2.skp?download_attachment=true

All those are non working examples.

The vertical batch hasn't been built besides few tests of mine. But it can give you some ideas.


It has tendency of "firebacks"    

But the two drawings above were meant for this one.


But designs evolve over time. What you need to do first, is to experiment with few outside cobbled up J tubes and batches.

Some of my early stuff


The core is still in use for outside cooking :D

First batch attempt.


You'll have to rummage through the early videos on my channel.

Since i have built the workshop heater,  i experiment on it. But i do far less. Up to the point i have abandoned the idea of building another rocket upstairs.

Hth.
 
Satamax Antone
gardener
Posts: 3471
Location: Southern alps, on the French side of the french /italian border 5000ft elevation
194
  • Likes 2
  • Mark post as helpful
  • send pies
    Number of slices to send:
    Optional 'thank-you' note:
  • Quote
  • Report post to moderator
One i had completely forgotten about, but which might give you ideas.

https://permies.com/t/107101/Retrofitting-Batch-Box-Rocket-Bell
 
Leigh Tate
author & steward
Posts: 5289
Location: Southeastern U.S. - Zone 7b
3072
5
goat cat forest garden foraging food preservation fiber arts medical herbs writing solar wood heat homestead
  • Mark post as helpful
  • send pies
    Number of slices to send:
    Optional 'thank-you' note:
  • Quote
  • Report post to moderator
Satamax, thank you! You've given us a lot to study. If I have questions, I'll be back!
 
Satamax Antone
gardener
Posts: 3471
Location: Southern alps, on the French side of the french /italian border 5000ft elevation
194
  • Likes 1
  • Mark post as helpful
  • send pies
    Number of slices to send:
    Optional 'thank-you' note:
  • Quote
  • Report post to moderator
Bad pictures, but this one might interest youses!

https://donkey32.proboards.com/thread/848/18cm-inch-double-batch-system
 
Leigh Tate
author & steward
Posts: 5289
Location: Southeastern U.S. - Zone 7b
3072
5
goat cat forest garden foraging food preservation fiber arts medical herbs writing solar wood heat homestead
  • Mark post as helpful
  • send pies
    Number of slices to send:
    Optional 'thank-you' note:
  • Quote
  • Report post to moderator
Future BBR will replace the woodstove. See the first post for more pics.


I took a series of measurements and then made a very rough drawing in Gimp to help me visualize what we've got to work with.

Living room hearth + bedroom hearth (back to back). Measurements are close, but not precise.

The placement of the chimney flue is fixed, so it's something we'll have to design around. It's feasible that we can remove the back brick wall shield and fireplace front behind it. That will leave a nice hole in the wall, although I'm not entirely sure of its actual size at this point.

Exploring ideas that will work within these parameters.

Satamax Antone wrote:You'll have to learn to use sketchup.


I can see this would be extremely useful! My problem is that my OS is Linux, and there is no Linux equivalent to sketchup. So I haven't been able to view any of the skp files.  
 
Rocket Scientist
Posts: 1809
Location: Kaslo, BC
525
building solar woodworking rocket stoves wood heat greening the desert
  • Likes 3
  • Mark post as helpful
  • send pies
    Number of slices to send:
    Optional 'thank-you' note:
  • Quote
  • Report post to moderator

Satamax Antone wrote:You'll have to learn to use sketchup.


I can see this would be extremely useful! My problem is that my OS is Linux, and there is no Linux equivalent to sketchup. So I haven't been able to view any of the skp files.  

Hi Leigh,  I'm running Linux as well and am able to use their online program for free. Go here first: sketchup.com
Then go to : Products > Create > Sketchup for Web
Then click on "Start Modeling".
I sign in with my Google account so that way I can also save all my work in "Trimble Connect".

It doesn't apparently have all the bells and whistles that the full version has, but its great for my needs.
 
Leigh Tate
author & steward
Posts: 5289
Location: Southeastern U.S. - Zone 7b
3072
5
goat cat forest garden foraging food preservation fiber arts medical herbs writing solar wood heat homestead
  • Mark post as helpful
  • send pies
    Number of slices to send:
    Optional 'thank-you' note:
  • Quote
  • Report post to moderator

Gerry Parent wrote: I'm running Linux as well and am able to use their online program for free.


I was hoping someone would have a solution; thank you Gerry! Does it open skp files others have made? I've collected a bunch I'd like to look at.
 
Satamax Antone
gardener
Posts: 3471
Location: Southern alps, on the French side of the french /italian border 5000ft elevation
194
  • Mark post as helpful
  • send pies
    Number of slices to send:
    Optional 'thank-you' note:
  • Quote
  • Report post to moderator
Leigh.

I think i would do a 49.5 x 49.5 X 6 ft tall bell.

Leaving a bit of slate hearth at the back, and of brick hearth at the front. May be less at the back. So you have more room at the front to store a bit of wood , a poker stand. Few things like that.


I would divert the 6 inch pipe to one side, for the plunger tube.  (a plunger tube is an insulated tube , which is the bottom part of the chimney, and goes nearly to the floor, to have the stratification effect of a bell)

With two 45 and a piece of tube.


That way, you still can center the firebox in the middle of the  bell.

I would strongly advise you to do a dry fit firebox, as i did, the brick slabs being easy to replace.

If it was my place, i would do a double skin out of a steel container of some kind. Well, you've seen the thread on my workshop's heater.

Or you could do a brick bell, lined with firebrick splits.

Make a door at the back, in the spare room, to inspect and clean.

I wonder if a junk gun safe couldn't do a nice bell! :D .

HTH.
 
Leigh Tate
author & steward
Posts: 5289
Location: Southeastern U.S. - Zone 7b
3072
5
goat cat forest garden foraging food preservation fiber arts medical herbs writing solar wood heat homestead
  • Mark post as helpful
  • send pies
    Number of slices to send:
    Optional 'thank-you' note:
  • Quote
  • Report post to moderator

Satamax Antone wrote:I think i would do a 49.5 x 49.5 X 6 ft tall bell. . . HTH.


Yes, that helps very much! I've been working through the How to size a batch rocket at batchrocket.eu and will have questions about that soon.
 
Gerry Parent
Rocket Scientist
Posts: 1809
Location: Kaslo, BC
525
building solar woodworking rocket stoves wood heat greening the desert
  • Likes 2
  • Mark post as helpful
  • send pies
    Number of slices to send:
    Optional 'thank-you' note:
  • Quote
  • Report post to moderator

Leigh Tate wrote:

Gerry Parent wrote: I'm running Linux as well and am able to use their online program for free.


I was hoping someone would have a solution; thank you Gerry! Does it open skp files others have made? I've collected a bunch I'd like to look at.


It sure does! Either from .skp files saved onto your desktop or that you've saved onto their server.
 
Posts: 52
2
  • Likes 1
  • Mark post as helpful
  • send pies
    Number of slices to send:
    Optional 'thank-you' note:
  • Quote
  • Report post to moderator
You may be interested in the Vortex stove as it is compact and very interesting to watch!
The new version and some videos are near the end of the long thread.
https://donkey32.proboards.com/thread/703/vortex-stove
 
Leigh Tate
author & steward
Posts: 5289
Location: Southeastern U.S. - Zone 7b
3072
5
goat cat forest garden foraging food preservation fiber arts medical herbs writing solar wood heat homestead
  • Likes 1
  • Mark post as helpful
  • send pies
    Number of slices to send:
    Optional 'thank-you' note:
  • Quote
  • Report post to moderator
It's a beautiful stove!
 
Scots John
Posts: 52
2
  • Mark post as helpful
  • send pies
    Number of slices to send:
    Optional 'thank-you' note:
  • Quote
  • Report post to moderator
Yes I agree but it also burns for quite a bit longer than most rocket stoves, it looks like the fire can last up to two hours rather than one hour of the batch box?
I am impatiently waiting to see how that last one in the video turns out....
Reading between the lines I think a lot of these top  range stoves  are very expensive to build?
 
thomas rubino
rocket scientist
Posts: 6318
Location: latitude 47 N.W. montana zone 6A
3188
cat pig rocket stoves
  • Likes 1
  • Mark post as helpful
  • send pies
    Number of slices to send:
    Optional 'thank-you' note:
  • Quote
  • Report post to moderator
Hi John;  
Just wanted to tell you that my batchboxes, burn 2 hrs easy. The 7" closer to three hrs.
The bulk of the wood may have burned off. But that mountain of coals will stick around a long time, especially if you have a brick core.
 
Scots John
Posts: 52
2
  • Likes 1
  • Mark post as helpful
  • send pies
    Number of slices to send:
    Optional 'thank-you' note:
  • Quote
  • Report post to moderator
Hi Thomas, that sounds great I have followed  your builds and your stove sounds perfect for your workshop.
Honestly I don’t really know much about rocket stove, only what I read!
I am sure Peter said his batch box is like a race horse and designed to burn fast and furious especially compared to Trevor’s Vortex design.

Peter seems to be presently developing his own version of the vortex stove (I am sure it will be great) and I think I read that he was surprised how long the design would burn?
I just thought it would look nice in someone’s lounge as the double vortex must be fascinating to watch and the long burn might be convenient but I really don’t know if it would be a better choice than a batch box?
 
Satamax Antone
gardener
Posts: 3471
Location: Southern alps, on the French side of the french /italian border 5000ft elevation
194
  • Likes 1
  • Mark post as helpful
  • send pies
    Number of slices to send:
    Optional 'thank-you' note:
  • Quote
  • Report post to moderator
Well, having lived with a J tube, and several iterations of the batch.

Following Peter and trev. I like the ease of use of the batch. It's like having a  normal stove, more or less, with less tending. Mine burns for an hour, then i have embers for an hour, an hour and a half. May be two, with oak.  

I'm not saying that the DSR 2 And the new iterations aren't good. Just that i have lost interest somewhat.
 
Leigh Tate
author & steward
Posts: 5289
Location: Southeastern U.S. - Zone 7b
3072
5
goat cat forest garden foraging food preservation fiber arts medical herbs writing solar wood heat homestead
  • Likes 2
  • Mark post as helpful
  • send pies
    Number of slices to send:
    Optional 'thank-you' note:
  • Quote
  • Report post to moderator
I've been doing some doodling with my hearth layout because I needed to visualize whether my ideas will fit our existing parameters. My husband and I have briefly discussed two options which I've made simple graphics for. The sketches are rough and the measurements are close but not precise. For either design, we'll have to tear out at least part of the back brick shield wall, plus the brick fireplace front in the bedroom.

Idea #1 would be to use the plans for Walker full masonry stove

First idea with Walker stove.

The Walker stove measures 55" by 30", so if built with the firebox end as the front, it would fit my space nicely. If we did this, I wouldn't put in an oven door; the oven space would become the bell.

Advantages:
- the plan already exists (wouldn't have to design anything)
- leaves good clearances
- because of the riserless core, we could leave the existing chimney in place
- ?

Questions:
- would the bell be large enough?
- ?

Idea #2 is to build a 6" batch box rocket stove. The measurements and placements for the batch box and heat riser in my picture (below) are roughly approximate, but hopefully close enough that I have confidence it would work. It would need to be a sidewinder to fit. I got the internal measurements from the chart at batchrocket.eu.

Box dimensions for 6" riser:
  W: 8.625"
  H: 12.9375
  D: 17.25"

Riser dimensions:
  W: 6"
  H: 43.1875 (43 and 3/16)

For my drawing, I guesstimated an additional four inches per side for brickwork. The sizing and exact placement of the bell are two things for which I have no clue for at the moment! What I drew is completely arbitrary at the moment. Max suggested 49.5 x 49.5 x 6 ft for the bell, but I only have 49.5" between the brick shield wall sides. I'd like to leave some clearance between the bell and the brick wall shield, so we'd have to work out different dimensions. I know the ISA is an important part of the equation, but I don't know how to calculate that yet.

Second idea, batch box rocket heater.

The chimney would exit at the bottom of the bell. We'd need one 90-degree elbow at the bottom, and two 45-degree elbows near the top to fit into the existing chimney flue in the ceiling.

Advantages:
- would probably give more (and longer) heat
- ?

Disadvantages:
- would have to design it myself (how good am I?!?!?)
- more time consuming and costly to build
- ?

So now I have something visual to wrap my head around. Still a long way to go, but it's a start.

Tell me what you all think. Suggestions? Potential problems? What else do I need to consider before moving on to the next step?
 
Gerry Parent
Rocket Scientist
Posts: 1809
Location: Kaslo, BC
525
building solar woodworking rocket stoves wood heat greening the desert
  • Likes 2
  • Mark post as helpful
  • send pies
    Number of slices to send:
    Optional 'thank-you' note:
  • Quote
  • Report post to moderator
Have you consulted at all with Matt Walker at all about your situation Leigh? He is nothing but awesome for helping people fit his stoves to match the needs of his customers.
I know that in many of his Stove Chats, he has mentioned that the only thing you can't change is the core....everything else is flexible. Most of his plans have his core being used to do different functions and look entirely different on the outside, but on the inside they are all the same. Highly recommend you send him the link to this thread.

ISA of the bell is only important if you don't include a bypass (which I see you have in your drawing). This opens up much greater possibilities for bell size and shape to help maximize the space your working with.
 
Satamax Antone
gardener
Posts: 3471
Location: Southern alps, on the French side of the french /italian border 5000ft elevation
194
  • Mark post as helpful
  • send pies
    Number of slices to send:
    Optional 'thank-you' note:
  • Quote
  • Report post to moderator
Hi Leigh.

I don't quite get it.

Why do you want the door to the side?

And in your second drawing, why do you separate the fire unit from the bell?
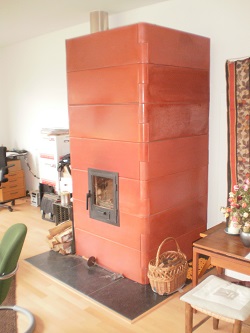
 
Leigh Tate
author & steward
Posts: 5289
Location: Southeastern U.S. - Zone 7b
3072
5
goat cat forest garden foraging food preservation fiber arts medical herbs writing solar wood heat homestead
  • Mark post as helpful
  • send pies
    Number of slices to send:
    Optional 'thank-you' note:
  • Quote
  • Report post to moderator

Gerry Parent wrote:Have you consulted at all with Matt Walker at all about your situation Leigh? He is nothing but awesome for helping people fit his stoves to match the needs of his customers.
I know that in many of his Stove Chats, he has mentioned that the only thing you can't change is the core....everything else is flexible. Most of his plans have his core being used to do different functions and look entirely different on the outside, but on the inside they are all the same. Highly recommend you send him the link to this thread.


Gerry, no, we haven't contacted Matt yet. My husband wants to build this same cookstove in our outdoor kitchen, and perhaps our kitchen too (eventually). Good idea about sending Matt the link.

ISA of the bell is only important if you don't include a bypass (which I see you have in your drawing). This opens up much greater possibilities for bell size and shape to help maximize the space your working with.


Thanks! I understood that to be the case.

Satamax Antone wrote:Why do you want the door to the side?  


If we go with the Walker stove, the door needs to be on the side because the 55" length won't fit in my 49.5" hearth width. Otherwise, we'd have to change the direction of the core. Not impossible, but since we access our current woodstove on the side anyway, it just seems natural.

If we go with the second idea, the sidewinder arrangement will optimize my allotted space, but it puts the door on the side. For any design, building codes require a certain amount of hearth in front of the door, so to have the firebox door in front, we'd have to either add to the hearth or set the unit further back on the existing hearth. The side door seems the easiest option.

And in your second drawing, why do you separate the fire unit from the bell?


Well, like I said, the drawing's size and placement of the bell is completely arbitrary at this stage of my research. I just wanted to show that there would be one.

One of the ideas we also discussed was something like this one from batchrocket.eu.

Photo source - batchrocket.eu/.

It's still a possibility, but I'd like to be able to use the firebox for some simple cooking, similar to what you did with yours. So that design is more at the bottom of the list.

I patterned my second idea more like this one, also from batchrocket.eu.

Photo source - batchrocket.eu/.

Obviously, I modified it for my drawing, but like I said, something similar could work.
 
thomas rubino
rocket scientist
Posts: 6318
Location: latitude 47 N.W. montana zone 6A
3188
cat pig rocket stoves
  • Likes 3
  • Mark post as helpful
  • send pies
    Number of slices to send:
    Optional 'thank-you' note:
  • Quote
  • Report post to moderator
Hi Leigh;
Both plans are good.  And yes, you guys are that good! You can build your own batch with brick bell! Remember it is just a funny shaped box of brick.  Think Lego's....
Matts plans would go together smoothly, you will have a complete material list and you get to reach out to Matt as much as you need to.  It will get completed faster.
Building your own will certainly take longer. You will not have a for sure material list but you do get to reach out here at Permies as much as you need to.

My vote is for you to build your own in the living room. That way you will have a real feeling of ownership and an integral knowledge of rocket science.
Your hubby will be able to retire from his day job and become the new RMH builder in your neck of the woods!

Purchase Matts plan when you are ready to build in your kitchen or for your summer kitchen.

No matter what plan you choose you will be happy campers next winter!


Leigh Tate
author & steward
Posts: 5289
Location: Southeastern U.S. - Zone 7b
3072
5
goat cat forest garden foraging food preservation fiber arts medical herbs writing solar wood heat homestead
  • Likes 1
  • Mark post as helpful
  • send pies
    Number of slices to send:
    Optional 'thank-you' note:
  • Quote
  • Report post to moderator

thomas rubino wrote:My vote is for you to build your own in the living room.


I'm definitely leaning that way now that I've worked through a beginning visual. I feel like it gave me a better sense of direction. The final say-so will be up to Dan, since he'll do the actual build, but he's always up for a challenge. :)
 
There's no place like 127.0.0.1. But I'll always remember this tiny ad:
permaculture and gardener gifts (stocking stuffers?)
https://permies.com/wiki/permaculture-gifts-stocking-stuffers
reply
    Bookmark Topic Watch Topic
  • New Topic