I have finally begun building my masonry heater. It is based off of matt walker's riserless core. The parts have been mostly scrounged or free. What i have spent money on is the white IFB bricks, secondary air tube, wood feed door, the superwool, and fire clay.
Here is where i purchased the door/secondary feed tube. Dragon tech RMH!
I want to start out by saying i have not done any masonry work before. Having erica/ernie's book here has been tremendous help. Also having the tremendous support of pemies has been fantastic so thank you to everyone who has asked question on here. And thank you to those who have help answer those questions.
Today i spent my time stacking the riserless core and began trying to figure out the transition to the heavy mass storage. Is there any issues with using a 4.5" x 9" channel for my air path in the mass storage area? The CSA is @ 40 with the 4.5 x 9.
The stove is going to have a double skin. I will be putting up red clay bricks around the outside.
base-of-the-masonry-heater.jpg
the base.
dry-stacked-masonry-heater.jpg
What i am hoping it will look like. only nicer
dry-stacked-masonry-heater-2.jpg
dry stacked
leveling-masonry-heater-base.jpg
had to level part of the bricks. I used clay slip
secondary-air-tube-in-base-layer.jpg
base layer with secondary air tube in
masonry-heater-base-2.jpg
Base layer for the heavier mass. Most likely going to fill the holes with perlite.
It seems for me soaking the red clay bricks than applying the mortar( which is just local soil sifted, mixed with some wood stove ash) to the wall first and than placing the brick on the wall works much better. As aposed to buttering the brick first and than putting it on the wall.
As far as putting the full sized fire bricks i found today that not making them wet at all and just using fireclay(clay slip) resulted in the best results.
I am super stoked to get this sealed up! I am excited to use it! Enjoying building and learning new skills.
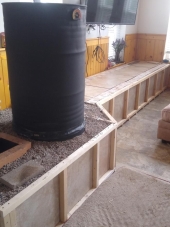
John C Daley wrote:Does the wooden floor need strengthening?
So i have been making some progress. It has been hovering around freezing here and it makes for cold days standing outside...
So i made a transition area which brings the flue gases down lower into the bell. It is about 7 3/4" by 8" and comes down to about 10" from the floor of the stove. It is topped with a ceramic fibre board along with a piece of superwool. The bricks i used were light weight ones which hopefully will not steal to much heat.
I made a chimney exit which is an experiment. The chimney sits on two IFB on end with some superwool. The chimney is about 7 1/2" from the floor of the stove.
I am getting excited to put the top on the bell. Than i can start getting the ceramic glass cut and installed.
I got to say i am surprised at how much mortar i am needing to use. Every 15 bricks requires a dish wash tub full of mortar. It snowed the other day so i am going to need to wait a few days to get some more mortar sifted.
All and all i am loving doing this work.
IMG_1318.JPG
Two IFB as the base
IMG_1319.JPG
a few rows up
IMG_1320.JPG
ceramic fibre board. Wear a mask!
IMG_1321.JPG
Where the board/ superwool went
IMG_1322.JPG
all finished
IMG_1323.jpg
I believe i am going to remove the far bottom left brick.
IMG_1325.JPG
blurry photo of the chimney resting on the IFB
IMG_1332.JPG
Where it sits today. I have been too cold for a week or so. I want a warm day inside!
Hi Jordan;
Your stove is looking very nice!
I just love the old brick, it has such character.
I have found that when using new fire bricks , no mortar at all works very well.
I remember working on my shop batchbox during the winter...
A propane heater helped and then about 3-4 hrs was all my hands wanted to do.
For all your Montana Masonry Heater parts (also known as) Rocket Mass heater parts.
Visit me at
dragontechrmh.com Once you go brick you will never go back!
Those who dance are thought mad by those who hear not the music. This tiny ad plays the bagpipes: