• Post Reply Bookmark Topic Watch Topic
  • New Topic
permaculture forums growies critters building homesteading energy monies kitchen purity ungarbage community wilderness fiber arts art permaculture artisans regional education skip experiences global resources cider press projects digital market permies.com pie forums private forums all forums
this forum made possible by our volunteer staff, including ...
master stewards:
  • Carla Burke
  • Nancy Reading
  • John F Dean
  • r ranson
  • Jay Angler
  • paul wheaton
stewards:
  • Pearl Sutton
  • Leigh Tate
  • Devaka Cooray
master gardeners:
  • Christopher Weeks
  • Timothy Norton
gardeners:
  • thomas rubino
  • Matt McSpadden
  • Jeremy VanGelder

Japan: Land of the riser-less sun...build

 
pollinator
Posts: 464
Location: Toyoura Hokkaido
163
  • Likes 5
  • Mark post as helpful
  • send pies
    Number of slices to send:
    Optional 'thank-you' note:
  • Quote
  • Report post to moderator
Howdy folks!

So I’ve started to work out and spec the build plans for a new RMH, based on Matt Walkers original cook stove design. It’s going to be a bit before we actually start construction of the stove, as we are in the process of trying to get a tiny house finished before the snow flies. (figures crossed)

Have been in touch with Matt a few times and corresponded with him on our build. He has been extremely helpful, as always, but also wanted to document the build process here, so that others can learn and we can all grow and understand more together.

Our design will be based on the Walker Brick Cook Stove/WALKER RISER-LESS COMBUSTION CORE. This core is an open source design under a Creative Commons License. We’re donating to the cause and ask that anyone who decides to use this design do the same.

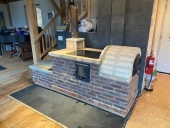
This is our second build. First was last season as a bell bench CFB J-tube. With the help of Matt and all of you here, we have a successful stove and a better understanding rocket mass technology.

Having said that, the J-tube is a much simpler geometry and a rather easy build in hind site. 6” (15cm) chimney flu duct= 15cm through out. I just cut all my CFB pieces so that all sides of the core were an exact 15cm.
i.e. feed tube=15cm x 15cm, burn tunnel=15cm x 15cm, heat riser= 15cm x 15cm.

Between those spec perimeters, the CFB insulated core and the “no manifold” direct connect to the bell, I think we were successful in our first build. Really have next to no problems getting draft and running the J-tube we have.

This new build is a bit more technical and so I’m taking the time now to try and understand the details of what we are planning to do. Matt makes a point over and over that a stove should be “a work in progress”. Build and tweak as you go. This approach resinates with me, as I feel that the design perimeters for each stove is depended on the needs of the builder and the environment in which it will be used.

With this in mind, I’m more than happy to keep fine tuning as we go. But first off I need to get my head around the stove, its technical aspects and build components. I’ve watched just about everything there is on the subject and spent late nights reading all the techie stuff on Donkey’s and Peter’s site. Some of which still escapes me for sure.

The other thing that attracts me to Matt’s stove philosophy is the idea of designing stoves that are stable in varying conditions. Like I’ve said before, we’re not trying to win the science fair here, just build a solid stove that is reliable and relatively efficient.

Here is my first SketchUp mock-up of the intended core. It’s been built from zero, referencing Matt’s riser-less core photos on his site.

Link: https://walkerstoves.com/walker-riser-less-combustion-core.html

As well as a SketchUp file created by Berry on Donkey`s

Appreciate these technical specs from Berry, however his mock-up has some of the bricks squished into other bricks (virtually) and does not account for any mortar in the build. I have rebuilt the core in layers adding a 2mm mortar allowance between each brick. I’m not sure that this is the correct allowance, but just based it off of my findings on the web. I have made each layer of bricks in different colors so that it will be easier to reference, and made a darker shade of any bricks that need to be cut to fit the build.

Here is a look at what I have to date. I think I understand how the flow of the riser-less system works, basically winding its way up and over the cooktop and then into a down draft chamber that empties out into a bell bench, in our case.

Link: https://we.tl/t-dH0O1HYLP7

Matt said I should “maintain a CSA of 29” through out”, but to be honest I’m not entirely sure what that 29” is referring too. The core design changed size a number of times between the port and downdraft space. I’m following the dimensions from Berry’s SketchUp file as closely as possible while allowing for mortar and the IFB (insulated fire bricks) we will be using in our build.

Are these dimensions/plans for an 8” system?
Should we be using 6” or 8” flu/exhaust pipe for this build?

Here are a few other areas I feel we need some guidance on:

Secondary Air:

1. Better understanding of how to build and implement the secondary air. Not sure I can get RA 330. Do I use standard square tube stock? What dimensions do I need for the horizontal portion? (8” or 6” system) How tall should the vertical portion be? Do I need to close off, weld shut, the end of the horizontal tube nearest the port?
2. How do I “suspend/raise the secondary air tube so it sits flush on the burn chamber floor?  It’s just hovering in space in the SketchUp mock-up.
3. Do you fill the area behind the secondary air tube, in the floor channel, with a small piece of IFB?

Door:

Thinking of constructing a simple plug style door to begin with, similar to what Matt showcases as an option in his “Building Stove Doors, Dampers, and Hardware” instructional video.

Link: https://www.youtube.com/watch?v=K7Zu7rSpnzs

Probably something that incorporates tensioning pins for seal. Questions:
1. I attach a steel angle iron frame to the brick core face? This frame is attached to the core on the inside face of the brick liner? (face of the bricks that make up the opening to the core?
2. Flange is mounted to the angle iron with bolts?
3. The door has a hole for the primary air? (which can be closed off separately from the secondary air)
4. Secondary air has its own hole in the steel/aluminum door flange? (which can be closed off separately from the primary air)
This is a bit unclear after watching Stove Chat 16 where Matt talks about the door as if it covers both the primary and secondary air. Maybe there has been developments in design since the ones shown on his site.
5. How should I be approaching this door? Size? Fabrication? Plug style for simplicity or hinge style convenience?
6. Is this being mounted to the IFB core or to the cob/stone skin in our case?

Cook top:

Thinking of using a large piece of 5mm steel to start with. Likelihood of us finding a glass cook top is not very likely, but will keep looking.
1. Just cut to fit the dimensions of the IFB perimeter and seal with cob correct?
2. Any tips on seasoning this top?

Bypass/Baffle:

1. Should we be incorporating a bypass into our system?
2. Should it be located in the spot pictured in the Attachment?
3. Will something like this work or are we still too hot for metal? (See attachment)

RMH base insulation:

This is a topic that I feel a bit uncertain of. In our first build I threw down a “bunch” of perlite and clay in a hurry and just started building on top. I’m a bit obsessed with this at the moment as I’m OCD and convinced we are loosing tons of heat through the floor with no way to tell. Want to maximize insulation this time around.

1. If we are using full IFB for the floor of our core, what should we be laying down under that? (the core will be set on tamped cold earth)
2. Is putting down a layer of glass bottles as a thermal break a good idea?
3. How do you know when you really have enough insulation under both the core (if necessary) and the bell?

I probably sound like a broken record on this point, but it just keeps haunting me and it seem to be the one topic that never gets very much attention, Maybe a question for Stove Chat?

That’s probably enough for an opening post.

All insights and comments are welcome.

I will do my best to clearly provide as much information about our build as possible throughout the process so that we can all learn together. Let me know when things are unclear or needs more details.

Feel free to follow this design thread and use what ever you like, just  remember that it is based on Matt’s open source core, and if you decide to use it please respect his time and innovations with a donation when possible.

Thanks again in advance for your time and looking forward to more rocks mass madness in the weeks and months to come…

Sincerely, Peter & Co in Hokkaido


P.S.- For anyone reading this and thinking of building their first stove, START NOW, START LAST WEEK…:)
Matts-Riser-less-Core.jpg
MATT'S SAMPLE CORE ON HIS SITE
109458340_995541297548897_1102515292851943702_n.jpg
OUR DRY STACK TEST CORE1
110020560_320525145769348_7334261168685891499_n.jpg
OUR DRY STACK TEST CORE2
Screen-Shot-2020-07-16-at-16.39.42.jpg
MATT'S PLUG STYLE DOOR SAMPLE
Matt-s-2nd-air.jpg
MATT'S 2ND AIR BUILD DESIGN
Bypass.jpg
BYPASS OPTION?
BYPASS OPTION?
Screen-Shot-2020-07-16-at-16.56.30.jpg
SPACE BEHIND 2ND AIR
Screen-Shot-2020-07-16-at-17.01.16.jpg
PORT DIMENSIONS ACCURATE?
Screen-Shot-2020-07-16-at-17.05.12.jpg
AREA C DIMENSIONS ACCURATE?
Screen-Shot-2020-07-16-at-17.08.12.jpg
FIREBOX DIMENSIONS ACCURATE?
 
rocket scientist
Posts: 6355
Location: latitude 47 N.W. montana zone 6A
3209
cat pig rocket stoves
  • Likes 2
  • Mark post as helpful
  • send pies
    Number of slices to send:
    Optional 'thank-you' note:
  • Quote
  • Report post to moderator
Hi Peter;
Super awesome your building one of Matt's stoves!   You guys are going to be so warm and happy next winter!  Soon you will be the talk of Hokkaido!   Oh wait you already are the talk about the island...But this will be good talk... :-) That crazy American that Mimi married. Has build with Mr Yoshida the most wonderful little house, and he has the most interesting stove we have ever seen!
We simply must get him to show us how to build that crazy stove in our home!

So I'll try to answer a few of your questions.  The secondary air tube.  Yes the end of the square tubing is welded shut.  Ra330 is excellent if you can get it but regular square tube is fine.
My secondary tube sits on a bed of perlite and clay. The vertical stub should be 1/2 the height of the port.  Pretty sure Matt's designs are all 6"  Fill in beyond the tube with ifb or cfb or perlite clay.
Here is my post about building an air channel.  https://permies.com/t/135328/construction-Batch-Box-floor-channel

Air inlets)   My new batch is using a separate secondary and primary air inlets. It all depend on what door design you choose. Matt has stated that both methods work well.
Peter has started combining both air inlets with one larger primary. The secondary air enters thru the primary hole and then being colder it sinks and puddles around the secondary air opening.
Matt's designs  depend on your door choice. If you went with the cast iron premade Pisla door then you would shorten your secondary air tube to be inside the firebox and allow it to receive its air from the primary hole  If you build your own door you get a choice.
Bolts)   Masonry screws (tapcon) using a masonry drill . They don't have a lot of straight pull strength but side pull is strong.
Your door can be as simple (plug style) or as fancy as you care to make it.
I am currently building a new door for my shop Dragon . There will be a thread all about it when I get far enough along. It will have separate primary and secondary inlets.

Your stove top) IF you could find it a piece of cast iron would be the cats meow for your top. Part of an old wood cook stove top would be perfect.
Cast iron is much better than plate steel.  But you must use what you have available.  Cooking oil rubbed in would season the metal.

IFB as a floor is all you need for insulation. The heat will not be passing thru the floor just over it.


Rocket Scientist
Posts: 1809
Location: Kaslo, BC
525
building solar woodworking rocket stoves wood heat greening the desert
  • Likes 2
  • Mark post as helpful
  • send pies
    Number of slices to send:
    Optional 'thank-you' note:
  • Quote
  • Report post to moderator
Hi Peter,  Your undertaking of this project to refine the details even further is commendable. Thank you from all rocketeers around the world!

 
Peter Sedgwick
pollinator
Posts: 464
Location: Toyoura Hokkaido
163
  • Likes 1
  • Mark post as helpful
  • send pies
    Number of slices to send:
    Optional 'thank-you' note:
  • Quote
  • Report post to moderator
Thanks guys for the words of encouragement!

I'll keep working on the specs and details. Will have a chat with Matt as well to get his thoughts.

So the 2mm mortar allowance seems reasonable?

The specs I have are correct? Like I said, I'm really sure how to calculate the 29" CSA in this stove.

The configuration I've cooked up looks accurate overall?

I'm sure we'll have tons more questions and details to share as we get into to build.
Probably do a dry stack build out side with a make shift cob chimney tacked on as a test run.

Will keep posting as we go.

Back to the tiny house build soon...

Cheers, Peter & Co.
 
Gerry Parent
Rocket Scientist
Posts: 1809
Location: Kaslo, BC
525
building solar woodworking rocket stoves wood heat greening the desert
  • Likes 2
  • Mark post as helpful
  • send pies
    Number of slices to send:
    Optional 'thank-you' note:
  • Quote
  • Report post to moderator
Hey Peter & Co,    

You know, I have never designed anything with Sketchup before so I never have the exact measurements of how its all going to be, I'm more of a Donkey "Dip and stick" kind of guy when it comes to applying mortar.
Another thing I have never done is build one of Matt's riseless cores so I can't give you any info on that except to recommend running it by Mr. Matt himself and see what he thinks. Just make sure your fonts are a bit larger and questions concise. :)  (Stove chat tip #34)

 
Rocket Scientist
Posts: 797
Location: Guernsey a small island near France.
299
  • Likes 4
  • Mark post as helpful
  • send pies
    Number of slices to send:
    Optional 'thank-you' note:
  • Quote
  • Report post to moderator
Hi Peter, I am also looking forward to following your new build, I know just how frustrating it is to try and find out all the little details you need to know!
Matt comes across as very amical guy and i am sure you would be best to ask him direct.

The door seems to be a hugely important aspect to me, it is a main visual feature and the only moving part ( apart from coat hangers!) I would be thinking hard about its design and especially the mounting and frame design. A nice smoothly operating door with a big as possible window,  secure hinges and catch would be important to me.

Obviously  you need to follow Matts internal design but I think you have plenty of leeway to adapt the external features.

The cook top is another thing I would spend time on, no doubt glass offers many benefits including an interesting perspective but metal can offer more stable cooking températures and perhaps more durability for bagging down saucepans!
I use a two part steel top that stops too much distorsion but I also have a hole above the riser where i can place glass or a pizza stone or directly place a wok or even directly sear  in the flame.
 
Peter Sedgwick
pollinator
Posts: 464
Location: Toyoura Hokkaido
163
  • Mark post as helpful
  • send pies
    Number of slices to send:
    Optional 'thank-you' note:
  • Quote
  • Report post to moderator

Gerry Parent wrote:Hey Peter & Co,    

You know, I have never designed anything with Sketchup before so I never have the exact measurements of how its all going to be, I'm more of a Donkey "Dip and stick" kind of guy when it comes to applying mortar.
Another thing I have never done is build one of Matt's riseless cores so I can't give you any info on that except to recommend running it by Mr. Matt himself and see what he thinks. Just make sure your fonts are a bit larger and questions concise. :)  (Stove chat tip #34)


Noted! Large fonts and concise questions...😉
 
Peter Sedgwick
pollinator
Posts: 464
Location: Toyoura Hokkaido
163
  • Likes 1
  • Mark post as helpful
  • send pies
    Number of slices to send:
    Optional 'thank-you' note:
  • Quote
  • Report post to moderator
Thanks for all that James!

Will be sure to run stuff by Matt. I’ll try to work out a door design. Not holding my breath on the hinged mount right now. Might have to be a simple plug style door this season, depending on how quickly we can get to that portion of the build.

Will keep tinkering...🙏🏼
 
Fox James
Rocket Scientist
Posts: 797
Location: Guernsey a small island near France.
299
  • Likes 4
  • Mark post as helpful
  • send pies
    Number of slices to send:
    Optional 'thank-you' note:
  • Quote
  • Report post to moderator
Hi Peter, I just read through your opening post again and looked at the pictures in a bit more detail and now I have some questions!

To be honest i have not really got my head around the key factor that allows a riserless core to function ?

I remember following PVDB double shoe box thread and thinking ‘this is great but why does it work at all without a tall heat riser’?  
I am not sure if  either of these gentlemen have actually explained how or why the stoves work in basic layman's terms?

I can see how a tall heat riser works on a J tube or Batch box and also why the efficiency and draw reduces when you reduce the hight of a riser but what makes these riserless cores work so well without a tall riser?


Just as a casual observation it appears that Matts builds are more utilitarian and Peters work is more uncompromising but both seem reliant on precise  measurements.


Gerry Parent
Rocket Scientist
Posts: 1809
Location: Kaslo, BC
525
building solar woodworking rocket stoves wood heat greening the desert
  • Likes 4
  • Mark post as helpful
  • send pies
    Number of slices to send:
    Optional 'thank-you' note:
  • Quote
  • Report post to moderator
Hey Fox,    Matt explains it pretty good in Stove Chat #5 starting around the 20:50 minute mark on how the riserless core is able to work.

In a nutshell, I remember him saying that draft is entirely reliant upon the vertical chimney which is why he strongly encourages the use of a bypass. In other words, a riserless core would not work by itself without a proper chimney installed whereas a J tube or classic batch box would.

Your observations of the two stove masters are very similar to mine. Matt has often described Peters builds as 'drag racers' to obtain the highest efficiencies possible and are very specific to Peters passive and well insulated house. Matt however is catering to a lot of folks who have many different goals and so he helps achieve them without straying too far off what will keep the stove working correctly and burn cleanly. No two builds will be exactly the same and compromises are often a part of that.
 
Peter Sedgwick
pollinator
Posts: 464
Location: Toyoura Hokkaido
163
  • Likes 3
  • Mark post as helpful
  • send pies
    Number of slices to send:
    Optional 'thank-you' note:
  • Quote
  • Report post to moderator
James, this is a really good question. Thanks for bringing it up. Matt's explanation is easy to understand. Having these Stove Chat seasons and being able to go back to them is really a game changer as far as being able to get info.

Gerry, it's amazing that you are able to site the queue time for that.

I recently asked Matt in an email about testing the riser-less as a dry stack outside and his repose was "You can dry stack if you find it helpful, you'll need to cobble on
a short chimney section though."

Now got to get me head around the construction and implementation of how and where to incorporate a bypass into this system.

Peter
 
please buy this thing and then I get a fat cut of the action:
12 DVDs bundle
https://permies.com/wiki/269050/DVDs-bundle
reply
    Bookmark Topic Watch Topic
  • New Topic