• Post Reply Bookmark Topic Watch Topic
  • New Topic
permaculture forums growies critters building homesteading energy monies kitchen purity ungarbage community wilderness fiber arts art permaculture artisans regional education skip experiences global resources cider press projects digital market permies.com pie forums private forums all forums
this forum made possible by our volunteer staff, including ...
master stewards:
  • Carla Burke
  • Nancy Reading
  • r ranson
  • Jay Angler
  • John F Dean
  • Pearl Sutton
stewards:
  • Nicole Alderman
  • paul wheaton
  • Anne Miller
master gardeners:
  • Christopher Weeks
  • Timothy Norton
gardeners:
  • thomas rubino
  • Jeremy VanGelder
  • Matt McSpadden

4" Batch Rocket Water Heater

 
Posts: 129
Location: South Australia
7
duck chicken solar
  • Likes 2
  • Mark post as helpful
  • send pies
    Number of slices to send:
    Optional 'thank-you' note:
  • Quote
  • Report post to moderator
Hi All,

I've almost completed a 4" batch rocket to be used in my laundry as a boost to my solar hot water and also for warming the laundry to dry clothes. Any excess heat will be pushed into the living area through the door with a small fan if the laundry gets hot enough.

I'm confident that this will work very well and am hoping to have it running within the day.

The hot water is low pressure with 30 evacuated tubes almost directly above the heater.

All made with 230x115x75mm fire bricks (except for the top of the fire box which is a 305x305x50mm tile and cladded in mild steel.

The riser is cut as an octagon.

The water jacket is 780mm tall and sits on top of the riser followed by a standard s/s flue out through the roof with no bell.

I will update shortly with hopefully a success story and some info if anyone else may benefit from a similar setup.  I believe it will put out around 6.6kw/h if I calculated correctly.

My hope is that others may benefit from this also as it seems to be an extremely efficient design from Peter with many opportunities for different applications and reasonable building cost.
IMAG0665.jpg
[Thumbnail for IMAG0665.jpg]
IMAG0669.jpg
[Thumbnail for IMAG0669.jpg]
IMAG0672.jpg
[Thumbnail for IMAG0672.jpg]
IMAG0678.jpg
[Thumbnail for IMAG0678.jpg]
IMAG0679.jpg
[Thumbnail for IMAG0679.jpg]
IMAG0676.jpg
[Thumbnail for IMAG0676.jpg]
IMAG0590.jpg
[Thumbnail for IMAG0590.jpg]
 
rocket scientist
Posts: 6476
Location: latitude 47 N.W. montana zone 6A
3319
cat pig rocket stoves
  • Mark post as helpful
  • send pies
    Number of slices to send:
    Optional 'thank-you' note:
  • Quote
  • Report post to moderator
Really nice work there Benan ! Following a design by Peter you can't go wrong.  Keep us updated with many photos !
 
Benen Huntley
Posts: 129
Location: South Australia
7
duck chicken solar
  • Likes 1
  • Mark post as helpful
  • send pies
    Number of slices to send:
    Optional 'thank-you' note:
  • Quote
  • Report post to moderator
Thanks so much!

Didn't quite get there tonight unfortunately! Managed to get the glass in the door and cut for the floor channel and primary air.
My mate was helping me with the copper and we didn't get all of the brazing done before it got too late.
Will maybe paint it tomorrow and get it plumbed in early next week.

Salvaged the glass from an old combustion heater door and cut it with a grinder. A little chipping on the edges but no problem.

Door is a little snug so might adjust the hinges a bit. Same mate that was helping with the copper made them up to being over.
IMAG0684.jpg
[Thumbnail for IMAG0684.jpg]
IMAG0685.jpg
[Thumbnail for IMAG0685.jpg]
IMAG0683.jpg
[Thumbnail for IMAG0683.jpg]
IMAG0682.jpg
[Thumbnail for IMAG0682.jpg]
 
gardener
Posts: 1063
Location: +52° 1' 47.40", +4° 22' 57.80"
452
woodworking rocket stoves wood heat
  • Mark post as helpful
  • send pies
    Number of slices to send:
    Optional 'thank-you' note:
  • Quote
  • Report post to moderator

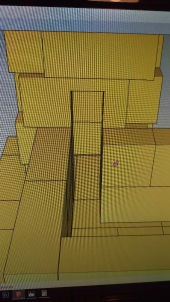
Benen Huntley wrote:All made with 230x115x75mm fire bricks (except for the top of the fire box which is a 305x305x50mm tile and cladded in mild steel.


Benen, I am sorry to say, but you missed a very important point. By scaling the design down, the mass of the core should be scaled down as well. In your case, I would have used 30 mm firebrick or slabs although in a number of cases it proved to be too much. Building such a small device out of insulating firebrick is a better way.

It would probably work like you built it but it'll take a long time to burn without smoke due to the fairly large mass around the firebox and riser.
 
thomas rubino
rocket scientist
Posts: 6476
Location: latitude 47 N.W. montana zone 6A
3319
cat pig rocket stoves
  • Mark post as helpful
  • send pies
    Number of slices to send:
    Optional 'thank-you' note:
  • Quote
  • Report post to moderator
Ouch Brenan;  That's horrible news.  
I can make one suggestion.
Have you heard of "Pinheads" 5 minute riser ?  It will replace your brick riser with a super lite highly insulated riser that will take any temperatures that a batch box can produce.
Ready ???  Really technical here...  Here we go... Ceramic blanket 1" thick stuffed inside of a piece of lite hvac /stove pipe !!! That's it ! Absolutely brilliant !  
You still may need to acquire lite insulated bricks for your core BUT that riser design is the current best thing going !
here is an item # from Ebay     (122673528486) that is a 24" x 12.5 ' 1" thick ceramic blanket. $84 delivered here . not sure how ebay works at your location , but it gives you an idea of cost.
Good luck ,your  building a beautiful BB it just needs a little tweeking.  
 
Benen Huntley
Posts: 129
Location: South Australia
7
duck chicken solar
  • Likes 1
  • Mark post as helpful
  • send pies
    Number of slices to send:
    Optional 'thank-you' note:
  • Quote
  • Report post to moderator
Oh
That's so disappoint to hear.

Thanks, Peter.
 
Peter van den Berg
gardener
Posts: 1063
Location: +52° 1' 47.40", +4° 22' 57.80"
452
woodworking rocket stoves wood heat
  • Mark post as helpful
  • send pies
    Number of slices to send:
    Optional 'thank-you' note:
  • Quote
  • Report post to moderator
Benen, try the thing first before you change anything. When it isn't working up to expectations alter the riser first, Thomas' suggestion is a very good one. Here's a link to it, it's dead simple.

In general the firebox' insulation is nice to have but not really important, in sharp contrast with the insulated riser. That riser is the spot where it really happens, on the rare occasion that the flame isn't through the port in mid-burn you'll see thick black smoke. All configuration in front of the port is there to ensure the afterburner is fed properly, enough but without over fuelling it.

Again, give it a proper test run and change one thing at the time when necessary.
 
Benen Huntley
Posts: 129
Location: South Australia
7
duck chicken solar
  • Likes 1
  • Mark post as helpful
  • send pies
    Number of slices to send:
    Optional 'thank-you' note:
  • Quote
  • Report post to moderator
Thank you both. My wife painted it today while I was at work as we decided to pop it in anyway and see how it goes and go from there.
I'll have a look at the riser option. The other option I have is to replace the current riser with a cast riser of thinner material.
Once it is working the plan is to commence the construction of the 200mm system in the living room.
IMAG1279.jpg
[Thumbnail for IMAG1279.jpg]
 
Benen Huntley
Posts: 129
Location: South Australia
7
duck chicken solar
  • Likes 2
  • Mark post as helpful
  • send pies
    Number of slices to send:
    Optional 'thank-you' note:
  • Quote
  • Report post to moderator
Put her in last night!

Draw is incredible with zero smoke back and it's so loud! It took a long time to dry the bricks and water was being pushed out and was dripping on the ground but ended up with no smoke eventually.

Will hook up the copper to the water jacket tonight and fire it again to see how it goes as that is the primary purpose of the construction.

A small amount of air is being drawn into the flue at the top of the riser which I will seal with some ceramic wool.
IMAG0695.jpg
[Thumbnail for IMAG0695.jpg]
IMAG0694.jpg
[Thumbnail for IMAG0694.jpg]
 
Benen Huntley
Posts: 129
Location: South Australia
7
duck chicken solar
  • Likes 1
  • Mark post as helpful
  • send pies
    Number of slices to send:
    Optional 'thank-you' note:
  • Quote
  • Report post to moderator
Fantastic success!
Tonight there was no smoke after about 5 minutes and water temp was lifting from 45-65celcius when at its peak.
IMAG0699.jpg
[Thumbnail for IMAG0699.jpg]
IMAG0700.jpg
[Thumbnail for IMAG0700.jpg]
 
thomas rubino
rocket scientist
Posts: 6476
Location: latitude 47 N.W. montana zone 6A
3319
cat pig rocket stoves
  • Mark post as helpful
  • send pies
    Number of slices to send:
    Optional 'thank-you' note:
  • Quote
  • Report post to moderator
That's great Benan;
Your build looks really good and it sounds like its working just like you wanted it to !
Is there any bell/mass at all ?  Does the chimney rise straight and exit?
Looking forward to seeing your bigger build as it happens!
 
Benen Huntley
Posts: 129
Location: South Australia
7
duck chicken solar
  • Likes 1
  • Mark post as helpful
  • send pies
    Number of slices to send:
    Optional 'thank-you' note:
  • Quote
  • Report post to moderator
Hi Thomas,
Yes it is working great, thank you!
This has no mass except the fire box and riser plus the water mass in the jacket. The room still gets quite warm quickly.
It weighs under 200kg

The next build will be a brick bell of a few metric tonnes I believe.  
 
Benen Huntley
Posts: 129
Location: South Australia
7
duck chicken solar
  • Mark post as helpful
  • send pies
    Number of slices to send:
    Optional 'thank-you' note:
  • Quote
  • Report post to moderator
After running the heater a few times I'm 100% happy.
I've managed to get the water temp coming out at well over 80c in only two firings and the 300l storage from 44c to 68c with very little wood.
At the same time the laundry area gets into the mid 20s with no problem when it was 10c before firing. My ceiling cornice will go on today which will help even more!

As a side note. I did come across a calculation and would be curious to know why it works.
I was trying to calculate the wood capacity and power output of my 100mm BBR and found that if I multiply the metric volume of the fire box by 200 you end up with the load capacity. I would love to know where the 200 comes from if anyone can shed some insight.
For example.
0.216 x 0.324 x 0.432 = 0.03 cubic meters of volume in a 150mm heater.
0.03 x 200 = 6kg of wood (22kw/h)

Also, bell ISA = riser CSA x 300.
For example.
150mm BBR has a riser CSA of .0018sqm
0.018 x 300 = 5.4sqm ISA for the bell.

 
Peter van den Berg
gardener
Posts: 1063
Location: +52° 1' 47.40", +4° 22' 57.80"
452
woodworking rocket stoves wood heat
  • Likes 1
  • Mark post as helpful
  • send pies
    Number of slices to send:
    Optional 'thank-you' note:
  • Quote
  • Report post to moderator
Congrats Benen, your little batchrocket performs quite well by the look of it. Do you have a way to measure stack temperature? That would be a good way to determine actual efficiency.

Now I had a closer look at it, it looks like the threshold of the floor channel is missing. The function of this piece of steel is to damp down the most violent top of the burn while placing an emphasis on the floor channel. In other words, the higher the air velocity and temperature inside the firebox the more air is sucked into the channel. Which is a very good thing since at the top of the burn the demand for secondary air is quite large.

About your calculations: I tried your method on the ISA numbers which I have found the hard way. And it does add up, you are right. At the moment I don't have a way to check the load capacity but I think it could be right as well since all measurements are tied to the riser, diameter or csa.

May I add this to the website complete with crediting you?
 
Benen Huntley
Posts: 129
Location: South Australia
7
duck chicken solar
  • Likes 1
  • Mark post as helpful
  • send pies
    Number of slices to send:
    Optional 'thank-you' note:
  • Quote
  • Report post to moderator
Hi Peter,

Of course you can add it to the website. Anything to make it easier for people to scale their builds is great and I'm glad to help in any way I can! You're so generous with your information.
I tested the numbers on a few of the sizes and they seem to work from what I can tell.
I discovered the load volume calculation first and then more recently though about scaling my best build to 190mm and needed to know the bell ISA.

The threshold being the little piece on top? It extending the floor out to the door?

The top piece is definitely on. The extension to the door I have but need to tack on with the welder when I get some time

Unfortunately, I don't think it's possible to measure the stack temperature now that it's indoors.
 
What consumes your mind controls your life / tiny ad
turnkey permaculture paradise for zero monies
https://permies.com/t/267198/turnkey-permaculture-paradise-monies
reply
    Bookmark Topic Watch Topic
  • New Topic