

|

|
|
|
|

|

|

|

|

|


 17
17


For all your Montana Masonry Heater parts (also known as) Rocket Mass heater parts.
Visit me at
dragontechrmh.com Once you go brick you will never go back!
11
For all your Montana Masonry Heater parts (also known as) Rocket Mass heater parts.
Visit me at
dragontechrmh.com Once you go brick you will never go back!
8


For all your Montana Masonry Heater parts (also known as) Rocket Mass heater parts.
Visit me at
dragontechrmh.com Once you go brick you will never go back!


 9
9
Rocket surgeon and soil builder... healthy plants are all about the soil.
- My 6" Batch Rocket specs and materials list: https://permies.com/t/248275/Batch-Rocket-Double-Skin-Bell
- Batch Rocket detailed build thread with Q&A: https://permies.com/t/238503/Batch-Rocket-Build
9
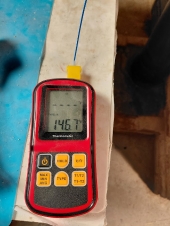
thomas rubino wrote:24 hours later, the riser is still 179F, and the exhaust stack was 93F. Overall, external brick temperatures are 87F!
That's almost 450 clay bricks at 87F sitting in my Living room.
5 minutes after lighting the riser is at 1186F and rising.
regards, Peter
8
regards, Peter
7
For all your Montana Masonry Heater parts (also known as) Rocket Mass heater parts.
Visit me at
dragontechrmh.com Once you go brick you will never go back!
5
Rocket surgeon and soil builder... healthy plants are all about the soil.
- My 6" Batch Rocket specs and materials list: https://permies.com/t/248275/Batch-Rocket-Double-Skin-Bell
- Batch Rocket detailed build thread with Q&A: https://permies.com/t/238503/Batch-Rocket-Build
6
![[Thumbnail for 20241029_065452.jpg]](/t/268052/a/252247/20241029_065452.jpg "Filename: 20241029_065452.jpg
Description:")
For all your Montana Masonry Heater parts (also known as) Rocket Mass heater parts.
Visit me at
dragontechrmh.com Once you go brick you will never go back!
7
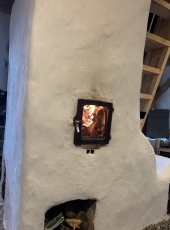
thomas rubino wrote:I already have one Glenn.
Peter keeps his secondary air tube inside the firebox, unlike Matt and I, who bring it out past the door frame.
7
thomas rubino wrote:I already have one Glenn.
A 2.5 x 1.5 piece of CFB mounted on a piece of 1/8" metal.
I built it for the studio stove but never use it or shut the primary out there.
Indoors, Yes, you should use one.
As a side note, I upgraded my temperature meter to a higher-quality one.
I can now monitor all three probes at the same time, much nicer!
Rocket surgeon and soil builder... healthy plants are all about the soil.
- My 6" Batch Rocket specs and materials list: https://permies.com/t/248275/Batch-Rocket-Double-Skin-Bell
- Batch Rocket detailed build thread with Q&A: https://permies.com/t/238503/Batch-Rocket-Build
5
Scott Weinberg wrote:If your batch rockets were made with the secondary air tube (tunnel) at the base of the batch box it could easily be cut to be flush with the frame inlet for the fresh air. Thus one mini door closing, closes both. This secondary tube often was replaceable, so you can easily figure out the exact length needed.

Rocket surgeon and soil builder... healthy plants are all about the soil.
- My 6" Batch Rocket specs and materials list: https://permies.com/t/248275/Batch-Rocket-Double-Skin-Bell
- Batch Rocket detailed build thread with Q&A: https://permies.com/t/238503/Batch-Rocket-Build

|
When all four tires fall off your canoe, how many tiny ads does it take to build a doghouse?
Homesteading and Permaculture Bundle - More than 35 Things
https://permies.com/w/235626/Homesteading-Permaculture-Bundle
|
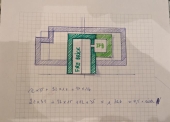
-Finished-Rocket-with-integral-sand-mass-connected-to-external-mass.jpg)

