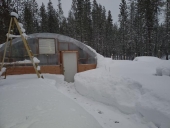
This experiment involved a 46X20, double layer, insuflated hoop style greenhouse.
If you care to help but would like to skip the background info, please see the question underlined and in bold.
The RMH experiment proved successful...So much so that somewhere around December, it quit working.
Though that sounds like a failure, I did not heed the warnings of those who suggested against the use of a steel tube liner in the riser. The liner was meant to hold the insulating perlite mixture in place between itself and the outer tube which was a triple wall insulated stove pipe. Thought the insulation value was great in producing the thermal gradient action the RMH is known for, the weak link was the inner liner. This spring, I finally had a chance to assess the failure. After removing the bell, I was perplexed at what I saw because it had little resemblance to what I'd constructed the previous fall. After digging through the ashes and lots of lose perlite clay mixture, I lugged a molten blob of what used to be the inner liner out of the rubble. It had melted and then slumped to the bottom, releasing all of the insulating material that the liner was supposed to be holding back. Simultaneously, it stopped all airflow to the RMH creating a catastrophic failure. We awoke to a smokey, stinky, ruined garden. But hey, we made it to December at an elevation of 4700 feet in central Oregon, under about 4 feet of snow, so by any standard, we successfully extended our growing season.
This year, having been preoccupied with a new job, family health issues and the various other "emergencies" that any other homesteader might understand, I am now on a fast track to rebuild from the ground up. I'm hoping for success on the first attempt as I likely won't have time for a second attempt: This year's August feels a whole lot like November, so it should be fairly clear what's ahead.
For this build, I will be placing the short end of the J-tube on the outside of the greenhouse for a few reasons: If it should ever fail or reverse in the middle of the night, it will not be a smokey mess; I also noticed last year that the hotter I would get the system, the colder the periphery became as cold air would slip into the cracks to displace the escaping gases; lastly, feeding the stove the coldest possible air will hopefully increase the density of the air for combustion, like dropping a half a pound of dry-ice in your hot-rod's air-intake before a big race.
So, that's the reason why. And here is the question: What is the longest burn tunnel I can get away with? With the J-tube on the outside of the greenhouse and the bell on the inside, I need to provide ample distance between the two in order to protect the greenhouse framing and the plastic from the high heat of the RMH; granted, I will be using some form of backing material but nonetheless, all of these things will be in close proximity and not necessarily "compatible".
Other delights:
The RMH will be placed to the right of the greenhouse door (photo) and will run the full length of the greenhouse (46 feet) which will help keep that side clear of snow, also clearing the way for low elevation sunlight to penetrate the garden. Given the length of the "bench" (46 feet), does anyone have feedback on the rise? My thought is that in order to have enough left over heat to make the chimney do it's job, I should increase my rise angle. I was thinking perhaps 1/2" per foot of run... does it matter? I know that low and slow is the best practice but even at 1/2" per foot is almost 2 feet of rise... that seems like a lot.
I would also like to know if anyone reading this rambling has any knowledge of constructing a riser from refractory cement? $40 for six little firebricks doesn't make a great deal of sense, economically. Similar to my forge design, I would pour refractory cement into a form between two tubes and then encase it in ceramic wool. I would use a cardboard inner liner which would then be burned out. My forge is very heavy but stands up to temps of about 2000 degrees. More perlite would also be added to the cement for insulative value.
Thank you for any replies and for any help. Hoping to be able to add some CAD drawings this week.


