• Post Reply Bookmark Topic Watch Topic
  • New Topic
permaculture forums growies critters building homesteading energy monies kitchen purity ungarbage community wilderness fiber arts art permaculture artisans regional education skip experiences global resources cider press projects digital market permies.com pie forums private forums all forums
this forum made possible by our volunteer staff, including ...
master stewards:
  • r ranson
  • Nancy Reading
  • Carla Burke
  • John F Dean
  • Jay Angler
  • paul wheaton
stewards:
  • Nicole Alderman
  • Pearl Sutton
  • Anne Miller
master gardeners:
  • Christopher Weeks
  • Timothy Norton
gardeners:
  • Nina Surya
  • Matt McSpadden
  • thomas rubino

Burn tunnels and other delights

 
Posts: 10
5
  • Likes 6
  • Mark post as helpful
  • send pies
    Number of slices to send:
    Optional 'thank-you' note:
  • Quote
  • Report post to moderator
This experiment involved a 46X20, double layer, insuflated hoop style greenhouse.

If you care to help but would like to skip the background info, please see the question underlined and in bold.

The RMH experiment proved successful...So much so that somewhere around December, it quit working.

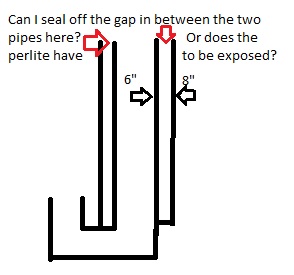
Though that sounds like a failure, I did not heed the warnings of those who suggested against the use of a steel tube liner in the riser. The liner was meant to hold the insulating perlite mixture in place between itself and the outer tube which was a triple wall insulated stove pipe. Thought the insulation value was great in producing the thermal gradient action the RMH is known for, the weak link was the inner liner. This spring, I finally had a chance to assess the failure. After removing the bell, I was perplexed at what I saw because it had little resemblance to what I'd constructed the previous fall. After digging through the ashes and lots of lose perlite clay mixture, I lugged a molten blob of what used to be the inner liner out of the rubble. It had melted and then slumped to the bottom, releasing all of the insulating material that the liner was supposed to be holding back. Simultaneously, it stopped all airflow to the RMH creating a catastrophic failure. We awoke to a smokey, stinky, ruined garden. But hey, we made it to December at an elevation of 4700 feet in central Oregon, under about 4 feet of snow, so by any standard, we successfully extended our growing season.

This year, having been preoccupied with a new job, family health issues and the various other "emergencies" that any other homesteader might understand, I am now on a fast track to rebuild from the ground up. I'm hoping for success on the first attempt as I likely won't have time for a second attempt: This year's August feels a whole lot like November, so it should be fairly clear what's ahead.

For this build, I will be placing the short end of the J-tube on the outside of the greenhouse for a few reasons: If it should ever fail or reverse in the middle of the night, it will not be a smokey mess; I also noticed last year that the hotter I would get the system, the colder the periphery became as cold air would slip into the cracks to displace the escaping gases; lastly, feeding the stove the coldest possible air will hopefully increase the density of the air for combustion, like dropping a half a pound of dry-ice in your hot-rod's air-intake before a big race.

So, that's the reason why. And here is the question: What is the longest burn tunnel I can get away with? With the J-tube on the outside of the greenhouse and the bell on the inside, I need to provide ample distance between the two in order to protect the greenhouse framing and the plastic from the high heat of the RMH; granted, I will be using some form of backing material but nonetheless, all of these things will be in close proximity and not necessarily "compatible".

Other delights:
The RMH will be placed to the right of the greenhouse door (photo) and will run the full length of the greenhouse (46 feet) which will help keep that side clear of snow, also clearing the way for low elevation sunlight to penetrate the garden. Given the length of the "bench" (46 feet), does anyone have feedback on the rise? My thought is that in order to have enough left over heat to make the chimney do it's job, I should increase my rise angle. I was thinking perhaps 1/2" per foot of run... does it matter? I know that low and slow is the best practice but even at 1/2" per foot is almost 2 feet of rise... that seems like a lot.

I would also like to know if anyone reading this rambling has any knowledge of constructing a riser from refractory cement? $40 for six little firebricks doesn't make a great deal of sense, economically. Similar to my forge design, I would pour refractory cement into a form between two tubes and then encase it in ceramic wool.  I would use a cardboard inner liner which would then be burned out. My forge is very heavy but stands up to temps of about 2000 degrees. More perlite would also be added to the cement for insulative value.

Thank you for any replies and for any help. Hoping to be able to add some CAD drawings this week.
thumb-20230310_182626.jpg
[Thumbnail for thumb-20230310_182626.jpg]
thumb-20221212_164108.jpg
[Thumbnail for thumb-20221212_164108.jpg]
 
rocket scientist
Posts: 6521
Location: latitude 47 N.W. montana zone 6A
3386
cat pig rocket stoves
  • Likes 11
  • Mark post as helpful
  • send pies
    Number of slices to send:
    Optional 'thank-you' note:
  • Quote
  • Report post to moderator
Hi Craig;
I tried a longer burn tunnel (16.5") one year with an 8" J-Tube.
It worked GREAT...
Until Mid winter when it all quit working.

This was my very first learning experience, about how important following the build specifications is.
Then I learned about rebuilding in the middle of a Montana winter, it was 17F outside of our plastic-covered greenhouse when I started.
Luckily I had built using clay mortar.
Disassembly of the barrel and roof of the burn tunnel might have taken 45 minutes.
My problem was excessive ash buildup.
My entire transition area was 3/4 full of fly ash and my 8" pipes were 3/4 full as well.
I had thought my RMH was burning well, but it was not, A 16.5" roof on a burn tunnel is too much.
I shortened the core to a five brick roof (12.5") and reassembled the entire rmh in under four hours!
I used a leaf blower to clear out my horizontal pipes of the excess ash.
The problem was solved with a proper-length burn tunnel.  

For a riser.
I recommend creating a five minute riser or create your own riser with fireclay and perlite.
A metal stove pipe outer form and a concrete (soni) tube as the inner form work great.
Castable refractory is expensive and you would still want to wrap it with an insulator.
Insulated castable is also expensive and very fragile, but no extra wrapping is needed.

And your last question, heat rises all on its own, sloping of the mass piping is not required.

Be sure to provide a large transition area when you go horizontal.


Craig Mason
Posts: 10
5
  • Likes 6
  • Mark post as helpful
  • send pies
    Number of slices to send:
    Optional 'thank-you' note:
  • Quote
  • Report post to moderator
Thanks Thomas!

I was able to read your post describing the joys of rebuilding an RMH in the middle of winter prior to pressing the "post" button. I'm into the science of things but I'm not a scientist so I am always hoping there's someone who can translate into plain English. I was able to glean that the longer tunnel did not work as others had mentioned but I'm not understanding the "why". Are the gasses cooling too much before starting up the riser?

I'm designing my RMH as dual fuel. I have an oil burner which will drop down in place of the wood when needed. Preheating will be done with propane in the same apparatus so starting with the oil will produce no soot or emissions. My first redesign was planned to use oil only and so I eliminated the J tube all together. The J tube's only purpose seems to be to make sticks burn very efficiently and then turn their upside down fire into a right side up fire. Jacob Klingel seems to have built a successful RMH while eliminating the J tube altogether.

My last build was an experiment gone awry and once started, could not be undone. I will have a proper clean-out system on this one and my mass will be cob, not a bed of rock. The length of my bench pipe, because it will be straight, will have a small steel cable residing permanently so that it can be quickly cleaned by pulling a chimney brush through and back. It will also have an Arduino board built into it to automatically damp it and shut it down if there are failures. I might even be able to make it send me a text.

By "transition area" are you referring to where the cooling gases come down from the bell and then into the horizontal pipes? I was not able to figure out a good way to make that any larger so I just used about 1/3 of a 55 gallon drum. Any ideas to give this a greater surface area?
 
Apprentice Rocket Scientist
Posts: 362
Location: Province of Granada, AndalucĂ­a, Spain
166
5
cooking rocket stoves woodworking wood heat
  • Likes 6
  • Mark post as helpful
  • send pies
    Number of slices to send:
    Optional 'thank-you' note:
  • Quote
  • Report post to moderator
Hi Craig,

would you reconsider to build the feed inside? It would solve the long burn tunnel problem and also give you more freedom to move the heater to a safe distance to flammable material. The failure of the last system was clearly caused by the riser, which you will not repeat.

I understand your reasoning about cold air entering the green house and why, after what happened with your last build, you want the feed tube outside. But the part with the cold air with high density as an advantage I can't follow. It will just cool down the burning process and won't provide benefits as far as I know.

Craig Mason wrote:I was able to glean that the longer tunnel did not work as others had mentioned but I'm not understanding the "why". Are the gasses cooling too much before starting up the riser?


From what I understand the fly ash piles up and clogs the system.  Thomas writes: "My problem was excessive ash buildup.
My entire transition area was 3/4 full of fly ash and my 8" pipes were 3/4 full as well."

Craig Mason wrote: my mass will be cob, not a bed of rock.


I was of the opinion that cob needs to be rather dry to be structurally sound and that's why the RMH in greenhouses often have pebbles as mass. Is the bench going to be dry in the  greenhouse?


Rocket Scientist
Posts: 4574
Location: Upstate NY, zone 5
599
5
  • Likes 8
  • Mark post as helpful
  • send pies
    Number of slices to send:
    Optional 'thank-you' note:
  • Quote
  • Report post to moderator
I second the idea of keeping the J-tube inside the greenhouse; you could easily have a dedicated fresh air pipe that opens near the feed tube so there is not a draft from all over. Covering that at the same time as you cover the feed after a fire would be simple and convenient.

A riser of perlite and a bit of fireclay to hold it together, along with a metal outer jacket and sonotube inner form, will work fine and be quite cheap and easy to make. Mine has gone through about eight seasons so far and going strong.

Especially for a greenhouse where you will not be spending a lot of time each day sitting by the fire, I would recommend a batch box system. One or two long-firing loads instead of three to six at 45-minute intervals seems much friendlier. You have unobstructed space to make a clean, by-the-book setup which can be depended on to just work. See batchrocket.eu for details.
 
Craig Mason
Posts: 10
5
  • Likes 4
  • Mark post as helpful
  • send pies
    Number of slices to send:
    Optional 'thank-you' note:
  • Quote
  • Report post to moderator
Hey all, I apologize that I have not been able to respond to the advice given. I have been out sick for a while.

Alright! I am reluctant to do it but I will keep the J-tube inside the greenhouse. Aside from the possibility of backing up smoke it the case of a failure or reversal, I noticed last year that when the stove was really fired up, I would get a case of 'cold shoulder'. When rocketing along at full blast, the stove produces a ton of draft coming from every crack in the poly-tunnel greenhouse. Though we've addressed the larger cracks and flaws causing the draft, it won't be possible to plug all of them.

So... I will cut a hole in the sidewall of the greenhouse and place a vent tube as near as possible to the intake. If that doesn't do the job, I'll science it and use a small radiator to heat the water which will run off of the bell and attempt to pre-heat the air coming in. I can adjust the size of the thermal exchange so that as long as it's running, the cold air and the hot water will regulate one another...in theory.

I'll address the reversal and failure potential with a thermal monitoring system on the burn chamber which will shut it down if the fire goes out. Most of that is already done.

Next question: I see in Ianto's book that the riser should be approximately twice the height of the tunnel. But I've also seen others suggest that the stove becomes more "rockety" by increasing the height of the riser. Is there any harm in increasing the height of the riser by 10 or 20% to help things along? The riser is the primary "engine" so it would seem to make sense that it could be lengthened a little without adversely effecting the whole system.

OK, sorry I couldn't get time to address everyone's input individually but I want you all to know that I have read your comments and will take them to heart...And thank you for the help.
 
Glenn Herbert
Rocket Scientist
Posts: 4574
Location: Upstate NY, zone 5
599
5
  • Likes 6
  • Mark post as helpful
  • send pies
    Number of slices to send:
    Optional 'thank-you' note:
  • Quote
  • Report post to moderator
A taller riser will increase the strength of the push up to a point... probably 10% would not have an adverse effect. As long as the flames do not come out the top of the riser -when the system is running in final position- height will not affect combustion efficiency. A J-tube running outside without a barrel or the rest of the system may shoot flames high, but in a system they will be considerably shorter as the draft cannot run away as it can in the open.
 
See where your hand is? Not there. It's next to this tiny ad:
Learn Permaculture through a little hard work
https://wheaton-labs.com/bootcamp
reply
    Bookmark Topic Watch Topic
  • New Topic