This post is both a brief tutorial and a question. I have been using some free software to do my site design and thought I'd share the process for anyone else who might be interested, but I'm also very interested in any other approaches that people have been using. I find that paper, while easy to get things down on, is hard to change dozens of times without ruining it, so I like to do this kind of thing on a computer. Here's my process:
First, find the property in question on one of the aerial photo mapping services online (I used google maps because they had low-altitude flyover photos of my land, but there are many others). Zoom it up to the maximum magnification where you can still see something, then start taking screenshots. If you're using windows and don't have a good screen capture tool,
MWSnap is pretty nice. If your property is too large to fit it all on one screen at max resolution, just pan around with the map and take a bunch of shots that overlap a little. They're easy to stitch together in the next step...
Which is to load all the screenshots up in the
gimp photo editor. Crop each one so that it's just the actual land (no browser window or other clutter to confuse things). When you have all the shots you need, create a new canvas that'll be plenty big to hold the entire picture after it's stitched (make it oversized by a fair amount, we'll crop later). Now import each of your cropped screenshots as a new layer, and move them around until they all line up. When they're all in place, flatten the layers of the image and crop it to your boundaries, then save it as a .png or .jpg file.
Now you can load that image into
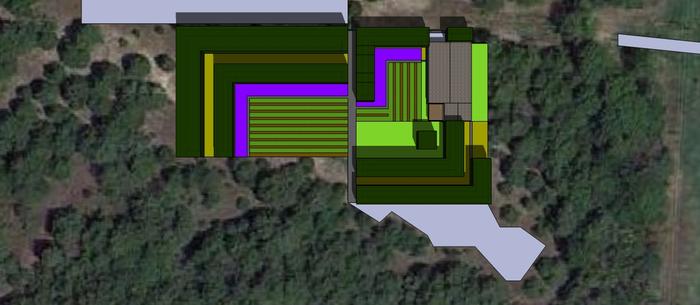
Inkscape (a free vector drawing tool) and start doodling site plans on it. Inkscape is not an amazing piece of software, but it's decent for this kind of thing. Nice features are that it keeps all the little things you draw as separate objects so you can pick them up and move them around (as opposed to an image editor, where everything just gets merged into the pixel dump). Also, because inkscape is a vector drawing tool, you can zoom in and out as much as you want without sacrificing resolution. When you load your property image into inkscape, put it on a new layer. In the top of the window you'll see the x and y coordinates of the image as well as the width and height, and a units box. I set the units to millimeters, then lock the aspect ratio for the size (the padlock button), and resize the image so that either the width or height in millimeters is equal to the respective actual dimension of my property in feet (or whatever unit you prefer). The last step is to turn on the grid -- under the file menu you'll find a document properties entry that you can select to open a dialog where you can fiddle with the grid. I made my grid so that it's spaced at 10 mm (corresponds to 10 feet on the map), with a darker line every 5th row and column. Now you can use the grid to measure stuff on your property as well as get an accurate idea of placement for your design, and it's much easier than trying to get an accurate measurement with a tape and transit.
One other thing you can do is pull up your property's coordinates on the
USGS topo map server (don't know what to use outside the US, sorry), get the topo map that covers the property, and overlay that over the satellite photo. Scale it up in inkscape until it fits over the original image, then use the blurry and indistinct contour lines as guides to draw vector-based lines with inkscape. Once you have the vector-based lines drawn you can scrap the topo screenshot, and now you have at least an approximate idea of the contours on the property. Note that this is probably only worth doing for properties over a few acres in size, as the topo maps don't have the level of detail you'd want for something like a residential property.
So that's what I've been doing, how are you doing it?


.png)

 2
2


![[Thumbnail for SW-Corner-drawing.png]](/t/12405/a/3362/SW-Corner-drawing.png "Filename: SW-Corner-drawing.png
Description:")