Ryan Kal

+ Follow
since Nov 09, 2013
Merit badge: bb list bbv list
For More
Apples and Likes
Apples
Total received
0
In last 30 days
0
Total given
0
Likes
Total received
1
Received in last 30 days
0
Total given
0
Given in last 30 days
0
Forums and Threads
Scavenger Hunt
expand First Scavenger Hunt

Recent posts by Ryan Kal

Also! It works like everyone says it does, and the videos show. AND the exhaust really is just steam. So cool. Its different when you experience it in person and have just finished building the stove.
8 years ago
I have a working stove. Still have to properly route exhaust and build my mass, but the stove works, and it works well.

Im exhausted, but had so much fun. Im exhausted so Ill post photos and details later.

Ryan
8 years ago
I opened my eyes and found my answers right in front of me.

I ended up making a form with brick and filling with 2.5 inches of clay/perlite. So, floor - alum foil - 2.5 in air channels w/ brick - 1.5 in concrete patio paver - 2.5 in clay/perlite - first brick course of combustion unit. Im fairly confident this is sufficient.

I assembled the fire brick to form the combustion unit. This took much longer than I had anticipated. Way more work than it looks like on video or in print. But its complete. And I am content, especially since this is the first time I have built with bricks.

I realized I made a mistake in the box construction, as I forgot to adjust the box size for a change in my core design, (just a dimension change from 4x7 to 5x6). I can get around this mistake with a couple small changes.

Next up is the manifold, which is terribly frightening. But I think I have it figured out, or will as I build it.

Ryan
8 years ago
Im finally starting to make some real progress on my rmh. I have all my materials, I have completed the boxes for the thermal mass and the combustion unit, did a dry stack of my combustion unit and ran it (ran great), almost finished cleaning barrel, and i have started the floor protection. Its coming together well, I think.

I have decided to run the exhaust out the wall, well under my window. I have researched and thought about this and feel that this is a viable option for me as I live in a circular structure, which would negate some issues of a high and low pressure side of my structure, the wind comes from one direction 90% of the time, I don't have any open roof vents so I don't think I will get the structure trying to pull air in through the rmh and if I do I will crack my window, and I am going to put 3 T's at the end of my exhaust. And, if it doesn't work I will add a vertical chimney outside.

For floor protection I put down alum foil, then fire brick for a 2.5 in air gap, then concrete pavers about 1.5 in thick, then more foil. I feel like I need more insulation and was going to add either sand or perlite w/ a small amount of clay, on top of the foil, just below the base for the combustion unit. What precautions can I take to ensure that I will be able to easily stack level bricks on top of this insulation? I have never done any masonry work.

I will get photos up when I can.

Thanks,

Ryan
8 years ago
So, I have watched many videos and read even more. You were right Allen, I want to buy the Wisner's DVD, but Ill have to pass right now. Im glad that they are gracious enough to give as much information as they did in the demo clips.

I feel pretty confident in my plan moving forward, which is a good feeling, but I am still a little hesitant due to the nature of this project. In response to your responses:

1. I had thoughts of making the thermal mass box larger, but I have a small space. Perhaps I can construct it with a curve along the back, though I was thinking of using that space for discreet storage. I think 3 ft wide is large enough for two, as long as you like to be close to that other person.

2. Regarding the floor/base layer, could I substitute paver bricks (with holes) for the cement backer board? I will eliminate the sand. So: foil, bricks spaced to support more bricks with air channel, more foil?

3. Could I substitute paver bricks (with holes) to build the manifold that supports the barrel and creates the exhaust manifold?

4. I am going to put a clean out just outside the exhaust manifold. I was thinking of adding a second one at the end of the run through the thermal mass before the exhaust goes vertical and out the yurt. Is it needed?

5. How do I attain an exhaust around 150 deg? Do I need to do anything in particular? This will affect my plan to run the exhaust out of the yurt.

6. I just want clarification on wood box protection. For the combustion unit I will want to glue foil to the box then fill the open space with clay and perlite/vermiculite, then top with cob. I should maintain at least 3 inches between the wood box and any part of the combustion unit, correct? For the thermal mass box, glue foil and maybe use some clay/perlite along the first 4 ft of stove pipe? Pipe clearance in thermal mass box? Regarding the foil, I noticed Glenn's post, should I put another layer of foil one inch into the cob/perlite? Is this necessary?

7. I think I can get some firebrick from my uncle. Though it has been in the elements for awhile, probably a decade. My thinking is that it is still "good", but do I need to take any precautions with it?

I think that is it. I am going to start gathering materials. I am hoping to have it completed by October 5th.

Thanks again for the input!

Ryan


8 years ago
Thank you! Currently digesting all the information and getting more excited by the moment.

Ryan

8 years ago
Hi Everyone, I am looking to build my first RMH enclosed in a wood box along the lines of the portable RMH constructed in the Wood Burning Stoves video and the pebble RMH Paul built, for use in my 12ft yurt on a wood deck. I plan to sleep on top of the thermal mass. I have read Ianto Evans' book, although I believe an edition old, and watched the three of the Wood Burning Stoves videos. I have also researched this forum. With the knowledge I have gained I started planning my first build, but I have questions. I suppose I will start with my plan. I also have attached a, fairly, to scale plan of my build.

1. I will reinforce the deck/floor of my yurt. It only sits 18 in off the ground so I will slide some cinder blocks under the floor joists and use wood blocks to make up the difference.
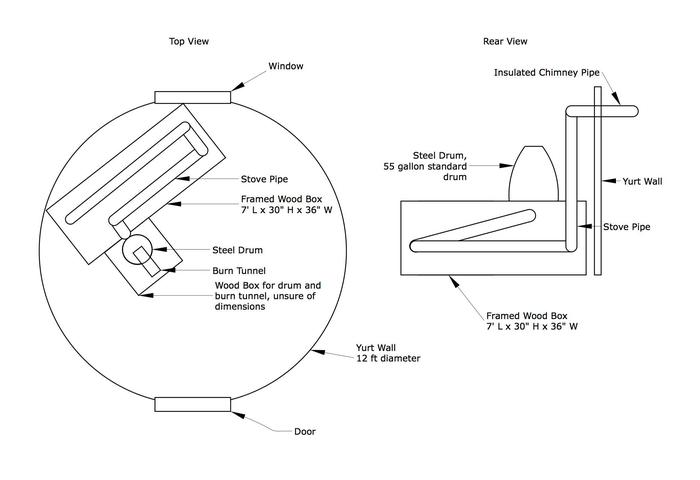
2. I will build a box from 2x6 or 2x8 dimensional lumber. I am, sort of, separating the thermal mass and the combustion unit, so technically I will have two boxes, or one box not in the form of a rectangle. I am not entirely sure how I am going to construct this yet. Please see attached diagram. I plan on constructing the larger box to 7'L x 30"H x 36"W.
3. I was considering cutting a sheet of plywood to protect my wood floor from physical damage. Thoughts?
4. I will follow advice from this forum on protecting the floor from heat, from the bottom: One layer of aluminum foil shiny side up, a thin layer of sand (I didn't see this as advice, but I have seen that sand is a great insulator so I thought, why not?), bricks arranged to create air channels and support a sheet of cement backer board, then the cement backer board, then another layer of aluminum foil. Do I need to use this same level of protection/insulation under the thermal mass, in addition to the combustion unit?
5. On top of this base layer, which is within the wood box and above my wood floor, I will construct my combustion unit (burn tunnel, heat riser, steel drum) and my thermal mass unit (single wall stove pipe, rocks/maybe pebbles).
6. I will build the combustion unit following the standard guidelines outlined in the book and the videos. As I am building a 6 inch system I will:
a. Construct my burn tunnel with standard "heavy" firebrick to the following dimensions: wood feed: 10" burn tunnel: 15" heat riser: 30" Im sure during construction I will experience some sort of issue that will require me to adjust the dimensions slightly. Ill be sure to follow the same ratios.
b. Construct my heat riser with standard "heavy" firebrick (to save money versus using more insulative brick). Insulate my heat riser using standard rock wool insulation held in place with either hardware cloth or chicken wire. I would consider using kiln brick/insulative firebrick if the difference is profoundly different in relationship to the cost.
c. I plan to use a 55 gallon drum and will have the drum sit 1.5" from the top of the heat riser. I have seen examples of the drum being cut to fit over the burn tunnel as well as cut to interface with the exhaust. Thoughts on this method versus using bricks and cob to create a "manifold"?
d. I will use cob to seal the drum around the burn tunnel and either create a manifold or seal around the exhaust.
e. I am unsure on what follows. I am sure I need to fill the area around the burn tunnel with an insulative material to protect the box. Should I also insulate the beginning of the exhaust?
7. I will run stove pipe from the exhaust manifold/drum to a clean out then a 90 degree elbow. Continuing the exhaust in stove pipe down to one end of the box at an downward angle, then either level or slightly upward to the other end of the box. Thoughts on level or rising stove pipe here? At the end I will exit the box vertically to a 90 degree elbow to outside the yurt. I will fill the box with a combination of rocks around the farm, maybe some pebbles, maybe some light cob at the top (to sort of seal the box). On top of the mass I will have 1.5" strips of wood spaced about .75" apart to form a sleeping platform.
8. I haven't decided how to run the chimney pipe through the wall of the yurt. I really don't like the idea of cutting into the fabric covering, but I suppose I have to. Any thoughts here?


I organized my questions to make it easier for those willing to provide insight:

1. I can't seem to find information regarding preparing the steel drum. Somewhere I think it was mentioned that there was a Utube video? I do recall in the book, that Ianto recommends building a large fire and putting the drum in it to burn off the paint and anything else in/on it. Im hoping for a more clear/better method.
2. How should I join the bricks in the burn tunnel and heat riser? I have read to just dry stack, clay slip, and also mortar. I have never done masonry work.
3. How do I protect the wood box from heat, both for the combustion unit and the thermal mass unit?
4. Do I need the same "base layer" for the combustion unit and thermal mass? (foil, bricks, cement board, foil)
5. Can I construct the system with the combustion unit not in line with the thermal mass, as I have planned? I suppose this should be my first question.


I think that is everything. If you notice a flaw in my plan, please call me out on it. I hope I don't offend anyone with my questions due to me missing obvious answers in the book, forum, or videos. Thank you in advance for any information and advice you are able to provide.

Thank you,

Ryan
8 years ago
I performed more research and found that I couldn't expect to see larvae for up to 3 weeks after the hive swarmed. So I didn't get a queen, left town for a week, and today found larvae. The link below is to some "bee math", which helped me enormously.

http://www.bushfarms.com/beesmath.htm

Ryan
8 years ago
I just performed a full inspection of the hive. I found several queen cells, but I believe I may have ripped them open when I inspected on the day of the swarm. They were attached to the walls of the hive. I found no larvae and couldn't locate a queen. Should I assume I am queenless and get one ordered?

Thanks,

Ryan
8 years ago
Interesting. I am thinking that the drone activity was due to a bunch of drones being "born" today. They were a bit uncoordinated, a little crazy, and seemed slightly disoriented. Shortly after posting, the extra activity stopped.

While working around the hive today (its near my yurt and garden), I had a bee following me and either trying to communicate or was giving me a thorough pat down. It was an interesting experience, as nearly every experience with my bees has been.

8 years ago