Jon Wisnoski

+ Follow
since Jun 11, 2014
Merit badge: bb list bbv list
Biography
Zone 6b
For More
Zone 6b, Ontario, Canada
Apples and Likes
Apples
Total received
In last 30 days
0
Forums and Threads

Recent posts by Jon Wisnoski

Thank you!
I finally found the time to read those threads.
1 week ago
Yes, you only need the fancy curing salts if you are doing non whole muscle (using ground meats). My understanding is this is as the dangerous bacteria need an air free environment to work with. I never really understood that, as there are definitely places in whole muscle meats that end up being pretty far from the air, but even the most careful people say this.

As for the the eating. It pretty much just does not make sense to cure for longevity any longer. A chest freezer is VERY energy efficient, the salt will cost more.
I just make lunch meat style parma hams and beef "parma hams". I only cook with it as a flavor additive, and mostly eat it as sandwiches, or on crackers or nachos.

This is the main resource I used: https://publications.ca.uky.edu/files/ASC213.pdf
Like previously mentioned the standard recipe is
8 salt to 2 sugar for 100 meat, and a minimum of 18% water weight loss. (I have always assumed you ignore the salt weight, so that actually translates into a 28ish% weight loss)
This 8+2 is pretty much the maximum a ham will absorb with a surface rub. You cannot get much more.

But they say that you only technically need a 4% salt concentration. But it is worth noting that the hams will get pretty moldy if you have much less salt, which might turn off some people. I am just very worried I will screw something up and ruin a lot of time and meat so always go with the full treatment.

I personally do the entire process in a fridge.
1 week ago
Hello all,

I am looking at converting a cellar into a Meat and cheese curing area. The fridge I was using is getting full and I am looking to expand. Some background. Right now my method is, in the fridge, rub on as much salt as possible and pile a bunch on top. Repeat probably every week for 3 weeks or until dry and hard crust forms and it stops dripping. Eventually weigh the meat to see if it has lost the ~18% minimum, then cover any meat not already covered by skin in lard.

The one area I am most inexperienced with is the Salt Box Method. I believe I have seen ongoing salt cure boxes. A box full of salt you just put all your meat in and take out a few weeks later. But all my quick searches are just returning some Tupperware setups (weight meat, measure out salt put both in plastic container, wait, take meat out and clean container). I want to start using this, but I don't see many designs or tutorials. I assume just a wooden box with small enough drainage holes that the salt wont fall out, but the meat juices can? But I am not really sure about the maintenance of the salt. Do you just add more salt as the pile dissipates? Google is saying I can spice before putting in the salt, does this work for an ongoing salt box, or do you need to worry about the contaminates going bad?

For everything else. From what I am reading, the molds for cheeses and meats are different and don't mix but people don't seem to be having problems doing this in the same room. I am thinking mostly a hanging setup would be best, but my thought as of now is I can weld some metal side bracket that I can place boards or beams on to either make hanging space or shelf space and so I can adjust heights based on how big of a piece of meat I am curing.

Anyone have any designs, suggestions, or information to share?
4 weeks ago
I do trim, but you want fat in your ground meat.
I dont think the size of the chunks matter to much as when it is clogged and the meat is going nowhere it becomes almost a paste for some reason. I send mostly frozen meat through the grinder, but if anything this seemed to make it worse this time, which is what lead my to thinking maybe heating everything up would be better. I have done less chilled meat than this before but this time it might as been the most frozen ever.

I have done pork and beef. This last one that is really not working at all is almost completely frozen beef.

I guess I should just send as lean as possible meat their it?
6 months ago
Hello,

I have this lens manual meat grinder. Sometimes it works fine, sometimes all it does it get clogged constantly. Like I get 1 cup of ground meat out of it before it needs a cleaning.

The basic design utilizes an auger that pushes the meat against the cutting plate. Pretty standard. This design seems to require more friction between the meat and the wall of the tube than the screw and the meat. Specifically the wall of the tube if covered in ridges that (particularly in one direction)  grab the meat and hold it still at the screw pushes it towards the cutting plate. What happens when the meat grinder clogs is that the walls get covered in fat and the meat just spins in a circle stuck to a single location on the screw.

I dont understand why it works so poorly a lot of the time. This auger design is pretty standard, I am pretty sure all meat grinders use it. The one possible difference is much of this meat grinder is made of cast aluminum.

Am I just doing something wrong?

One thought I had is maybe I could heat up the grinder to try and liquidize the fat?
6 months ago
Sorry it took so long. Here are some pictures.


1 year ago
Hello all, After a lot of research and messing about I finished my weeder.

To answer some of the concerns and questions, lets first start off with the reason the why.

Safety: The standard multi burner flame weeder I went with mixes the flammable gas in the ignition chamber, instead of through a hole upstream in the pipe. This was a no brainier for me, I did not want to be messing with the fluid dynamics of explosive gases or dragging a burner though a muddy field when it had holes in the system not inside the burn chamber. This design is literally impossible to screw up, the entire system only has holes where it is allowed and supposed to be on fire.

Cost: A single burner unit in Canada is about $80, a multi burner unit is about $800. This cost me $20 in materials to build.

Why flame weeding: We already use a single burner flame weeder, it works great for the few things that we use it for but is slow. It is a traditional organic method. People even use it directly on their food (BBQs). Maybe it is bad for you, I am no expert. Also, here in Ontario you could not get a flame to spread if you wanted to. Really it was never my decision to  do any flame weeding, I just saw people using a slow method of flame weeding and losing out of some beds because of this slow speed so decided to make it easier.

Design: The single burner unit I had came with a 18 PSI regulator rated for a maximum of 500k BTU of throughput. The Burner wand was rated at 100k, so I could use 5 of them (which is the standard multi burner design). The unit ran off a 1/4" pipe, had a 3/64" fuel nozzle, a 2" X 5" pipe burn chamber guard pinched on one end to connect to the pipe leaving two air intake openings. The unit already was capable of connecting to standard 1/4" pipe thread so it was easy to just copy this setup exactly. The one thing I changed was it had a on/off valve near the burner end of the contraption that used a tiny hole for throughput, I left this off to maintain as much flow as possible.
1 year ago
Hello Douglas Aplenstock,

I think it is the best solution for organically weeding carrot beds prior to the carrots breaching the soil.

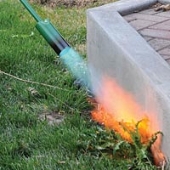
I already have something like included pic, which seems to be the same thing as a tiger torch, but want something that would do that over a 3 foot line.
1 year ago
Anyone ever make or see a simple wide DIY Flame Weeder? Most designs I see are just single burners connected to a frame in a line, but presumably you could drill holes down the length of pipe, install a wind shielding skirt/burn chamber/air mix chamber with some air holes on the top???

Looking at the single burner designs it looks like the top holes are almost half the size of the bottom exhaust holes, and the skirt is probably about 5 inches. The biggest issue I see is getting the right air/fuel mixture in the burn chamber.

I am seeing some people make heating/cooking style burners with a pipe with hole drilled in it, but that uses a pre mixer, with the air mixing in the pipe on the way to the holes.
1 year ago

Kevin David wrote:avoid fat when freeze drying.


I am not familiar with freeze drying but they may be talking about general food preservation techniques. Fat will outlast wet protein, and is used to cover and save protein in many preservation techniques, but dried protein will outlast fat which can go rancid.

It is also not very good at letting moisture flow thorough it, so can retard the drying process. Colostrum will dry and store similar to whole milk, and I am sure their are guides on how to dry that and if a freeze dryer will work.
2 years ago