gift
Rocket Mass Heater Plans: Annex 6" L-shaped Bench by Ernie and Erica
will be released to subscribers in: soon!

Noah Elhardt

+ Follow
since Apr 09, 2016
Merit badge: bb list bbv list
For More
Senegal, ~600mm rain, 9 mo. dry season
Apples and Likes
Apples
Total received
In last 30 days
0
Forums and Threads

Recent posts by Noah Elhardt

Thanks for the reply!

I dont understand this comment, how are the pins being used?


Rebar is driven vertically through the earthbags, a method often cited in the literature for increasing strength/rigidity in corners or near window or door openings.

Is the courtyard big enough and will the walls around the courtyard be tall enough to actually work?


What are the impacts of courtyard height and size?  The theory (from my understanding) is to create a reserve of cool, low-dust air that convection currents in the house can draw from for circulation.  A water feature (basin or fountain shown) and a shade tree will help cool this air.  I hadn't seen any recommendations on size... this one is about 8 m in diameter.

2 years ago
We are in the Sahel, and are considering building our house with earthbags.  This would not be our first build, as we've done some round (non-domed) earthbag houses in the past.  However, this would be by far the most ambitious build to date.  We would love some insight from experienced builders or engineers.

Although we love curved walls in some contexts, for this house we opted for straight walls.  We chose an octagonal shape for the building, which consists of two separate structures and a covered porch surrounding a courtyard, all connected by a roof.  The courtyard and long (2m) eaves are intended to help passively cool the house in our tropical climate.


On the right, light brown indicates lofts, dark brown 2nd story


In designing this layout, we kept in mind recommendations we read in Hunter & Kiffmeyer's book, specifically that straight structural walls should be buttressed every 5.4 m. (I've even heard 6 m. elsewhere)

However, this book by Patti Stouter says to keep your non-buttressed straight walls to 4 m. or less.

Meanwhile, this page on Kelly Hart's website gives even more stringent guidelines for straight walls: buttresses every ~3 m.

Who's right?

Wherever possible, we are using interior earthbag walls to provide extra support.  On the living/dining/kitchen area, which has high ceilings, and on the guest apartment, which is two stories tall, we plan to pour a reinforced concrete bond beam around ceiling height.  We've allowed a meter from all corners to any windows and doors, and kept these openings no wider than 1.2 m (except for a few interior arches, which we plan to reinforce by adding some cement to the earth in the arch, and a few windows that are capped by the abovementioned bond beam).  All corners will also get rebar pins for added strength.  

For those of you with experience with these kinds of buildings - are these measures sufficient?  What else should we be considering?  Do you see any red flags?  Are we being over-ambitious trying to build at this scale with earthbags?

2 years ago
With the fencing and gates installed, it's time to add the first test pigs!  Some of the big questions with this pen are:

1. What density can be maintained while keeping a healthy litter?
2. How will this thinner bedding fare?
3. How do we best manage pig groups within these larger pens?

For feeders we are using old tires, one rim cut off, and then lined on the bottom with cement, enough to make the tires hard to flip.

We sorted the pigs by size, which is how we plan to keep them.  The youngest ones were really showing signs of stress/hunger by the time we got them sorted into the new pens (from being bullied in larger groups), but made a rapid turnaround once settled into the new pens.
7 years ago
Thanks for the replies and interest.  I should say here that we are still very much in the learning and experimenting process, and will no doubt make many more changes before we have this system perfected for our conditions.  Hopefully you can learn from and build on our experiences as we go, as we have on that of others.

Miles, let me address you questions first.

The KNF tradition has developed a number of recipes for culturing locally occurring beneficial microbes.  The resulting cultures are used in a variety of ways: in livestock feed (to improve gut flora and aid in digestion), on crops (to combat bacterial and fungal attacks, or to trigger certain plant growth responses), and on animal bedding.  In this last use, the microbes are used to alter or speed up the decomposition process at work in the bedding.  By culturing beneficial microbe X and then applying it onto the bedding, its is hoped that microbe X will become a backbone of the microbial community.  This helps to ensure that any animal wastes start breaking down aerobically as soon as they hit the bedding.  You may be familliar with EM (effective microorganisms), commercially produced microbial solutions that are marketed for these and similar applications.  The recipes used by KNF aim to culture local strains of these same microbes - often referring to them as IMOs (Indigenous Microorganisms) - using commonly available materials.

Now, this is not to say that deep litter couldn't function without these inoculations.  We've never not inoculated, so I can't say for sure.  The indigenous microbes we are culturing are, assumedly, already present to some degree in the very bedding we are using, assuming we source it locally.  Theoretically, then, this system should work without inoculation, assuming all the conditions are ideal.  However, the KNF guys who have been doing this for years or decades recommend inoculating not only to start, but also whenever a problem occurs (like smells going south).  Though we've never done any standardized tests, we've been happy with the results when we have applied these sprays/mixtures, in terms of kick-starting the kinds of decomposition we are looking for.

The cultures that we have used on our pig system are (recipes in the links):

1. Fermented rice bran (yeasts and white mold). This is similar to I.M.O. 3 in KNF recipes.
2. Lactic acid bacteria spray - LAB
3. Fermented plant juice - FPJ

Lactic acid bacteria spray is especially renowned for speeding up decomposition and turning an anaerobic process into an aerobic one (assuming air is also present).

Maureen:  We don't typically harvest compost from the litter during a pig cycle.  After one or two cycles, you can start harvesting compost and replacing it with fresh bedding (though this is not required).  Otherwise, it's just a matter of adding fresh bedding material as the litter settles, decomposes, or develops a problem (like getting wet!).  As far as feed goes... I'll dedicate a post to that on another day.  Stay tuned!
7 years ago
For the third layer we used peanut shells (20-30 cm), an agricultural byproduct available here in abundance.  It has a lot of features of what you want in your upper beddling layers: dry, fairly fine, carbon-rich.  Wood shavings, sawdust, dry leaves, and chaff are other options... just use whatever is readily available in your area.  

Before adding the final layer, we inoculated the peanut shells with fermented rice bran, a form of Indigenous Microorganisms we culture on site.

The final layer is millet hulls (~10-15 cm).  At this point, based on our experience with chickens, we lightly watered down the bedding to get the microorganisms started, and then gave them a few days before we added any pigs.
7 years ago
The roof design is a simplified version of what we've used for our chickens, and what is typical in KNF systems.   The idea is to use rising hot air (created by the animals and the decomposing litter) to create a convection current that sucks cool air in from the sides, even when there is no breeze.  This is achieved by having a 1 meter wide gap along the eaves of the roof where the hot air can vent.  If the building is oriented perpendicular to the prevailing wind direction, this air will be further sucked out by the low pressure system created by the air moving over the roof.  We oriented our building East-West on the recommendation of a KNcF instructor.  For us, this means that the gap in the roof is at the top end of the south-facing roof slope.  Typically, a tarp or other temporary covering will be used to cover this gap during rainy weather.  So far, we haven't had to cover it, though that may change as the bedding matures.

As we ran out of already-cut brush for the second layer, we started trimming and thinning live Acacia seyal trees, our dominant pioneer species.  At this stage, we should have taken more care to separate out the larger branches, trim them down, and add them to the first layer.  Since we included some whole branches in layer 2, some of these branches quickly migrated through the third and fourth layer once the pigs were added.  In other words, layers 2-4 should really only include fairly finely chopped (<50 cm long) material, so as to settle well and not to obstruct pigs from rooting or bedding down.
7 years ago
The bathing area needs to be large enough to accommodate at least a couple pigs at a time.  As you know, pigs don't sweat on most of their bodies, but really benefit from the marvels of evaporative cooling if you can provide a place for them to get wet or, even better, covered in mud.  Our pigs spend a decent amount of time laying in this area, so we're glad we didn't skimp on these.  On the other hand, you want to maximize your surface area of decomposable bedding, so don't go overboard!  We've usually ended up with around 15-20% of our surface area devoted to the mud bath.

For the purlins (?) we used fairly low-gauge angle iron, which we strengthened by welding rebar as shown in the photo below.

Meanwhile, we started filling in the litter.  The more of this you can do before the fence goes up, the easier it will be!  

Again, we used a base layer of logs.  We aimed for wrist-thick or thicker, 1 meter + in length.  The idea here is to keep pigs from digging their way out, and to provide a source of carbon to "soak up" any liquid wastes that make it down that far.  In our area, few people have an abundant enough source of wood to supply this layer, as deforestation is well advanced.  Because our land has been fenced and restored for 15 years, this isn't a problem for us.  If it was, it may be possible to get away without this step, depending on how "diggy" your breed of pigs is, and what else you are using for the upper layers of litter.

After the logs, we laid down finer brush, including the smaller branches of all the trees and limbs we cut to establish the first layer.
7 years ago
For the current barn, our aim is to house a good portion of our pig operation.  For us, that means at least 40-60 pigs (of various ages), enough to be able to butcher 1-2 a week.  KNF recommends a maximum barn width of about 8 meters for good airflow, so that is where we started.  The pens, including the mud bath area, are 8 meters long, and we added an extra meter for a walkway on one side, for a total width of 9 meters (plus overhang).  Six pens, each 3.5 meters wide, makes 21 meters of length (plus overhang).

We went with a steel I-beams for the posts and rafters , the simplest and cheapest reliable long-lasting roof construction option in our area.  The walls are again cinderblock, but this time we only did minimal digging out of soil (mainly just for the wall footers).  Additionally, we decreased the overall wall height, shooting this time for a litter depth of 45-55 cm.  If your have well-draining soil or are in an area with no risk of flooding, you can sink your entire litter depth into the ground.  This makes access into the pens much easier, and might save you in some construction materials (ex. not having to build the roof as high).  For us, on flat ground with clay soil and heavy rains, we opted to build up.

7 years ago
Test 2:  This was/is a slightly upscaled version of the previous pig hut, retrofitted into an existing single-slope roof structure.  Advances include a raised walkway for improved access to the pens, slightly larger size, and somewhat reinforced fencing (welded rebar on lower portions).  Test #1 uses a water nipple screwed into a 20 L. plastic container, whereas this house has each pen equipped with a water line.

Here we tried several waterer options.  In every case, we've always located the water dispenser inside the bathing area, so that spilled water doesn't become a problem.  Pigs like to play with water nipples sometimes and make a royal mess, which could be a problem on the living litter.  If they make a mess in their bath, well, good for them.  Here, we ended up settling on nipples which are attached (at a 90 degree angle) at the end of a swinging hose/pipe.  This gives the pigs access to the nipple, but without any resistance.  That way, they spill less and don't wreck any piping.

The litter depth stayed the same, as did the general composition of the litter (though we used a lot more small brush and millet stalks, as that's what we had available at the time).  On the initial fill, we actually bought several cart-loads of millet stalks off of a neighboring farmer, who was going to burn them in preparation of planting (a common local practice).

The completed mini-barn has 3 pens, each of which has housed as many as two sows with their respective litters of piglets.

This pens here are 100% covered with a non-leaking roof, and the litter has therefore never gotten too wet from rain.  I can't recall ever having litter problems here in the year+ of operation.  Occasionally, we've topped off the littler with new peanut shells or other dry organic matter.  (Which is necessary especially in the first weeks of operation, as the litter always settles quite a lot).

With these first two tests working well, we felt confident enough to start construction on a larger version to house the bulk of our herd.  I have a lot more pictures of that process, which I'll post in the coming days.
7 years ago
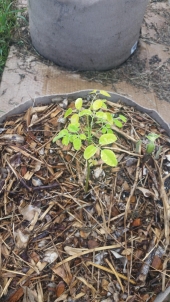
I suspect an overabundance of water as well.

Moringa is native to areas that receive as little as 2-3 months of rainfall.  That means that they are very acclimated to dry conditions.  In heavy soils, I've seen even larger plants get stressed in wet conditions, although growing in straight sand they never really seem to mind our rainy seasons.
7 years ago