Chris Knite

+ Follow
since Apr 19, 2016
Merit badge: bb list bbv list
For More
Apples and Likes
Apples
Total received
1
In last 30 days
0
Total given
0
Likes
Total received
11
Received in last 30 days
0
Total given
3
Given in last 30 days
0
Forums and Threads
Scavenger Hunt
expand First Scavenger Hunt

Recent posts by Chris Knite

Hey!  We are about to try a similar thing.  I got about 6 bales of spoiled hay for free and we spread it about 6" deep.  Try to google the "ruth stout" method of gardening to raise your confidence.  Our plan is to let it sit there all winter, and then kick a little hole in the hay and pop the plants/seeds in.  The internet says that will work - so...
4 years ago
We have a soapstone fireplace.  So definitely it can take the heat - but we have found it is very easy to stain.  (it's  a light gray).  Our old neighbors got soapstone counters put in.  It was beautiful.  It was Very dark, but it still would stain easy with normal stuff like wine.  They also found it uncomfortably easy to scratch.  The good news is re-oiling took care of most stains, and that scratches could just be sanded out, but it was happening all the time so they basically treated it like it was glass.
5 years ago
My wife is a cooking enthusiast so her counter tops where critical to her.
Last house we upgraded and splurged for Corian.  She ended up regretting it - mainly because the sink was molded to the counter top, which was awesome for cleaning, but the sink was off-white and as it aged it started taking a stain and basically never looked clean.  Turns out it can stand the heat, but it gets micro porous so it get stained.
She ended up wishing she had just stuck with a high quality lamenent.  Easy and cheap to change.  Much lower initial cost.
On our current house she has gone with a wooden plank counter top.  She could stain the whole thing whatever color she wants - it can take abuse - and it was cheap cheap cheap.
You can see the process in this
http://beechhousebuild.blogspot.com/2016/11/kitchen-cabinetry.html

It's worked perfect for us so far.
5 years ago
Holy Cow!  Not nearly enough information on your cool build!  I have too many questions to fit into one post!  But this looks awesome, exciting, inventive, scary, and fun.

I'll stick with one question - (literally) How did you do that roof?  Designed and made a form out of plywood that you suspended and then poured?  How thick?  How much rebar etc.  Living roof on top of it eventually?

Thank you for sharing so far.
5 years ago
I've no personnel experience, but up here (NY) they used what the called a dry well.  Meaning a buried settling tank that would then slowly drain downhill.  

I like the idea of some sort of settling tank or barrel. Just to keep your solids a chance to settle. At my place I was concerned with soaps in my dish water, so I'm not collecting that water at all.  But I suspect the concentrations are so low that I could use it for anything but drinking - so maybe I should.
5 years ago
In my area I couldn't find anything on it either.  The only way I got anywhere was a call to the code inspection officer via the town office.  In our area, there was no code concerning construction types per se - but we did have to get a stamped design by an architect.  If the architect was willing to say it was safe - they went along with it.
I don't feel qualified to give you too much input on modifying this stove, but I'm very curious what feedback you'll get.  It may be relevant to know if you have any fabrication tools/experience.  Like a welder, grinder, metal cutting tools, etc.
For my part, I had a very similar situation (same size space, with a temporary heating need) and I took the easy way out and bought a beat up, used, inefficient, cast iron stove for $55 - and it got me through my 2 year gap until I was ready for my permanent solution.  Not as fun, but it worked.  Probably could have sold it for what I paid, but gave it to a relative.  Depends on available time I suppose.
6 years ago
A home in place since the 70's without signs of water damage sounds pretty promising.  
I know when I lived in TN, since the land was full of clay water didn't perk well, so movement of rain water was an issue - but it was for everyone.
Pretty easy to make an offer with some sort of "subject to home inspection" to protect yourself.  
6 years ago
I've used both power pressure washer, and scraping for removing old paint.  Definitely did not enjoy the pressure washer.  Made a huge mess with shoddy results that then had to be scraped or wire brushed afterwards.  

I never knew if it was lead based paint, so I just wore a mask to keep it out of my mouth.  It would be smarter to test for it.

Here's my big tip that someone told me.  I bought a 5 gallon bucket of one of the primer/sealers available at home depot, but had it colored to closely match the final paint.  Hopefully saved me a coat of final paint.  No downside since it didn't increase cost - but you could see where you missed due to different sheen between paint and primer.

6 years ago
My recent experience:
This took place in Upstate NY, not Canada, but it might be relevant to your decision making.  
We bought land and subdivided with my brother-in-law.  Both of us built temporary buildings before the final building.  We were like you in not knowing how to avoid legal trouble.  Luckily, and I think this applies everywhere, a two minute discussion at the local town hall told us everything we needed to know.  This started a non-combative relationship with code enforcement.
Our local code required a permit and inspection for any structure over 100 sq ft.  My brother-in-law avoided that by keeping his shack under that size.  No permit, no inspection, no required footers, insulation, nada.  The county still came out to visually inspect (looking for a way to increase tax base I expect) but that's it.  He seems happy with that decision.  My viewpoint was that he made a questionable decision.  He is always crushed for space, has had to spend the money to make a couple other outbuildings, and is never really comfortable.
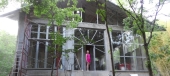
We went ahead and built a 20x24 building.  This required a permit ($25), a "during" inspection (made sure footers where deep enough- no cost), and final inspection (make sure it would not fall on our heads-no cost).  Our value of our property also got bumped up by $2,500 which added about $15 to our annual taxes.  
So very little extra cost for a much more comfortable space.  Plus the inspector gave us good advice along the way.  And when we built our final house, he already knew us and was on our side.  He let a few (non important but technically required) things slide and gave more good, money saving advice.  Actually, he helped me save thousands now that I think of it.  He knew some local sources for materials, and some techniques that saved me some additional work.
No regrets for either my brother-in-law or us actually.  But there's something to consider.  Our temporary building is now an combo outbuilding, canning shed, and art studio - and of course a hefty mess in the loft.
http://beechhousebuild.blogspot.com
6 years ago