Scott Charles

+ Follow
since Sep 19, 2016
Merit badge: bb list bbv list
For More
Adirondack Park, New York
Apples and Likes
Apples
Total received
In last 30 days
0
Forums and Threads

Recent posts by Scott Charles

I so miss my redbuds since moving north, and man am I jealous of all the early blooms being shared!  The prettiest thing I've seen so far up in the NY Adirondacks is the daily catch of voles and mice in my traps as the snow and ice melt away and expose the tunnels all the little devils have used through the winter to ravage my perennials and shrubs!!  I did put in 400 daffodils in my quarter-acre of front yard last fall so I'm very hopeful for something to pop soon
Since Styofoam is evil now and some of those Amazon boxes that show up on my door each week have things packed with Styro in them, I tried putting sheets of the stuff under the heat mat to keep the heat going up to my seedling trays and that seemed to make a noticeable difference.  My latest batch of pepper and tomato seeds are sprouting already, just 72 hrs from being sown.  Good use for something that'd sit in a landfill otherwise and likely will outlive me, plus seems to do the job better than the cardboard I used previously (which will now be used in a new terrace bed out back).  Win-win!    My Vivosun mats are on a shelf in a 55 degree basement but with the Styro beneath they seem to do the job.   Now I just need to keep the seeds alive until transplanting time.
Excellent info, I would've been far better off if I'd jumped thru time and watched this before trying to frame up my chicken coop and wood shed using trees I cut from my property and sawed to fit.  The bracing idea especially would have saved me a ton of headaches, and that joinery info.  I plan to use a lot of what I learned from the movie when I start tackling my hybrid wofati/sunken greenhouse project this year.   The most incredible thing about being here is that no matter what jumps into my head I can come to the forum and do a little searching and there's almost always someone who has done the same thing and offered up all kinds of useful experience and ideas.   Thank you once again for gathering all this knowledge and all these ideas in one place where we can learn and try and overcome and improve together!
2 years ago
I just added some comments to another thread like this recently with some info about propagating with cuttings in central/northern NY zone 4/5 that may be helpful, check it out here:

https://permies.com/t/151917/Cuttings-Flowering#1189063

4 years ago
Those mulberry starts would have been big gorgeous trees full of delicious fruit by now if not for the winter of the demon rabbits...  
that was the one of the years when rabbits infested the garden and enough got past wire fencing and wrapped deer netting and avoided snares and traps and even my freezing my butt off hiding in the bushes with an air rifle (no firearms area so beefed up BB guns was the only option) to decimate my beds and pots of cuttings.  We had some heavy snows that let them up and over the 4 foot fencing, and they were tenacious once they realized how many tasty things were in my gardens.   And what the rabbits didn't chew off above the snow was stripped of bark and girdled below by mice or voles or whatever evil vermin decided to have a go at my plants.  It was a maddening winter, and I honestly almost gave up gardening altogether after the spring thaw showed just how bad the damage was.  

When I did go back to that creek for more cuttings a few years later to try again the tree was gone and the area cleared of brush with only sad grass left behind.  I may try again if I find another tree like that somewhere, or just buy a new mother tree once I get more are cleared and improved and fenced in here at the new place we moved to.  I never did figure how that old mulberry got there in the first place, since there aren't any others anywhere around here that I can remember seeing since then.  It had a very thick and stubby main trunk that branched off into three angled splits not far above the ground, which made it great for climbing in as kids.  Later on I thought this might have been because it was mulberry scions grafted onto a hardier local tree, since mulberries are commonly sold as grafted trees and there used to be a lot of grafted fruit trees all around town.   This was right near the famous Erie Canal and there had been some sort of business across the road that went back to that time period, so from the size of the tree it's possible that someone had lived on the property and planted the tree by the creek back then.  I never had much luck with grafting myself but it's something I may try again in the future now that I'm probably where I'll stay for the duration.

Before I do though there will have to be some serious thought to fencing and such since at the new place rabbits are only an occasional passing nuisance quickly managed by fox and coyote, and the constant danger comes from deer that are much harder to control and much, much more destructive.   My poor apple trees....
4 years ago
I'm about in the middle of NY, up where the mountains start and right at the border of zone 4 and 5 depending on how bizarre the weather is in any given year  
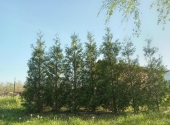
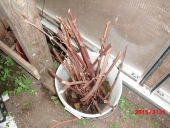
Where I grew up there was a gorgeous old mulberry growing from a bank over a creek where a few of us kids spent a whole lot of time in the summer.  When I got into propagating later on I went back and snipped a bunch of softwood cuttings from the newest growth and used the method with an upside-down 10 gallon aquarium over a tray filled with peat moss and coarse sand to start what was probably 30 or so cuttings.  

If I remember correctly the aquarium was painted with a light covering of white spray paint except for two strips near the bottom (which becomes the top when flipped over and placed on the tray) where I'd used masking tape so there'd be two narrow clear bands to let light in.  The cuttings went in and I misted well, and every couple days I'd take the tank off to check on things, mist if needed with my spritzer, and remove any cuttings that had failed (which I usually replaced with a quick cutting of a spirea or something easy to not waste the space).  

This would have started in May or June probably since that's when the new growth kicks off on most things around here.  The covered trays were kept on the north side of my shed where they didn't get any direct light since that'd turn then into ovens.  

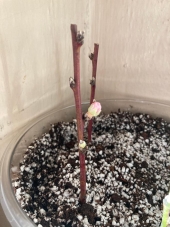
By the end of summer the roots were at least a few inches long and the cuttings got moved to old reused nursery pots up on shelves in my little lean-to greenhouse where they'd got some direct sun for an hour or two.  If I remember right the mulberries were one of the things I kept the new growth trimmed on, so they'd put most of there energy into rooting - and because they grew quick.  Pink pussy willow, butterfly bush, red twig dogwood, and some others done this way can put on new top growth a lot quicker than you want when started from softwood cuttings in spring and you really want them to put more into roots than tops until you get a nice clump of roots on each.  Then before the ground got too cold I moved them to one of my nursery beds or a much bigger nursery pot. Doing them, and many other woody shrubs, bushes, and fruit trees from softwood cuttings in the spring this way is a lot easier and usually a bit faster than hardwood cuttings from dormant growth from my experience, at least in colder areas - and the success rate is higher.  Plus you have the benefit of being able to go back for semi-hardwood cuttings a few weeks later if the first batch meets some misfortune.

4 years ago
I would very highly recommend checking out Mikes BackyardNursery channel on YT.  He is quite literally a master of the art and science of growing new plants from cuttings.  All kinds of plants, all kinds of cuttings.  I'm used several of his methods with excellent success, most especially his classic sharp sand and tray under a painted aquarium system.   I have 5 of those and I used them to make hundreds of cuttings of everything from weigela to cherry trees to blueberry bushes and the list goes on.  I did end up buying a used copy of his book on Amazon for a couple bucks and it's my propagation bible now   For most hardwood cuttings like you're using one of the key principles is warm bottoms/cool tops.  I had exactly the same result as you with early attempts and it was because the air temp was getting too high - his methods make it easier to maintain the soil moisture too.   Your cuttings need no light at all in the early stages, they need warm soil first to grow system.   Once they have roots they can then start to get indirect sun and try to leaf out.  

I can't recall right now which it was (at one point I was growing about 300 different perennials and shrubs) but there were 2 or 3 woody types that needed to be done as hardwood cuttings that were bundled in bunches and buried upside down in a loose sandy mix for many months to get things started.  It sounds crazy but Mike's book and videos are very easy to explain and he's a real down to Earth, dirt under your nails kind of guy so I found it very easy to learn from him and follow the explanations of why and how.  If you get as much fun from it as me you'll probably want to try an intermittent mist setup at some point, then the sky's the limit!

Hope you can give his methods a try and enjoy success with your propagation efforts, I know it was always great for me when I could bring someone trays of started plants to share.  And I didn't mind a little money from selling extras to folks that would stop by to admire my gardening efforts and end up buying some of this and that to take home with them    I hope to eventually have the same kind of experience at our new home, once I've gotten conditions improved enough.
4 years ago
Glad to have you here  Your perspective on homesteading for us not-so-young folks and some of your tips and experiences helped me when I was thinking about moving to a more rural area and getting some land years ago.  I remember finding info on chicken/compost ideas and also egg storage without power, and recently some of those tidbits resurfaced to mix with others I'd seen over the years as I began my own journey with keeping chickens and trying to find ways to build healthy soil.   Great to have the perspective of someone who's been in a more similar situation for those of us who couldn't get started sooner or do quite so much.
4 years ago
Northampton here, just above the Great Sacandaga Lake - wondering if anyone else in the region has been noticing that our weather patterns have gone wacky the past several years!!  Makes me long for Tennessee...
4 years ago
hi Simon - from my experience trying several different versions of this my thought would be that it depends on how much soil you added to the top, and what else you added besides the wood.  

what I've been doing at the end of each growing season is digging around the vegetables to see how far their roots went down, how far they spread across, and how thick they were.  plus, I wanted to check on what the soil looked like 3, 6, or 9 inches down.  from what I've seen if you are growing mostly those green leafy crops they don't seem to root down very far - although that probably depends a lot on soil makeup.  

my native soil is actually almost pure sand except for an inch or two at the top, so when I built my hugels they had to be in the form of filled pits instead of piled up mounds, but the idea is the same.  the rotting wood was topped with several inches of compost and fall leaves and yard clippings all mashed together, and then the sandy soil went in mixed with the topsoil I had set aside for the very top.  when I dug down at the end of the season I'd hit the mixed material at about 4 to 6 inches down, and surprisingly the roots of almost all the plants would go that far and then spread laterally.  it seems that the rotting wood and compost and all are doing such a great job of holding and wicking up water that the plants don't need to reach deeper.  and the heat from the decomposition has allowed kale to overwinter (this is a solid zone 4 with 3-4 foot frost level normally so my kale always died off) and melts the snows off weeks ahead of everywhere else in the spring.  

I've grown tons of greens, loads of bush beans and pole beans, chard, tomatoes, cucumbers, and squashes along with a mix of carrots, beets, and some others in the hugels.  all of it has done incredibly well, far outproducing the neighbors who are doing traditional gardens with tilling and fertilizers.  I think if you are worried about the nitrogen loss the first couple seasons you could add compost over the bed and be fine, as those shallow roots will take it up from there and do well.  I tend to do this any time I harvest a crop and am getting ready to sow another one - I just spread an inch of fresh compost over the whole area first.  I've learned that keeping something - anything - growing to cover the soil at all times is the best method, even if it's just some beans or peas that won't have enough time to produce a harvest, I use them as a cover crop and then chop and drop to protect the soil over the winter.  then I watch the neighbors clear off their gardens and leave them bare for the winter and wish I was better at pitching these new ideas to folks...
4 years ago