r ranson
I am looking for ideas for an easel for my granddaughter. She is 12 and I think she shows some promise , but more importantly she has a strong interest and really enjoys many different mediums. Watercolor, oil, charcoal, pencil.
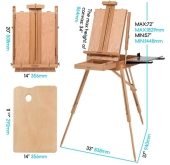
I admit I know very little about painting, my medium is wood. I would really like to build her one. With my skill set and limited knowledge of the act of painting the first example that caught my eye was the French Easel. I Am very sure that The French Easel caught my eye because I really like building purpose built boxes with lots of dividers and complex lids. However I would much rather build one that she will use and not be concerned about making a mess of what might be looked at as grandpa's art. I think it will spend most of the next 5 to 10 years in a small bedroom/studio that she shares with her mother. So size matters or the ability to fold up to make room for other projects
I was hoping you may be able to give me some ideas. I am open to going much simpler or if you could custom build your easel what would be useful? I plan to use White Oak. It is both strong and dent resistant and should hold up for a very long time with a little care. Any suggestions?