Thomas Tipton

pioneer
+ Follow
since Feb 07, 2018
Merit badge: bb list bbv list
For More
Apples and Likes
Apples
Total received
In last 30 days
0
Forums and Threads

Recent posts by Thomas Tipton

Thank you for that, Cristobal.  I had heard of attempting airflow through the traditional grate over the ashbox but that configuration did not feed the air to the load in the same way as Peter's Batch Box designs.  

I'm considering a pedestal bell upon which the core will sit.  It will have the outside air run through the main bell low and enter the pedestal bell low.  The pedestal will act as a warm air reservoir and feed the supply air into the core floor channel as I described earlier.  It would assist in  early season starts as it would already be near room temp.  Subsequent firings should be easier as the pedestal has been bathed in radiant heat from the main bell.  I would also make my top burn chamber floor from splits to get heat to the air channel faster.

1 week ago
Hi Benjamin.  Thank you for replying to my post.  

As a certified Permies Rocket Scientist, you must be aware that many of us live in jurisdictions that have building codes that require outside air for solid fuel burning appliances and I have seen many masonry stoves and steel woodstoves that are designed to utilize outside air.  

That said, I fail to understand why a Batch Box cannot be adapted to work properly with outside air.  

If you re-read my post, you'll see this proposal would only be of interest to persons who wish to participate in BBR tech but:
1.  Have a house with too tight an envelope ( and have no intention of just cutting a hole in a wall to let air through).
2. Have a building code enforcer and/or insurance policy that requires outside air supply.
3. Already have provision for outside air readily available and just need to know how to use it with a BBR.

So rather than just dismiss the idea outright, let's do what engineers and innovators do and talk about what works, and why, what doesn't, and why, and how it might be made to work in a foolproof manner.

J-Tube rockets are not part of this conversation.

1 week ago
Outside air for a BBR?

I know it's been explored some, but after some internet search, I couldn't find much about it other than Paul's video where he came out unfavorably about it.  And that's fine.  No one likes stale air and it is undoubtedly a far superior thing to burn your farts as fuel.  But what if your dwelling is sealed up too tightly and an outside air channel was built right into your chimney, just begging to be used?

That's the situation I find myself in.  After learning I could no longer use my living room fireplace due to having buttoned the house up so tightly, I resorted to using the ash door for make up air and the results were astounding.  Then I began asking myself if I couldn't use the make-up air flue in the basement the same way for a BBR.  Now I understand a RMH is not a candidate for make-up air because it relies on its fuel opening for air.  But a BBR is a different animal.

So, with this new inspiration I propose to build a BBR with a provision for feeding it outside air, fed to the fuel load in much the same way as current practice, as well as feed pre-heated air to a P-Channel.
In addition, once the fire is mature, the entire air supply will be subject to pre-heating.

This is imagined for a 7" Sidewinder BBR.

Three level floor.
To do this I propose a three level floor.  

The floors will be standard hard firebrick.
The first floor laid flat. East-West
[     ][     ]
[     ][     ]
[     ][     ]
[     ][     ]
[     ][     ]

Like so.
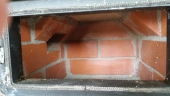
The first bricks will need a gap cut from between them so that air can pass through from underneath.

The second layer will run the other direction, North-South, with the bricks running along the lengthwise center line of the first floor getting material removed from their sides.  This will open a channel down the center of the burn chamber from front to back.  I'll take about 1.5" off mine so the channel will provide the appropriate cross section for my intended 7" CSA.

The middle third layer of firebrick will run perpendicular to the second layer, East-West, with a full length brick spanning the gap.  The rest of the floor will have the bricks oriented the same as the second floor. North South.

Now we have an air channel from front to back running through the center of the burn chamber floor.

Manifold.

A manifold will be made from a length of rectangular steel tubing.  3" x 6" (guessing here, not exactly sure what might need to be fabricated) and cut to the interior width of the firebox.  The manifold should rest on the first layer, have an opening cut to accept air from the channel, and sit proud of the third layer by at least an inch.  Air holes will be drilled along the length of the manifold to direct airflow across the floor towards the fuel load.

An optional side channel may be added to the third floor to accommodate a P-Channel.  

A damper is installed near the makeup air supply to control the amount of air to the stove.

So, in short,  outside air enters the BBR bell via a dedicated stove pipe, galvanized, or other type vent and enters the raised, hollow pedestal that supports the core and is separate from the rest of the Bell.  
A damper is used to prevent gasses from entering the bench.

When a fire is started in the BBR, the updraft created by the small riser works in conjunction with the 35' chimney to pull hot gasses through the system while fresh air is pulled up through the pedestal and into the bottom of the burn chamber where it travels under the top layer of firebrick and into the manifold where it is redirected across the burn chamber floor.  As the fire matures, the burn chamber floor gets hot and pre-heats the supply air.  If a P-channel is used, the extra trip back down the burn chamber floor allows additional time for even more pre-heating.

Remember.  This is only for those who desire a BBR that can utilize outside air.  A lot of us have building codes that demand it.
Let me know if you see any obvious oversights on my  part, or if this has already been tried and failed.
Creative criticism is welcome and expected.  
Help me make this idea better.
1 week ago
This is an old post but it certainly isn't finished.  I set aside my stove building plans years ago but recently picked up the itch again.  Seems I had done such a good job of insulating my house, sealing up drafts and such, that I found I could no longer have a fire in our main fireplace without smoke spilling into the living room.  I'd long been curious about the ash door on the other side of the fireplace, which resides in an unconditioned and very well ventilated breezeway passage to the garage, and whether it might safely be used for makeup air.  I removed the little cast iron trap door from the bottom of the fireplace floor and opened the ash door.  To ensure fire safely I laid down a cookie sheet and made sure no sparks or embers had an easy go of finding fuel.  To my great satisfaction the fireplace performed beautifully after this modification and led me to wondering how I could apply this to the desired RMH site in the basement as my 35' chimney has a third flue that exits the wall very close to the basement fireplace that I wish to use for my flue exhaust.  After thinking about it for a while I realized an typical J-Tube rocket stove is NOT a good candidate for secondary air as the J-Tube is dependent on the feed tube serving as the sole air supply opening.  
A batch box, however, is a different story.  At least in theory.  I'm presently working out how to configure an air channel that enters from under the rear of the burn chamber floor, travels forward to the front of the chamber, presents air towards the fuel load across the chamber floor, AND diverts air to the in-floor P-channel.  I'm looking hard at Peter's Shorty Core Sidewinder build at the Ceramic shop which omitted the P-Channel, so I'd be ok with omitting it too, for simplicity's sake, but I would incorporate it if I could.  I have a little bit of stick welding in my wheelhouse now, so perhaps I can figure out a way to make this happen with some rectangular steel tubing and steel angle iron profiles.  \rambling monologue off.
1 week ago
First they hand out taxpayer dollars as incentives for home owners to install solar panels, then, when the amount of energy being produced is on the threshold of overwhelming the power grid itself, they tax the taxpayer who's solar panels were incentivized to pay for the upgrades to the grid.  As always, the utility comes out on top.
1 year ago
Benjamin.  I see I misunderstood the part of it being a black oven.  But isn't it true that by removing the insulation and directing the flue gases around the outer oven shell, the oven will still heat up, though perhaps more slowly?  That had been my plan.  To direct the post-riser flue gases around the oven, keeping the interior sealed off from the smoke.
1 year ago
I find this build very inspiring.  I had a smallish electric oven that mounted in a wall cabinet that no longer functioned that I was considering doing something like this with.  Unfortunately, it was destroyed in the process of removing it from the wall.   So much for my plan!  But your results clearly show that an oven can be repurposed in this way with very good results.  It is a white oven, and I think that is a big plus.  Have you thought about putting a thermometer on it?
Thanks for sharing!
1 year ago
Tamara,

Thomas is correct, but also important to mention is the fact that by the time the air/fuel mixture has exited the riser and enters the radiator-like steel barrel, most, if not all of the atmospheric oxygen has already been used to oxidize the wood gas fuel and is no longer available to oxidize the steel in your drum.

Many say that a Stainless Steel drum is far superior to a steel drum as it will outlast a steel drum and is far more aesthetically pleasing.
1 year ago
I love it when a story has a happy ending.
1 year ago
Call me crazy, but if I'm going to go to the trouble to construct a raised garden bed, I want it up high enough to nearly eliminate bending over to tend it.  My last raised bed was constructed of 2" x 12"s and was 24" high, 2 foot wide x 6 feet long.  It served us so well that I am strongly motivated to make some more, slightly bigger.  Probably going for 2.5' x 8 feet this time.  Loading the first two thirds of the bed with punky firewood and well aged sticks from the compost area saved a ton on how much compost was needed to fill it.