Mark Dumont

+ Follow
since Jan 10, 2020
Merit badge: bb list bbv list
For More
Apples and Likes
Apples
Total received
In last 30 days
0
Forums and Threads

Recent posts by Mark Dumont

Great stuff Thomas!   Glad to see a shop offering RMH accessories, having these products available will make the whole process more accessible to a lot more people!!
3 years ago
If I understand you correctly, you're proposing to rest the entire unit on just one layer of hardie board, sitting on top of bricks, correct?  I personally was not comfortable with this at all as it's a LOT of weight, and it would not be possible to retrofit should the single layer start to collapse or fail.  It may well work, I just didn't want to risk it, the cost of the extra hardie board was worth the peace of mind for me.  As I mentioned already, if i did it again I would skip the air gap under the bench, it was not necessary for my design and was a hassle to build and work with.  The underside of my dragon does not get very hot due to the CFB I put on top of the hardie boar (under the barrels), so there is no appreciable heat transfer from underneath.  However, if you elevate the combustion chamber and not the bench you'd want to pay attention to the height difference - yes, you can draw your heat down from the combustion unit to a lower bench, but I would not recommend too much of a difference, for one, it weakens your draft a bit, for another, it complicates the manifold.  Hope this makes sense.
4 years ago
Yes, I used Hardie board, it's the right stuff, way stronger than Durarock!
4 years ago

 
Post Today 3:11:42 AM     Subject: My First RMH Build up and running! Cob bench, 6" CFB J-tube, Split Barrel chamber.
Hi , i am building a 10 inches RMH in my house in argentina. Looking for differrent plasters to use. What are you using as plaster? Thanks!!


Hola Eugenia!  

I built with cob (sand & clay) and finished with earthen plaster followed by lime plaster.  The technique is to start with course materials and then use increasingly finer sand and lime as you go.  I finished with a polished lime fresco.  I'm happy to share more details on recipes, materials and good books if you like, let me know!

4 years ago
Matt: Yes, in the photo you are referring to of the innards there was a small section of horizontal pipe that led from the barrels to the exhaust flu.   I actually altered the design after I took that photo.  I realized that I wanted a bypass mechanism, so I re-routed the exhaust flu to the top of the barrel, you can see that the exhaust flu has moved in the final photos.  I detail this retrofit on a previous post - https://permies.com/t/151891/Telescoping-stovepipe-adjustable-bypass-split.  I think this is a better design not only for the sake of an adjustable bypass, but also the exhaust draws from the bottom of the bench bell chamber with this design, whereas previously when I was trying to draw from the side of the barrel the exhaust was much higher.  The lower exhaust means more heat is extracted before it escapes the flu.  Hope this answers your question.
4 years ago
Hey Matt:  Here's a photo of the first retrofit to my floor support - I added the footings you see on the left, which fall directly underneath the outer footprint of the bench.  After thinking about it, I realized that the joists on the right were relying on joist hangers, and not directly supported underneath, so I then crawled down and installed another set of footings directly under the joist hangers.  Then, my design changed a bit and I had to add yet another set of footings in the foreground of this photo to support the combustion chamber/ riser assembly.  Lesson learned - spend a LOT of time planning, plan some more, then overbuild so that you don't end up crawling underneath your house over and over like I did.  I'll emphasize that I'm not a contractor, and took my best guess at what would be sufficient.  It's always a good idea to consult directly with an experienced contractor when possible.
4 years ago
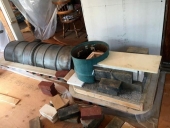
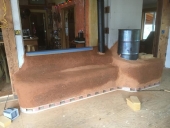
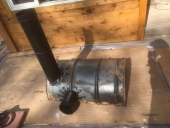
Finally!!  Many months after starting this project I’m 99% finished.  Here are a few photos of my nearly completed RMH.  I recently applied a polished lime fresco and will finish it with olive oil soap and beeswax for a surface that has some sheen and can be cleaned.  The photos show the basic construction, it’s a 6” J-tube, core purchased from http://rocketstovecores.com/..  I used two 30 gallon drums for the riser and base, split 55 gallon drums for bells under the bench.  Construction is cob, finished with lime plaster.   This is on a raised wooden floor.

A few notes:

Jtube to batch box and back again – My design started with the J-tube design presented in both books.  Luke Perkins of rocketstovecores.com turned me on to the idea of ceramic fiber board (CFB)cores and also the split barrel bell for a bench.  Several folks in this forum suggested a batch box design, the advantages are obvious – bigger burn box, higher efficiency due to higher temps and secondary air, a door.  Luke and I did a side my side test of the two and they both performed well, but I liked the extra features of the batch box.  So I pursued this design idea for quite a while.  As much as I like the idea and would love to have the features, the design variables proved too much for me on my first build.  A few mason heater builders cautioned me about the use of CFB in a batch box and its ability to withstand the long-term abuse of wood loading.  Even fire brick splits, they warned, are not durable and need to be replaced in the long haul.  I puzzled over how to construct a burn chamber that was both insulated and durable.  A door has its own challenges – you either need to find one and build around it, or fabricate one for your stove, and figure out a secure way to mount it.  There are many options, most of them tried and well-documented by folks on this forum so it’s all do-able, but ultimately the extra challenges proved to be too much for me on my first build.  It seemed to me that the batch box builds I was seeing online entailed a lot of tinkering and retrofitting, something I wanted to avoid given that this installation is in my living room, not my shop.  Ultimately my desire to arrive sooner rather than later at a finished, functional, and aesthetically pleasing RMH won out over my desire for the extra features.  I came full circle back to the J-tube with a new appreciation for it’s simplicity.  I live in a relatively mild climate compared to a lot of other folks posting here, and my house is small and well insulated, so I’m confident that a 6” J-tube will be sufficient.  

A RMH on a raised wooden floor presents some real challenges.  In fact, it’s a royal pain in the ass.  First is the extra support required.  Be ready to spend some time, energy and money beefing up your floor, perhaps even cutting out the RMH footprint and pouring a masonry footing as described in E & E Wisner’s book.  Second is the raised platform required for an air space under the RMH for fire protection.  I agonized over this decision – a mason heater builder told me he didn’t think it would be necessary, but I read some pretty strong recommendations for it on these pages, including some horror stories of charred floors.  I erred on the side of caution and installed one.  Turns out I didn’t need it, the temps of my bench/ mass are nowhere near anything to be concerned about.  The underside of the mass, above the air gap, is less than 100 F.  My guess is that a batch box might result in higher temps and require the air gap.  It sure would be nice to have some kind of chart that correlates combustion unit size with the ideal amount of mass and the temps you can expect.  I can say for sure that with my system - a 6” j-tube with a 6.5’ bench, an air gap is not required.  The mason heater I mention builds his units on a 2 to 3” slab of concrete or perlite-crete, which would have been much easier and aesthetically more pleasing.  The air gap ads a few inches onto that, and thus my bench ended up higher than I wanted.  I don’t fault anyone for advising me to use an air gap – it’s impossible to give specific advice without seeing something in person and always better to be safe than sorry, but this does point to an area that could use more info and guidelines.  

If you do have to add support under your raised wood floor I recommend this this elevated post base which is adjustable https://www.mitek-us.com/products/caps-bases/post-bases---cast-in-place/EBG%20/%20EPB%20/%20EPBH/- you install into your poured footing and can then turn the nut at the base to adjust the height.  The nice thing about these is that you can lift them if your footings settle from the weight of your RMH.  Don’t expect to jam a 4 x 8 beam into place between your floor joists and newly poured footing, it doesn’t work, you need some slack to fit it and then some way to raise it.  I tried shims but don’t trust them.  Foundation jack posts, also look promising, just do an internet search.  One big challenge of building on a wooden floor that I don’t see mentioned often is the fact that you are going to determine the footprint of your RMH early in the game, before you actually start building, so you need to have your design dialed in.  If you’re building on slab and you make a modification then it’s no big deal, you can expand your footprint pretty easily, but once you’ve built your raised platform and started you can’t make any significant changes to the footprint without going back and rebuilding.  

Installing a bypass, and/ or supplemental heat for priming draft – I’m surprised that there is not more discussion about bypass options.  If you live in a climate like mine, where winter temps can swing from the 20's to the 50's and include rain and wind, then a RMH can be pretty finicky and hard to start on mornings when temps are warmer and/ or the wind is blowing, making a bypass essential.  I have a post in this forum on the telescoping stove pipe I used as a bypass.  I also stumbled upon another option by complete accident – I purchased a soot door from https://www.firespeaking.com/, and found that this small electric box heater I had kicking around fits the opening perfectly, like they were made for each other.  The heater has a fan setting.  When the RMH is cold I set up the heater and leave it on for ten minutes and the flu is warm and primed.  I think I’ll end up using this more than the sliding bypass.  

Confessions of a Novice RMH Builder - My first advice is to start small, my first mistake is that I didn’t.    This is my first build and it’s in the living room of my new addition where I want a totally functional and aesthetically pleasing result.  It all worked out, but I can't recommend starting this way.  It’s required a LOT of research and has at times been stressful.  Ironically, I’ve taught Permaculture for years and always told folks to start small, make a pizza oven or cob bench, before taking on a building.  I should have taken my own advice.    If you want to build a RMH someday then go build one now, or tomorrow, in a shop or shed or greenhouse, or just mock one up and test fire it, but go build one, preferably in a situation where you can make some mistakes and it’s not a big deal, that’s the best way to wrap your head around the concepts and get some hands-on experience.  

Building a RMH is not hard, but don’t underestimate it - I’ve done straw bale, cob, cordwood, living roof, light straw clay, earthen floor, pizza ovens, and I mistakenly assumed this would prepare me for building a RMH.  Wrong!!  The best experience for building RMH’s is building RMH’s.  For instance, if you build on a wooden floor, like I did, you’ll have to research load bearing specs and shore up your foundation.  No matter where you build, you’ll need to pay attention to clearances from combustible materials (walls, floors, etc).  These are big deal issues that will (or should) keep you up at night; you’re building something that is likely to weigh a few tons and reach temperatures of 1000 degrees F or more, you don’t want to burn your house down or have your floor collapse, so start small and make small mistakes. do your homework, be thorough.   I recommend buying both books , The Rocket Mass Heater Builder’s Guide by Erica & Ernie Wisner, for the detailed technical info and scaled plans, and Rocket Mass Heaters by Ianto Evans and Leslie Jackson, for an excellent presentation of the basic concepts.  

Much gratitude to the kind folks on this forum who offer ongoing support!!!  The digital world can sometimes be snarky, or even downright rude, but not here!  Folks on this forum have been extremely helpful in both their technical advice and moral support.  Thanks so much!


4 years ago
Hey Gerry:

Hard to tell in the photo, but the pipe is about 2 inches from the ground.  I took this photo during construction, before the bypass was operable, so I was just guessing at the placement.  Since using it I;ve kept it between 5" and 2" from the floor, when not in the full bypass mode (all the way raised).  I find once the flu has heated up it's difficult, if not impossible, to adjust the flue due to expansion, so I do my adjustments fairly soon after the stove is primed and leave it.

Clarification question for you -

I was going to do this type of bypass as well for my build but found that an uninsulated pipe just allowed too much heat to escape out the chimney until I insulated it. Of course once insulated though, I lost the function of my bypass. Instead, now I just leave the pipe about 2 or so inches off the floor and use the cleanout closeby to act as a priming port if needed.  


I would assume the reverse - that an uninsulated pipe would disperse more heat to the room and less up the chimney, unless you are referring to surrounding the pipe in mass?  

Good to know that you leave it 2" from the floor.  How often do you need to prime it?  Is priming simply a matter of burning a little bit of newspaper in the flu, or is it more elaborate?  Does the priming create much ash over the long term?  Where are you located?  I'm just curious about the varying needs for bypass and priming by climate.  

4 years ago
When I got my first RMH assembled enough to do a test fire I immediately encountered the reality of operating a low temp exhaust system in a marginal climate.  If your exhaust temps are around 150 F then your draft is not that strong.  If you live in a climate like mine, where winter temps can swing from the 20's to the 50's and include rain and wind, then a RMH can be pretty finicky and hard to start on mornings when temps are warmer and/ or the wind is blowing.  You can deal with this by priming the flu, but a bypass seems to be a more sure bet.  I realized this a bit late into the game, and after considering various options decided to try making my exhaust flu adjustable where it exits the split barrel bench bell.  Lift the pipe to the highest position as a bypass, so the hot gasses bypass the bench entirely, and then lower it once draft is primed.  I was wary of the idea of trying to slide a pipe up and down through cob - I suspect it would be challenging to maintain a good seal over time, and the pipe is going to expand and contract at a different rate than the cob.  So I used a telescoping stove pipe.

I cut the outer sleeve as shown below and bolted it to the barrel, the inner sleeve slides up and down through it.  It's functional, but still needs some tinkering to make it easier to use.  I'm able to raise the flu for starting, and then lower it once the RMH is drafting well. (I only need the bypass when the RMH is cold or when weather is windy and/or warmish).  One challenge I have is that the exhaust stove pipe is not straight, it jogs a bit through two 45 degree elbows between the bench and the ceiling, so it's hard to keep the upper part of the stove pipe stationary while I slide the adjustable sleeve up and down.  I fabricated some brackets to try to hold the pipe firm, but there are several angles and they did not come out quite right, I need to fabricate something adjustable so that I can dial in just the right amount of support and tension on the flu, not too much, not too little.  I'll be fiddling with this some more in the weeks to come, for now it works fine.

Not all telescoping stove pipe is created equal.  Duravent makes 2 models of telescoping stove pipe under the brand Durablack.  I found the one offered by Northern Tool & Equipment to be the best: https://www.northerntool.com/shop/tools/product_200447737_200447737?cm_mmc=Google-pla&utm_source=Google_PLA&utm_medium=Heaters%20%26%20Stoves%20%2B%20Fireplaces%20%3E%20Heater%20%26%20Stove%20%2B%20Fireplace%20Accessories&utm_campaign=DuraVent&utm_content=710700&gclid=Cj0KCQjw28T8BRDbARIsAEOMBcz_hwIUmxLmf_e99w6rTFc_scGV44nvhjH2TrkfBjA7v_X31yMRbPIaAuI7EALw_wcB&gclsrc=aw.ds  

There is another made by Duravent under the Durablack label that is much lower quality, the sleeve does not fit as tightly and I would bet it's subject to leaking.  I'm including labels of the two in the photo below.  

Would love to hear more about what other folks are doing for a bypass.  I'm surprised I don't see more posts and discussion on bypass ideas and designs on this forum, is this because most RMH users are in cold climates that don't require them?  I'm considering another post on RMHs in marginal climates...
4 years ago
After months of head-scratching and labor (and a few sleepless nights), my first RMH is finally up and running.  Here are some photos and brief explanations.  This forum has been a huge help to me, so I hope to reciprocate by sharing my own experiences.  I will emphasize that I consider all of these results and conclusions tentative until I have a year or two to live with my dragon, it’s gonna take at least that long to judge the success, but so far, so good!
 
Here's the RMH so far, I'm firing it everyday, waiting for the cob to dry before applying plaster.  Total length is 126", bench length 80".

Second photo is the bones underneath.   I used a 6" CFB core purchased fromrocketstovecores.com, a 30 gallon barrel for the riser and for the manifold, and  two split barrels as a bell under the bench.  This shows the various temps I got with my first test firing.  

Rather than provide a detailed account of the build in one post, I'm going to post more details under specific topics, such as constructing a RMH on a raised wooden floor, planning and prep, creating a bypass, etc.   When I was building and referring to this forum, I found it easier to locate info I needed when it was listed by topic on the Subject line, rather than buried in a build description.  Hopefully this will be of use.  Feel free to post questions if you like.  
4 years ago