• Post Reply Bookmark Topic Watch Topic
  • New Topic
permaculture forums growies critters building homesteading energy monies kitchen purity ungarbage community wilderness fiber arts art permaculture artisans regional education skip experiences global resources cider press projects digital market permies.com pie forums private forums all forums
this forum made possible by our volunteer staff, including ...
master stewards:
  • r ranson
  • Nancy Reading
  • Carla Burke
  • John F Dean
  • Jay Angler
  • paul wheaton
stewards:
  • Nicole Alderman
  • Pearl Sutton
  • Anne Miller
master gardeners:
  • Christopher Weeks
  • Timothy Norton
gardeners:
  • Nina Surya
  • Matt McSpadden
  • thomas rubino

Seeking Input: How much mass around a split barrel bench?

 
Posts: 57
21
  • Likes 2
  • Mark post as helpful
  • send pies
    Number of slices to send:
    Optional 'thank-you' note:
  • Quote
  • Report post to moderator
I'm wondering how much mass to put above and below my split barrel bell/ stratification chamber in my RMH cob bench?  It will be sitting on a raised platform over a wooden floor.  See photos of mock ups below.  The  challenge I'm facing is how to get enough mass under and over the split barrels without raising the bench up too high and making it uncomfortable to sit on. Comfortable bench height is considered to be 18"  I'd like to keep it to  20 - 21".   The platform eats up 3.75", a split barrel sits 12" at the highest point, In the Rocket Mass Heater Builders Guide, E &E Wisner recommend 4-5" under  and 4-6" over stove pipe buried in mass.  Add it up (using the lower numbers) and you get 23.75", too high for a comfortable bench.  Options I'm considering:

*Cut some off of my barrel split to lower the peak height.
*Fill the floor of the split barrel in with some mass (in my case, bricks or cob, which is kinda similar to the first option  I lean towards bricks, for a flatter surface that's easier to clean of ash).   I These two options reduce the internal surface area a bit.  
*Put down a layer of insulation (CFB or Clay-perlite) under the barrel split in order to protect the wooden floor beneath , then cover with a few inches of cob or brick.

Does a bell / stratification system require the same mass over and under as a stove pipe system?  I'm wondering if the temps on the floor of the barrel splits will be somewhat cooler than a pipe, so I could get away with a little less mass?  Any guess what temps I can expect in the split barrel intake and exhaust?  This is a critical design decision i don't want to mess up - don't want the base to get so hot that it damages the floor, not do I want the bench so high that it's uncomfortable to use.  

Any input welcome!  Thanks!
IMG_4240.JPG
rocket mass heater construction
IMG_4270.JPG
[Thumbnail for IMG_4270.JPG]
 
Mark Dumont
Posts: 57
21
  • Mark post as helpful
  • send pies
    Number of slices to send:
    Optional 'thank-you' note:
  • Quote
  • Report post to moderator
By the way, it;s a J-tube, kiln shelf is covering the combustion chamber in the photo...
 
pollinator
Posts: 161
Location: north west Michigan
68
7
duck fish tiny house books chicken composting toilet bike bee solar rocket stoves
  • Likes 2
  • Mark post as helpful
  • send pies
    Number of slices to send:
    Optional 'thank-you' note:
  • Quote
  • Report post to moderator
I have not built one myself, so I cannot recommend an amount of material.

I just had the thought of adding a step integrated into the mass if you want more material (more bench height). This would give your feet a nice warm spot, but you would have to climb to get to the bench.
 
pollinator
Posts: 556
Location: Northwest Missouri
215
forest garden fungi gear trees plumbing chicken cooking ungarbage
  • Likes 3
  • Mark post as helpful
  • send pies
    Number of slices to send:
    Optional 'thank-you' note:
  • Quote
  • Report post to moderator
I don't have any hard and fast answers, but that in itself is kinda my answer. It's nearly impossible to guess or calculate how your system will be since everyones build/materials/climate/heating needs are different.  

One point I keep seeing is that you won't get it exactly right the first time, so the more adaptable you can make your system the better you can fine tune it. I've been trying to finely plan my own design for so long that I'm getting ready to just go for it based on a rough ISA calculation, leaving myself room to add more mass if needed.

I've never seen much in the way of mass under the bench bells. Usually the split drums get squared by brick and a masonry top with cob filling the void space. So a couple thoughts on adaptability:  You could start by leaving most of that void space empty and see how it feels. If you don't like the balance of quick heat to heat storage you could fill the void until you are satisfied. Or you could start with a thinner masonry top and add big flat pieces like concrete pavers until you found the balance of heat storage and conformable height that works for you.


rocket scientist
Posts: 6525
Location: latitude 47 N.W. montana zone 6A
3395
cat pig rocket stoves
  • Likes 1
  • Mark post as helpful
  • send pies
    Number of slices to send:
    Optional 'thank-you' note:
  • Quote
  • Report post to moderator
Hi Mark;
Looking at your pictures, I notice that you retained a strip of metal across the "bottom" of the barrel.
This is forcing you to use a complete half barrel.

A more common way of cutting barrels for this application is to leave 3-4" at the top arc of the barrel.
This way you can easily adjust your bench height where you want it.
 
Mark Dumont
Posts: 57
21
  • Mark post as helpful
  • send pies
    Number of slices to send:
    Optional 'thank-you' note:
  • Quote
  • Report post to moderator
Plus, I have a clarification question - Can the base of the split barrel bench be lower than the base of the combustion unit?  My understanding is that it can, as long as the inlet from the combustion unit is high and the exhaust draw up the chimney is low. i.e.on the floor.  I found this thread from Donkey's forum:  https://donkey32.proboards.com/thread/2403/attempt-batchrocket-team-build-bencheswhere Perter van de Berg says that the base of the combustion unit and bench bell must be even, but I recall reading somewhere (??) that the heat can be downdrafted considerably...  
 
thomas rubino
rocket scientist
Posts: 6525
Location: latitude 47 N.W. montana zone 6A
3395
cat pig rocket stoves
  • Mark post as helpful
  • send pies
    Number of slices to send:
    Optional 'thank-you' note:
  • Quote
  • Report post to moderator
Hi Mark;
Yes it can.
My J tube build mass was at least a foot lower than the bottom of the core unit.

With a batch box, it can be quite a bit different height, with no problem.


Rocket Scientist
Posts: 1810
Location: Kaslo, BC
525
building solar woodworking rocket stoves wood heat greening the desert
  • Mark post as helpful
  • send pies
    Number of slices to send:
    Optional 'thank-you' note:
  • Quote
  • Report post to moderator

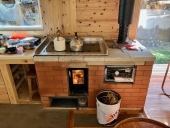
Mark Dumont wrote:I'm wondering how much mass to put above and below my split barrel bell/ stratification chamber in my RMH cob bench?


In the ISA calculations, the floor is left out of the equation as the exhaust pipe is placed above the floor height and does not absorb much heat anyway. Also, after a while, ash accumulates on the floor and acts as insulation which again makes mass on the floor of the bell kinda useless for heat extraction.

Mark Dumont wrote:The  challenge I'm facing is how to get enough mass under and over the split barrels without raising the bench up too high and making it uncomfortable to sit on.


The peak of the barrel is obviously going to get the hottest and gradually cooler as you travel down each of the sides. An option could be to put a strip of cf blanket or board along the entire length of the peak and bury it under a layer of cob. This should dramatically reduce the hot spot strip down the middle and help to even the heat out.

Not sure if you have seen Peter Sedgwick's build here: Advice on a RMH build in Hokkaido Japan
He used a half barrel bench as well and had some very good input to share. I think his barrel bench starts around page 4.
 
Mark Dumont
Posts: 57
21
  • Likes 1
  • Mark post as helpful
  • send pies
    Number of slices to send:
    Optional 'thank-you' note:
  • Quote
  • Report post to moderator
Thanks so much for the replies and links!!  It's a huge help to be able to bounce these ideas off of fellow RMH builders (the rest of the world is convinced we're crazy).

Below are a few more photos of my latest mock up, for clarification.  I plan to lay down 1" of CFB to protect the wooden floor below from high temps, and then 1 layer of brick as mass to buffer the heat on the floor and provide some thermal mass storage.  Any comments?  Is the layer of brick on the floor a good idea?  Unnecessary?

Gerry, your comment on ISA pertains to my next thought - If I were to use 6" ducting instead of a split barrel bench my ISA would be about 2,800 square inches, (about 140" of pipe) as opposed to 2,046 square inches - the exposed area of barrel (minus the brick/ mass covering the lowest sides).  The duct would give me more ISA, but I like the idea of the barrel chamber better, it seems the self-regulating stratification allows the mass to extract more heat from the flue gasses before escaping, so maybe the ISA of pipe and bell chamber is comparing apples and oranges?  

Another advantage of the pipe, though, is that it allows for a lower bench design, without the warm strip at the top.

Gerry, the thought crossed my mind of insulating the mass above the peak of the barrel to avoid the warm strip.  Given my design goals of keeping the bench low and comfortable, i have a total of 4 inches above the peak of the bench.  If I were to place 1" of CFB here that would leave only 3" for cob, E & E Wisner recommend a minimum of 4" for structure...  hmmm....

Another detail - I cut the slot on the inlet pipe thinking I wanted to deliver the incoming heat as high as possible in the bell (and withdraw the exhaust as low as possible).  Now I'm thinking perhaps it would be better to rotate that slot underneath, and get the heat delivered just a little further into the bell.  
IMG_4272.JPG
system mocked up
system mocked up
IMG_4273.JPG
barrel raised to show CFB and brick on bell floor
IMG_4274.JPG
detail
detail
 
Gerry Parent
Rocket Scientist
Posts: 1810
Location: Kaslo, BC
525
building solar woodworking rocket stoves wood heat greening the desert
  • Mark post as helpful
  • send pies
    Number of slices to send:
    Optional 'thank-you' note:
  • Quote
  • Report post to moderator
Mark,    Having the air space that you have under the bell should take care of most of the heat transferring down to the floor. Adding an insulation layer is extra insurance but think that using cfb is overkill in my opinion unless you have no other use for it. You could save it to make another core with for your next build! Bricks would make a nice cap over the insulation but again, don't expect them to hold much heat.

As Peter van den Berg states on his website, ISA calculations are for batch boxes with bells not J tubes or piped systems. A piped system uses length and bends to determine how long a run can be, not ISA.

As Peter Sedgwick did in his half barrel bell (as you may have read), he did a hybird bell/pipe system on Matt Walkers recommendation. The exhaust pipe extended down to the far end of the bench (sitting on the floor of the bell) which forces the gasses to flow all the way to the opposite end helping to heat up the whole bench more evenly.  

Personally, I don't think you'll have any problems with a 3" layer of cob over the cfb if you go this route and still maintain good structure. If you are in any way concerned though, flat rocks, concrete slabs etc.  placed over this peak area can easily distribute the weight enough...except maybe for parking your tank on.

Your inlet pipe with the slot in it looks fine facing upwards. Extending it in a bit further may be something to consider though.
 
Posts: 65
Location: Dirtling Farm, Jackson County, Oregon
19
  • Mark post as helpful
  • send pies
    Number of slices to send:
    Optional 'thank-you' note:
  • Quote
  • Report post to moderator
I'm trying to build something similar to this. I asked in another thread about the materials underneath the barrels and didn't get a reply, but now I see more stuff.

Would anyone see an issue with a design like this except for only a single layer of Hardie board on the bottom, sitting on rows of bricks? It's a single pass design, the chimney is on the far end.

Primary seal is high temp silicone. I'm expecting the floor of the barrels to not have much heat at all.

This is not for trying to protect the house floor, it's concrete, but to partially decouple it and increase exterior surface transfer area.
 
Mark Dumont
Posts: 57
21
  • Likes 2
  • Mark post as helpful
  • send pies
    Number of slices to send:
    Optional 'thank-you' note:
  • Quote
  • Report post to moderator
If I understand you correctly, you're proposing to rest the entire unit on just one layer of hardie board, sitting on top of bricks, correct?  I personally was not comfortable with this at all as it's a LOT of weight, and it would not be possible to retrofit should the single layer start to collapse or fail.  It may well work, I just didn't want to risk it, the cost of the extra hardie board was worth the peace of mind for me.  As I mentioned already, if i did it again I would skip the air gap under the bench, it was not necessary for my design and was a hassle to build and work with.  The underside of my dragon does not get very hot due to the CFB I put on top of the hardie boar (under the barrels), so there is no appreciable heat transfer from underneath.  However, if you elevate the combustion chamber and not the bench you'd want to pay attention to the height difference - yes, you can draw your heat down from the combustion unit to a lower bench, but I would not recommend too much of a difference, for one, it weakens your draft a bit, for another, it complicates the manifold.  Hope this makes sense.
 
Legend has it that if you rub the right tiny ad, a genie comes out.
Free Seed Starting ebook!
https://permies.com/t/274152/Orta-Guide-Seed-Starting-Free
reply
    Bookmark Topic Watch Topic
  • New Topic