Tido Bishop

+ Follow
since Oct 24, 2021
Merit badge: bb list bbv list
For More
Apples and Likes
Apples
Total received
In last 30 days
0
Forums and Threads

Recent posts by Tido Bishop

It is done. It is mesmerizing. I've watched it burn for most of my waking hours since Tuesday lol. I love it.

Except...boiling water only succeeds after 20mins running at full burn. The small cast iron pot I use has a lid. Thermocouple fan is also up top making it more difficult. More on all this later...

Building one of these is a fair amount of work. Taking a cluttered garage and creating enough space for a raging fire to safely heat a drafty & uninsulated workspace.

I've learned that to create a rocket stove of any sort one needs to dabble in many different skills. This project was a refresher on; layout & prep, metal cutting, welding(or self-tappers screw), bending/forming, siding/cladding, masonry, thermodynamic material properties, fire safety. I can definitely see the benefits of a monolithic mass/finish like cob.

Cutting the tiles was a daunting task that I hadn't figured out when I started this. My uncle, whom you saw welding above, just happened to have a small wet saw that really saved my bacon. You can see in the photos below it was used for mitered corners and the fire box bricks which penetrate the outer barrel. I modified the wet saw, by removing the riving knife and blade cover to get max depth out of the Ø4" blade. The curved section slotted into the top brick was done by hand with a grinder and run of the mill steel blade. If you want the proper angle grinder tool for doing this yourself, look up Diamond "Tuckpointing" Blades.

A lot of different brands were thrown together to make the exhaust pipe. Luckily I was able to assemble them with minimal modifications for a fairly snug fit. These were shown to past the visual and olfactory smoke leak-tests BEFORE having aluminum heat tape added. It's majority double wall (air pocket insulation) gas furnace ducting which is rated for flue gasses of 118°C (245°F) with a max temp of 233°C (470°F). I don't have a proper method for testing the flue temp without leaving an unwanted whole somewhere but from just putting my hand on the few single wall pipes I can tell it is not even above 70°C. Double wall pipe helps the draft but has a much lower thermal flux than single wall. If I ever find a free piece of Ø6" single wall black stove pipe I'll switch it out, but for now I'm content with the draft/heat exchange trade off.

So far I've done minimal rigorous testing. This is for two reasons. One, I've been building up my intuition for what this set up is capable of i.e. how different materials burn/pyrolysize and horizontal vs vertical feed. Secondly all I have is a multimeter capable of reading temp using a thermocouple in terms of measuring tools, I don't have a full plan on how to test this...I've done calorimetry studies 10+ years ago in Uni but this doesn't fit in a test tube in a lunch box cooler lol. Because of this, the drive to innovate on this apparatus is a little stunted because I've yet to devise solid/fair bench mark test for the current set up. Following this I think boiling a known volume of water is on the right track.

All that being said I think the gap between the riser and top surface is too great and thus not having the best heat exchange. The current gap is just less than 4", If I were to reduce this I believe the "cook" surface would exceed the current maximum of 460°C (860°F) and really cut down on the boiling time.

So far this is like the bare bones model. None of the bricks are mortared together, no high-temp silicone in the barrel/brick slots, no choke point/venturi at firebox/riser junction, no secondary air, no mitered corners for forced cyclone, no rockwool insulation around the riser(inner barrel is in place)...so there are still a number of tweaks to get this rocket roaring, but the purr is has now is still quite nice

I still feel like I'm leaving out key info, If you have any questions or want specific pics let me know I'll do my best to accommodate.

Ok picture time lol.
3 years ago
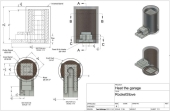
Here is the current design, R0.5.

Noteable changes:

Brick sizes is actually 2" thick (other users suggest1-1/4" thick bricks). This changes the riser and fire box CSA.
New CSA rations 31-1/2-->7-3/16(future venturi)-->41-->29-3/16-->114

Inner barrel, heat riser & outer barrel have offset centers.
This is to allow the outer barrel to slot into the first horizontal brick of the the firebox.

Decreased choke point/venturi aperture.
I plan to introduce a secondary air intake just before this point. Probably sneak it between the bricks, through a metal channel. I havent figured out how to make it air tight in the barrel yet.....


3 years ago
Updates:

Resized the inner barrel
This was simply tacked together, if desired riser could easily be resized using screws

Mitered the riser interior corners.
This was made soo much easier due to the wet saw with diamond blade. Centers are a little rough but, once rubbed against one another they smooth out. This is also a trip wire as the cyclone is driven upwards.

Slotted the firebox floor.
With a little bit of high temp silicone these slotted fire bricks will create an airtight seal. Again made possible but the wet saw. I'll have to curve the slot on the top brick, this will be done with a grinder. These slots in the brick may cause issues with cracking and must be kept shallow, P-tube may be necessary.

Cut the breach for DIY thimble.
Designed a thimble to safely breach the garage wall. Constructed from pieces found on the side of the road (pics to come)

Purchased stove pipe.  
$200CAD for 15' of 6" insulated Don Park B-Vent pipe. Pick up is on Sunday.
3 years ago
So I may have over estimated the need for a thicker brick and underestimated the capabilities of a thinner brick. 1-1/4" brick wrapped in insulation or a 5 min tube is the way to go apparently. I'm invested in fire bricks so let's ride this out!

I kind of knew this when designing, so fire brick was a small nod to heat mass.

Batch boxes are attractive, but before I can trust this thing for a long (or short unattended) burn, proper understanding/tinkering must be done first. Indications look good that Rev1 will have a batch style feed. I hope the forced cyclone will encourage stead flow, also have thoughts on a secondary intake too so stay tuned
3 years ago
Gerry- Glad to hear rockwool is a good temporary solution. How thick were the fire brick in your riser? I plan to push the temps this can handle, were you able to get an intense core temps? I

Thomas- Thanks. Like I said it's first build so this is designed to hopefully illustrate what has worked and what hasn't as I experiment. Done in Fusion360.  Figured I'd try to jam as much knowledge into the drawings as I develop/implement my ideas.

R.Han- I have yet to experiment with cob, A few pictures on this forum have really caught my eye. In terms of rockwool I dont think it's too nasty as it's used in residential settings. How I understand it is rockwool FIBER has a max/working temp of  ~1800F but the BINDER which holds it together loses integrity at much lower temps. That why it becomes crispy/friable too close to the extreme core temps. I've read that a risers need insulation and cob is more a heat mass.

thomas rubino- I intend to create a J tube as my experiments progress. picked up 2" bricks for $2.14CAD each. Within 5 mins of a weak test burn i could feel moderate heat on top inner corner of the L. So hopefully it wont take anymore than 20mins to reach full burn. See section view below, gap between riser and top of barrel is 3-1/2" the insulation is shown a little too high.
3 years ago
I guess my main questions are:

-How do the flow ratios look? CSA of 29 --> 62 --> 114 --> ~29sqin

-Will it create a cyclone? Will the little pinch from fire box to riser have a positive venturi effect?

-Does rockwool have any place in a rocket stove? Thinking of using it for riser insulation. On the other side of fire brick. Bigelow Brook for details  


-With properly rated insulation how thick "should" the firebricks be? I have access to 2.5, 2 & 1.25". I plan to use the same orientations as shown in the drawing.

-Any bets on how hot I can get the top "cook" surface?
3 years ago
Hello all,

I've been reading this forum on and off for years, glad to finally contribute! I'm about to embark on my first engineered burn chamber, a horizontal feed rocket stove(if classified right). It will be built from smooth 55 gallon drums, 2x4.5x9 firebrick and rockwool insulation. I've got a line on all the materials and started the prep on the barrels.

This thread will be used to document my progress, get a conversation going and possibly receive feedback on things I forget or was simply wrong about.  
3 years ago