I've been reading about rocket heaters for the past few years and got sick of dreaming about them, so I decided to go ahead and do one. I bought Ernie & Erica Wisner's book the RMH Builder's Guide and have been primarily using that as a reference. I'm temporarily unemployed (funemployed) so have time to focus on this uninterrupted for a good stretch.
So this has been more of a build-design than a design-build project. I.e. I'm improvising as I go along and learning a lot in the process, it's great. I'm mostly copying one of the sample layouts from the Wisner book and adapting it to the materials I have readily available. So I built a 6" J-tube outside. It's a prototype I don't intend to last forever, so it's relatively unprotected from weather, I'm fine with that for now. If it rains and I still haven't built a protective structure around or over it I'll throw a tarp over it (or just let the rain dissolve the mortar). Longer term I want to build one inside the house for space heating. And my house already has hydronic heating, so the long term goal is a rocket heater that can both warm the living room directly and send heating hot water to more distant rooms. Shorter term goal.... maybe a hillbilly hot-tub! So I'm prototyping heating a large amount of water with this thing, we'll see how far I get.
First off I bought a load of bricks. Regular red building bricks. 250 to be exact, used ones of various dimensions found on facebook marketplace. Advertised at $0.50/brick, I got mine at $.40 each. Don't know if that's a good price for used bricks. If I was to get more I'd try and pay less for the uneven ones. Some of my load are nice and flat with very even dimensions and straight corners, others less so.
I'm mining some red clay from just behind the house and mixing that up into clay slip, for mortar and stabilizing the perlite insulation. I have some fairly pure deposits of red clay on my property, hardly any silt or sand in it that I can tell. So unfortunately I've been needing to import sand for the mortar and whatnot. My learnings indicate the 'sharp' edged sand locks together firmly and will resist the natural shrink/swell tendencies of many clays. Some friends of mine in the area with a background in geology and clay minerology have advised me that "Clays in your area tend to be locally high shrink swell".
After soaking and screening some of my local red clay, and mixing it with some Quickcrete playbox sand (eyeballed the ratio, probably somewhere around 1:3 clay:sand by volume), it worked acceptably as a brick mortar.
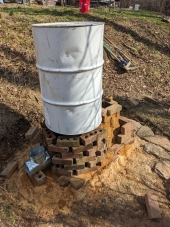
The combustion core not only survived without any cracks or leaks overnight through a freeze/thaw cycle but also through an extended test firing the next day for several hours in which surface brick temperatures likely exceeded 300 deg F. Exhaust temperatures unknown, maxed out my digital meat thermometer at 482 deg F. Quite pleased with the initial test firing, I probably had too much fun just watching/listening to the thing burn and feeding it twigs.
Next step is to build a box of some sort and pack insulation around the combustion core and existing chimney. The insulation will be horticultural perlite stabilized with the locally harvested clay slip.
I just bought 2 used 55 gallon steel barrels. I think I'll use one of them as your typical RMH 'bell'. Unfortunately they're the tight-head variety i.e. no removable lid so I'll have to cut the top out and will be raising the thing above the heat riser whenever maintenance or inspection is needed. Couldn't source a clamp-lid barrel locally. So before or while I add the insulation I'll probably also build the manifold, probably in the form of a brick plinth with lots of clay/sand mortar to seal it all together.
After this is achieved work on constructing the heat exchanger will commence. If I could have found a steel tank of the right diameter (30 gallon drum would work) I'd have liked to have an annular flow heat exchanger, i.e. 30 gallon welded inside the 55 gallon, forming a water jacket with the exhaust gasses downdrafting like a typical RMH.
But right now it feels easier to do something like, line the inside of the 55 gallon bell with a coil of copper tubing that will have water recirculating. Designing such a coil that will passively thermo-siphon to an accumulator tank will be an interesting challenge.
Realistically I am probably going to just put the barrel over it and might put a big pot of water on top before doing that, to test and play around. Maybe stick a smaller coil in the flue pipe downstream of the manifold.
I'll post some concept drawings later before I build anything with plumbing.
And for anyone tempted to post the typical 'boom squish' warning, you're not going to tell me anything I don't already know. I've done a fair amount of reading and research and have a background as a mechanical engineer so I'm pretty confident I do more dangerous things than this on a regular basis (driving my car, dangling on ropes dozens to hundreds of feet in the air)
Spend so far has been $292.95 including a few tools. $253.12 just in materials.
| Material | Quantity | Cost | Supplier |
|---|
| Assorted red clay builders bricks, used | 250 | $100 | Facebook Marketplace |
| Perlite | 4.27 ft^3 | $48.63 | Local hardware store / Feed & Seed |
| Playbox sand | 4.5 ft^3 | $54.49 | Lowes |
| Tight-head steel 55 gal drums, used | 2 | $50 | Facebook Marketplace |
Likely a local landscape supply company would be better price than buying sand at $6 per 50 lb bag.
Things I'm unsure about:
What if anything to do about a rain-protective coating on the outside of the combustion unit. A portland cement based stucco would work I suppose but I want this installation to be possible to break down easily and recycle the materials. Could build a framed roof over it but that sounds like too much work right now. Unsure if lime mortar (instead of clay sand mortar) or a lime render over cob would work as a relatively weather proof finish.
I have a bag of "High-calcium hydrated lime" in powdered form, unsure if it's the type suitable for lime mortar or render. The bag says "Minimum calcium oxide 71.5%".
I have lots of wood ashes from my wood stove. Probably over 100 lbs. Very curious how this could be used as an ingredient along with my clay in mortar, cob, or plaster. Some initial reading suggests it behaves more as additional aggregate than anything else, maybe could replace some of the sand I've been needing to buy?
Thanks for reading. Suggestions comments or feedback on my unsure-of list welcome.
(I'm trying to post pictures as well)